


16 ENGLISH
Disposing of dust
When dust has accumulated up to the full line of the
dust case, follow the procedure below and dispose of
the dust.
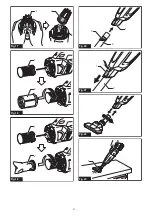
1.
Hold the dust case firmly, press and hold the two
buttons, and remove the dust case.
►
Fig.37:
1.
Full line
2.
Dust case
3.
Button (two
locations)
4.
Mesh filter
2.
Dispose of the dust inside the dust case and
remove any dust and powder adhered to the surface of
the mesh filter.
3.
Insert the dust case all the way until the two but-
tons lock with a click.
►
Fig.38:
1.
Dust case
2.
Button (two locations)
NOTE:
Check that the cyclone attachment, cleaner,
and straight pipe are locked properly before restarting
operation.
NOTE:
If the suction force does not recover even
after disposing of the dust and cleaning the mesh
filter, check whether dust has accumulated in the
capsule of the cleaner or clogging has occurred.
NOTE:
The dust may fly up when disposing from the
cyclone attachment. Be careful not to let dust get into
your eyes.
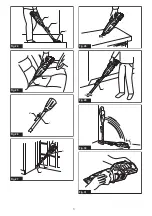
Cleaning
When the dust case becomes dirty or the mesh filter is
clogged, remove and wash them with water. (Refer to
“Disposing of dust” for the removal procedure.)
Dry the parts thoroughly before reinstallation and use.
►
Fig.39:
1.
Dust case
2.
Mesh filter
When the mesh filter gets dirty badly, clean it in the
following procedures.
1.
Turn the mesh filter counterclockwise and remove
it while the hooks are unlocked.
►
Fig.40:
1.
Mesh filter
2.
Hook
2.
Remove the dust on the mesh filter and then wash
it with water. After that, dry it thoroughly.
3.
Insert the mesh filter into the base while the hooks
are aligned with the port. Turn the mesh filter clockwise
until the hooks are locked with a click. Make sure that
the mesh filter is installed securely.
►
Fig.41:
1.
Mesh filter
2.
Hook
3.
Port
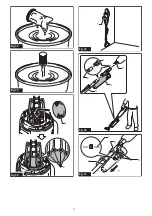
Summary of Contents for CL001G
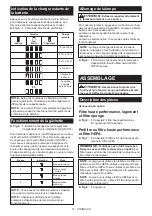
Page 4: ...2 1 Fig 17 1 2 Fig 18 1 2 Fig 19 3 2 1 Fig 20 1 2 Fig 21 Fig 22 1 Fig 23 4 ...
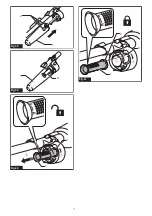
Page 5: ...3 2 1 Fig 24 2 1 Fig 25 1 2 Fig 26 2 3 1 Fig 27 Fig 28 1 Fig 29 Fig 30 Fig 31 5 ...
Page 6: ...Fig 32 Fig 33 2 1 Fig 34 1 Fig 35 3 4 1 2 5 Fig 36 2 3 1 4 Fig 37 6 ...
Page 7: ...2 1 Fig 38 2 1 Fig 39 1 2 Fig 40 1 2 3 Fig 41 7 ...