background image

21 ENGLISH

MAINTENANCE

Cleaning the adapter

Wipe the adapter’s exterior with a cloth slightly 

moistened with mild detergent.

NOTICE: Never use hot water (hotter than 40°C 

or 104°F), gasoline, naphtha, thinner, alcohol, etc. 

Discoloration, deformation, or cracks may result.

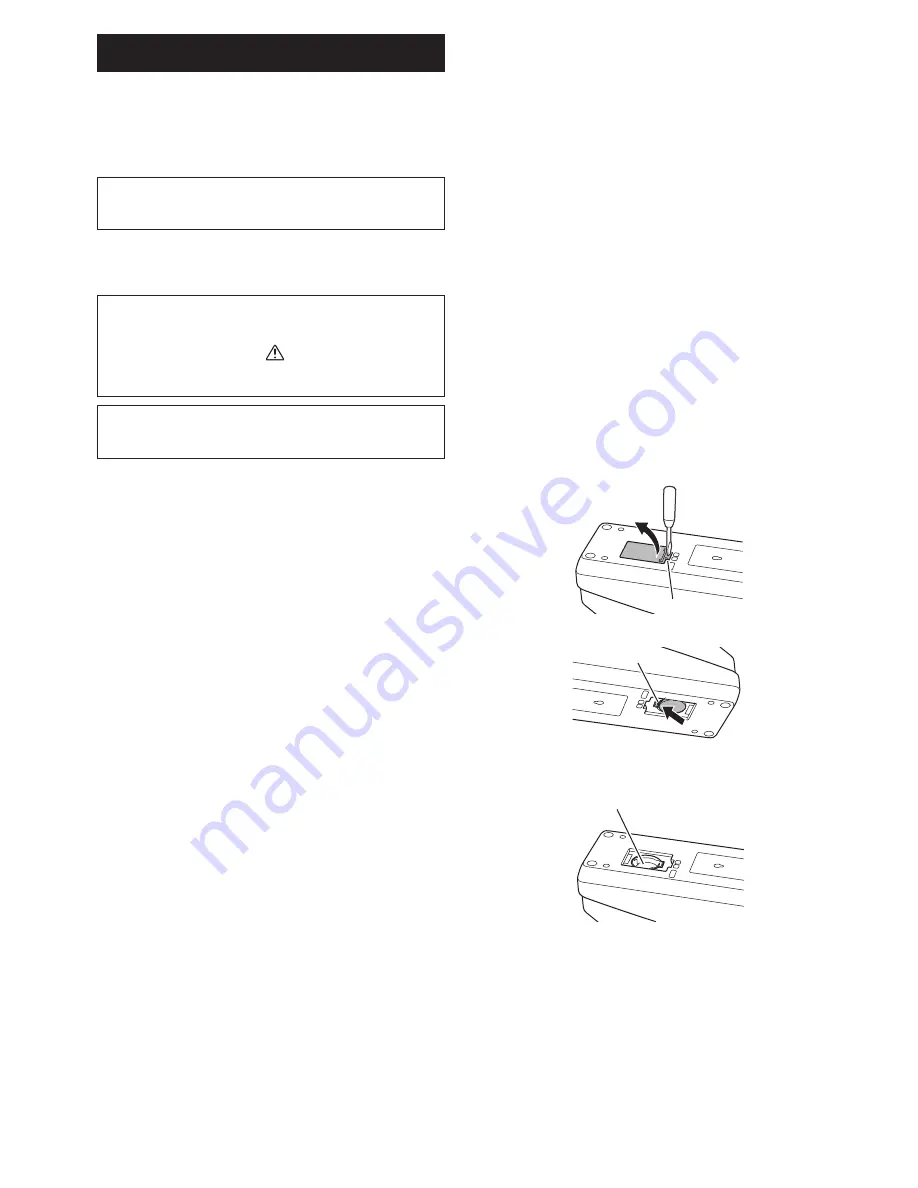
Replacing the coin cell battery

NOTICE: The adapter’s internal clock runs on power 

supplied from the coin cell battery. To ensure that 

the internal clock keeps the correct time, replace the 

coin cell battery when the 

 Warning lamp (see 

“IDENTIFICATION OF PARTS”) begins flashing 

intermittently or rapidly.

NOTE: Be sure to reconfigure the adapter as the 

settings saved on the adapter will be reset after the 

battery is replaced.

Removal

1.  Insert a flathead screwdriver into the battery 

compartment slit (a). Pry the tab to release the lock 

and then remove the cover.

1.

a

2.  While holding the adapter with the battery 

compartment facing down, push in the tab (b) 

and let the coin cell battery falls out onto a desk, 

cardboard box, etc. so that it does not get lost.

2.

b

Installation

3.  While holding the adapter with the battery 

compartment facing up, place the coin cell battery in 

the battery holder (c) with the + side facing up.

3.

c

Summary of Contents for BPS01

Page 1: ...Battery Timer Setting Adapter ENGLISH Original instructions IMPORTANT Read Before Using BPS01 Non English versions of operating instruction files are included in the supplied CD ROM ...

Page 2: ...nication mode Registration mode 7 USB port micro B type 8 Installation screw holes 9 Battery compartment cover 1 6 9 7 2 8 3 4 5 8 Confirmation feature for adapter and battery cartridge settings You can confirm the settings for the adapter and battery cartridge using the mobile PC app Applicable lithium ion battery cartridges BL1830B BL1850B BL1430B and other battery cartridges with model numbers ...

Page 3: ...t leave coin cell batteries in an extremely high temperature environment Do not disassemble the coin cell battery Do not solder the coin cell battery Do not short circuit the terminals of the coin cell battery Do not use any other type of coin cell battery than specified Do not place the coin cell battery inside a pocket bag etc together with any small metal objects such as keys coins or necklaces...

Page 4: ... Android devices is not guaranteed Installing the mobile app The app is only downloadable from the Google Play Store A Google account is needed to use the Google Play Store NOTE The mobile device must be connected to a cellular network or Wi Fi network NOTE Be sure to enable Wi Fi when connecting to a Wi Fi network in a Wi Fi enabled area 1 Go to the Google account sign in page and create a Google...

Page 5: ...on 1366 x 768 or higher Available disk space 4 GB or more Installing the PC app NOTE Installation must be performed by a user with administrator privileges 1 Load the CD ROM in the disc drive and click Install Makita Timer 1 3 Tap APPS and search for Makita Timer 3 4 Tap INSTALL on the app installation page to install A Makita Timer icon will be created on the home screen 4 2 Click Next 2 ...

Page 6: ...k Finish A Makita Timer shortcut will be created on the desktop 6 4 Confirm the destination folder and click Next 4 5 Click Install 5 3 Read and confirm the License Agreement Select I accept the terms in the license agreement and then click Next 3 ...

Page 7: ... If it was not installed successfully USB Serial Port will appear under Other devices In this case right click on USB Serial Port and select Update Driver Software 3 2 Open Control Panel and click System and Security Under System click on Device Manager and check whether the USB Serial Port has been installed successfully under Ports COM LPT 2 ...

Page 8: ...8 ENGLISH 4 Select Browse my computer for driver software 4 5 Click Browse Select the Makita Timer folder And then click Next 5 ...

Page 9: ...ome screen in the explanations in this document as click and desktop instead The adapter and the PC are connected The adapter and the PC are not connected Registering a PIN code and user name 1 If using the PC app connect the adapter to the PC using a USB cable NOTE Make sure the icon is displayed on the title bar a b 1 2 Set the operation mode switch to the position 2 3 Tap or if launching the PC...

Page 10: ...de conducted between the adapter and battery cartridge NOTICE Do not forget the PIN code as you will be unable to change the settings 6 Change the PIN code and enter a user name Enter a new code if needed a Toggle the NO YES switch to YES b Tap the text box and enter a new 4 digit code Enter a user name if needed c Toggle the NO YES switch to YES d Tap the text box and enter a user name NOTE The u...

Page 11: ...leted successfully NOTE Enable NFC in the settings on your mobile device For more information on the settings see the manual that came with the mobile device NOTE To establish contactless communication the distance between the mobile device and the NFC contact point on the adapter should be less than 1 cm 1 2 in NOTE If a communication error occurs an error message will appear on the app screen On...

Page 12: ...ll light up and the adapter will beep when the transmission is completed successfully NOTE Do not detach the battery cartridge before the adapter stops beeping NOTE If the PIN codes set for the adapter and the battery cartridge are not identical the Warning lamp will flash and the settings will not be updated To transmit the same settings to other battery cartridges If necessary settings are saved...

Page 13: ...time may be extended by up to 10 1 If using the PC app connect the adapter to the PC using a USB cable NOTE Make sure the icon is displayed on the title bar 1 3 Tap or if launching the PC app double click the app icon on the home screen The app will display a splash screen while loading and then the Home Menu screen will appear NOTE Tap Close App to close the app 3 4 Tap Timer Setting 4 2 Set the ...

Page 14: ...ap the time text box Select a time from the list that appears and then proceed to Step 8 You can set a time from 0 00 to 21 00 in increments of 3 00 b Specify a time Tap the Hours remaining option and then tap the text box Enter an integer value for the hour and then proceed to Step 8 c Specify a date Tap the Set date option Tap the text box and then proceed to Step 7 Cancel the timer Tap the Time...

Page 15: ...able NFC in the settings on your mobile device For more information on the settings see the manual that came with the mobile device NOTE To establish contactless communication the distance between the mobile device and the NFC contact point on the adapter should be less than 1 cm 1 2 in NOTE If a communication error occurs an error message will appear on the app screen On a PC The adapter will bee...

Page 16: ...ill beep when the transmission is completed successfully NOTE Do not detach the battery cartridge before the adapter stops beeping NOTE If the PIN codes set for the adapter and the battery cartridge are not identical the Warning lamp will flash and the settings will not be updated To transmit the same settings to other battery cartridges If necessary settings are saved to the adapter in advance th...

Page 17: ... battery cartridge to the adapter CAUTION When installing battery cartridges be careful not to get your fingers caught between the adapter and the battery cartridge Align the groove a on the battery cartridge with the tongue b on the adapter and slide the cartridge into place Insert the battery cartridge all the way in until it locks in place with a small click NOTICE If you can see the red indica...

Page 18: ...acing the NFC contact point The adapter will beep when the transmission is completed successfully NOTE Enable NFC in the settings on your mobile device For more information on the settings see the manual that came with the mobile device NOTE To establish contactless communication the distance between the mobile device and the NFC contact point on the adapter should be less than 1 cm 1 2 in NOTE If...

Page 19: ...gs 8 a Operation Mode Hours Remaining automatically calculated by the app User Name 8 a Adapter settings 8 b Timer Setting Change PIN PIN update mode NO YES Change User Name user name update mode NO YES User Name NOTICE Tap Close to return to the Home Menu screen 8 b ...

Page 20: ... the battery cartridge with the tongue b on the adapter and slide the cartridge into place Insert the cartridge all the way in until it locks in place with a small click NOTICE If you can see the red indicator c on the upper side of the release button the battery cartridge is not completely locked The Registration or Timer lamp will light up and the adapter will beep when the transmission is compl...

Page 21: ... lamp see IDENTIFICATION OF PARTS begins flashing intermittently or rapidly NOTE Be sure to reconfigure the adapter as the settings saved on the adapter will be reset after the battery is replaced Removal 1 Insert a flathead screwdriver into the battery compartment slit a Pry the tab to release the lock and then remove the cover 1 a 2 While holding the adapter with the battery compartment facing d...

Page 22: ...ISH 4 Press down on the coin cell battery until the tab clicks to secure the battery 4 5 Replace the cover 6 Reconfigure the adapter For details see Registering a PIN code and user name and Setting the timer 5 ...

Page 23: ...igital device pursuant to part 15 of the FCC Rules These limits are designed to provide reasonable protection against harmful interference in a residential installation This equipment generates uses and can radiate radio frequency energy and if not installed and used in accordance with the instructions may cause harmful interference to radio communications However there is no guarantee that interf...

Page 24: ...885523 7 www makita com Makita Europe N V Makita Corporation 3 11 8 Sumiyoshi cho Anjo Aichi 446 8502 Japan Jan Baptist Vinkstraat 2 3070 Kortenberg Belgium IDE ...

Reviews: