background image

14

MakerBot executes an alignment script 
on every MakerBot Replicator 2X before 
shipping. However, if plastic coming from the 
two extruders does not appear to be aligned 
correctly during dual extrusion prints, you 
can run the alignment script again at home.

1. Make sure filament is loaded into  
both extruders. 

2. To start the nozzle alignment script, go 
to the LCD menu and navigate to Utilities > 
Calibrate Nozzles. 

3. The MakerBot Replicator 2X will heat the 
build plate and extruders and then print a 
test print for aligning the nozzles.

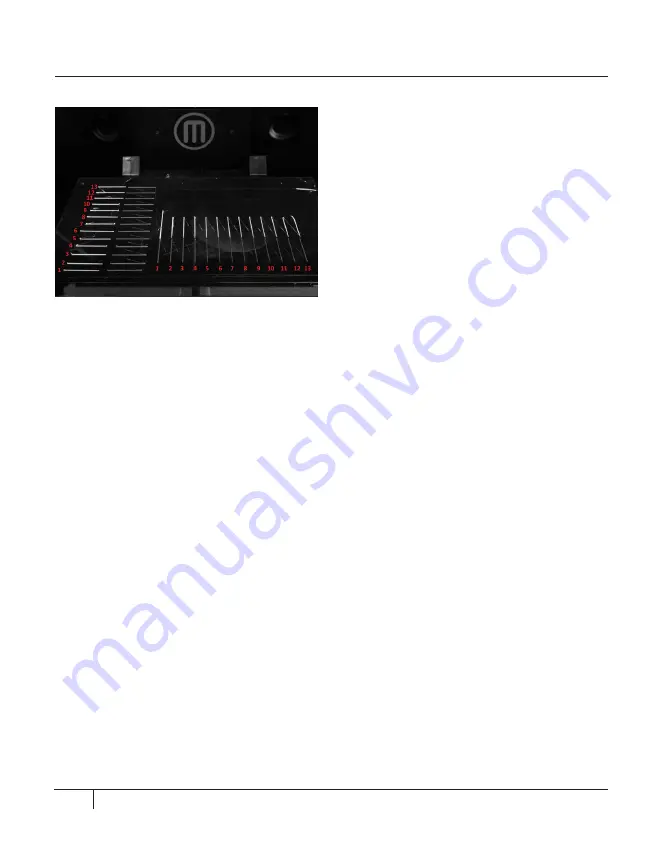
First, one extruder prints a series of 
straight lines parallel to the front of the 
build platform, starting at the front left 
corner of the platform and extending to 
the back left corner of the platform. The 
other extruder then prints a second series 
of lines, perpendicular to the front of the 
build platform and starting at the center of 
the platform and extending to the left. The 
second extruder then prints a line alongside 
each line printed by the first extruder.

4. When the test print has completed, you 
will see two sets of lines. Each set includes 
two sets of 13 parallel lines, one set printed 
by each extruder. [Fig. 1.4]

After the test print is completed, the LCD 
menu will provide new instructions and 
prompt you for input.

MISALIGNED NOZZLES

Fig. 1.4

Summary of Contents for Replicator 2X

Page 1: ...TROUBLESHOOTING AND MAINTENANCE...

Page 2: ......

Page 3: ...essages 11 Misaligned Nozzles 14 MakerBot MakerWare Error Messages 16 MakerBot Support 21 Dos and Don ts 21 Tools You May Find Useful 22 Diagnosing Print Quality Issues 23 2 MAINTENANCE 28 Leveling th...

Page 4: ...Troubleshooting 1...

Page 5: ...on in the Make dialog in MakerWare If you continue to have adhesion problems loosen each of the plate leveling knobs about a quarter of a turn to bring the plate slightly closer to the nozzles OBJECTS...

Page 6: ...on Fig 1 1 Is your filament tangled Check that the spool is spinning smoothly on the mount Is the build plate too close to the extruder If so there might not be room for the plastic to come out of the...

Page 7: ...eplicator 2X To check and change the Acceleration setting go to the LCD menu on your Replicator MakerBot 2X and navigate to Info and Settings General Settings Accelerate You can turn acceleration off...

Page 8: ...the nozzle You might have to apply some pressure 5 Whenthefilamentissuccessfullyloaded set theextruderleverarmtotheclosedposition If filament doesn t emerge from the nozzle try the following solutions...

Page 9: ...ers 2 Set the extruder arm to the open position 3 Push about half an inch of filament through the extruder to clear the blockage 4 Try pulling the filament out of the extruder again If you are unable...

Page 10: ...f the fan guard using your 2 5 mm hex wrench As one piece remove the fan guard the fan the heat sink and the spacers Keep these pieces assembled and move them out of the way 4 Set the extruder lever a...

Page 11: ...age you will have to restart your MakerBot Replicator 2X Your MakerBot Replicator 2X has automatically disabled its heaters after a period of inactivity as a safety precaution Re start your print or t...

Page 12: ...r extruders are securely plugged in or contact MakerBot Support by emailing support makerbot com To clear Heating Errors 3 and 4 you will have to restart your MakerBot Replicator 2X Your MakerBot Repl...

Page 13: ...e software telling the MakerBot Replicator 2X to change the extruder temperature These are the messages you could receive if your SD card is not formatted correctly or if there is something wrong with...

Page 14: ...extruder prints a series of straight lines parallel to the front of the build platform starting at the front left corner of the platform and extending to the back left corner of the platform The other...

Page 15: ...line for the Y axis 6 Look at the set of lines to the right the lines that are perpendicular to the front of the build plate Examine the lines and find the pair that match best The best match will lo...

Page 16: ...t by emailing support makerbot com Your operating system may not recognize the drivers MakerWare is installing because they are specific to MakerWare and to your MakerBot Replicator 2X Select OK to al...

Page 17: ...the background service This error message appears when You try to print an object while the background is unavailable You try to export a file while the background service is unavailable To restart Co...

Page 18: ...you want to put it on the platform Select No to leave the object in its current position Select Yes to place the object on the platform This object seems very small It may have been designed in inche...

Page 19: ...via USB Check the USB connection between the MakerBot Replicator 2X and the computer Conveyor the background service is unavailable To restart Conveyor go to the Service menu and select Restart Backg...

Page 20: ...are a few things you can do ahead of time to help us help you Have your serial number ready We use your serial number to look up your order and get more complete information on your MakerBot Replicato...

Page 21: ...as likely to hurt you as it is to help Don t turn your MakerBot Replicator 2X off immediately after finishing a print Give the extruder fans time to cool the extruder first Don t drill out your extrud...

Page 22: ...ply it s more likely to damage your Kapton tape When you ve used the spatula to detach as much of the edges from the build surface as possible twist the handle slightly The print should pop right off...

Page 23: ...If the bond between two layers isn t strong the strain of the warping layers can actually cause cracks in the sides of your objects Fig 1 5 Warping occurs more often with ABS than with PLA because AB...

Page 24: ...config file in a text editor Then find the correct feedDiameter setting You will see two feedDiameter settings one enclosed in each of the extruder profiles Change the first feedDiameter setting if y...

Page 25: ...Fig 1 7 decrease the feedstockMultiplier setting by 0 05 save the config file and Export your file again Continue to decrease the value entered for this setting in increments If after lowering the def...

Page 26: ...upport makerware documentation slicer After you have created a custom profile click the Edit Profile button to open the config file in a text editor Find the outlines extrusion profile near the end of...

Page 27: ...the motor shaft and make sure it touches the flat side of the motor shaft 3 Use the 1 5 mm hex wrench from the accessory box to tighten the set screw against the motor shaft 4 Return the drive block t...

Page 28: ...Maintenance 2...

Page 29: ...plate Leveling your build plate often will help ensure that your prints always stick well to the build plate To access the MakerBot Replicator 2X built in leveling script go to the Utilities menu on t...

Page 30: ...ngers off the leveling knobs and platform when you test the friction on your paper or feeler gauge pressure from your hands can affect platform height If you re having trouble leveling your build plat...

Page 31: ...2X Fig 2 3 If you can t find the tape applicator you can use a plastic spatula or a credit card 3 On one of the short sides of the sheet peel back the plastic backing approximately 1 4 inch from the e...

Page 32: ...t the video Replicator 2X Kapton Tape Application Fig 2 5 After approximately 50 hours of build time you should lubricate the threaded rod on your Z axis and the X axis idler pulley Tolubricatethethre...

Page 33: ...ide Fig 2 6 The idler pulley is one of the pulleys that allow the rubber belt to move the extruder from left to right or along the X axis The pulley at the other side of the gantry is called the timin...

Page 34: ...r 2X side panels Set the bolts and panels aside 3 Locate the four pulleys holding the Y axis belts There is one pulley in each corner of the MakerBot Replicator 2X upper frame You will see two pulleys...

Page 35: ...it away from the front of the MakerBot Replicator 2X Make sure to exert an equal amount of pressure on both sides of the gantry Push only until you can see the hidden set screw 7 Manually move the ext...

Page 36: ...at puts tension on the extruder bearing The extruder bearing then pushes the filament against the drive gear which drives the filament into the hot end of the extruder If the spring puts too much or t...

Page 37: ...o the address above to open a ticket with the MakerBot Support Team To help us understand your problem from the start it is very helpful to include pictures or a video as attachments on your email sal...

Page 38: ...rposes only MakerBot reserves the right to modify or revise the Manual in its sole discretion and at any time You agree to be bound by any modifications and or revisions Contact the MakerBot Support T...

Page 39: ...39 TERMS OF SERVICE NOTES...

Page 40: ...MakerBot One MetroTech Center 21st Floor Brooklyn NY support makerbot com makerbot com...

Reviews: