


25
e) Mounting the servos on the top plate
Mount the servos with the M3 screws (M3 x 6 mm, large head diameter) as shown in Figure 36.
For mounting the servos with the servo discs, always use the M3 x 6 mm screws (servo mounting screws) with the larger 6 mm head is used. The
M3 x 6 mm screws with the smaller 5 mm head are used for the spacers!
Insert the servos into the teeth of the previously mounted servo disks. Proceed carefully so that the servos do not twist during insertion. If it should happen that
a servo has rotated from the middle position during assembly, then bring the servo back to the middle position with the aid of the Hexapod Robot Board and
the "ServoCenter" software. This procedure has already been described in Chapter 12.
If, due to the teeth of the servo disk or the general mechanical tolerances, you are not yet able to align the legs too precisely, this is not a problem. Adjust the
leg as mechanically as possible, as shown in the illustration. An exact calibration is done after the assembly with the help of the software.
The servo mounting screws (PH2 (M3 x 6 mm, large head diameter) are not yet equipped with a screw lock! Only when the robot has been completely
assembled and calibrated can these screws be removed and secured!
Required tool:
PH2 Phillips screwdriver
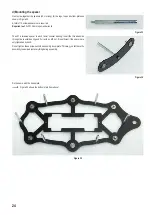
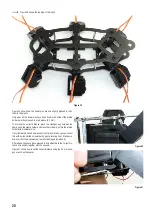
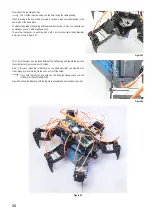
Figure 36
Figure 36 illustrates the Hexapod body viewed from "above". The two front and the two rear legs are installed in such a way that they point outwards at an
angle of 45° without twisting the centre position of the servo (centre position). You can orient yourself on the cross-paths in the upper plate at an angle of 45°.
The two middle legs (left and right side) are installed straight outwards at an angle of 90° to the body.
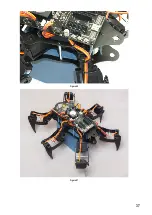
Please also refer to Figure 37 on the next page.
Summary of Contents for 1664151
Page 1: ...Operating Instructions Hexapod Robobug Complete Set Item no 1664151...
Page 23: ...23 The femur servo mount must be mounted a total of 6 times Figure 31 Figure 32...
Page 26: ...26 Figure 37...
Page 36: ...36 Figure 58 Figure 59...
Page 37: ...37 Figure 60 Illustration_61 Figure 61...
Page 38: ...38 Figure 62...
Page 66: ...66...
Page 67: ...67...


