background image

22

Specifications

Specifications

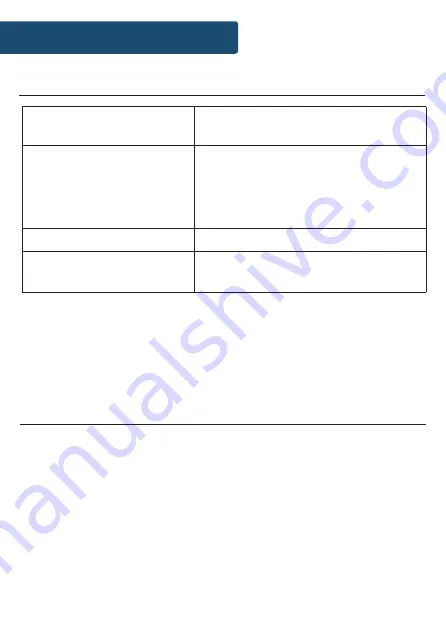
All products come with a standard 12 month warranty. All items 
must be registered on 

www.majorityradios.co.uk


for the 

warranty to be valid. Once on the web page, use the menu to 
find “Register Your Product”. You will also be given the chance 
to extend your warranty for an additional 24 months, free of 
charge.

Warranty

Power Supply

5V 2A

100-240V~ 

50/60

Hz 0.

3

A

Mode

DAB/DAB+ BAND III 5A - 13F
FM 87.5MHz - 108 MHz
Bluetooth
AUX-In

Earphone output power

2 mW (32Ω)

Dimensions

13.5 x 16.5 x 5 cm
399 g

Summary of Contents for Fulbourn II FUL-DAB-BLK-2

Page 1: ...FUL DAB BLK 2 FULBOURN II Bedside Digital Radio Instructions Guide ...

Page 2: ...FM Radio 11 FM Radio Settings 13 Bluetooth and AUX in 15 Dual Alarm Settings 16 Alarm Functions and Sleep Timer 17 Radio Settings 18 Additional Features 20 Troubleshooting 21 Specifications 22 Warranty 22 Safety Information 23 Contents Watch video tutorials and register your product for a FREE 3 year warranty at www majorityradios co uk 3YEAR WARRANTY ...

Page 3: ...1 What s in the Box Box Contents 1 Majority Fulbourn II 2 UK Standard Plug DC 5V 2A Power Supply 3 Instructions Guide ...

Page 4: ...2 Controls And Functions Front View Control Buttons 1 Volume dial 2 On Off 3 Mode 4 Info 5 Scan Pair 6 Preset 7 Navigation Select dial 8 Sleep 9 Snooze Mute 10 Alarm 1 2 3 4 5 6 8 9 10 7 ...

Page 5: ...3 Controls And Functions Back View 11 Dual USB Ports 12 AUX In 13 Headphone jack 14 DC 5V Charging Port 15 Antenna 11 12 13 14 15 ...

Page 6: ... Fulbourn II Please follow the guidance of the manual to set up your new purchase and begin enjoying its features If you require further assistance with your new radio please contact our support team on the Majority website https www majorityradios co uk support ...

Page 7: ... and stations available Press down the dial to select your chosen stations or make settings Mode button Switch between DAB FM Bluetooth AUX In using the mode button Info button On DAB or FM mode select repeatedly for station information and radio setting options Also use the button to go back when creating settings and alarms Scan Pair In DAB or FM mode press this button to scan for available stat...

Page 8: ... you were using When DAB DAB radio is activated for the first time it will automatically start scanning and storing all stations that have a strong signal If scanning does not automatically start press the Scan Pair button Ref 5 To change the mode press the Mode button Ref 3 This will switch between DAB DAB Radio FM Radio Bluetooth and Aux in The display screen will dim automatically after 10 seco...

Page 9: ...ing up the frequency band and store all stations that have good signal The radio will automatically save all the stations with a strong signal up to 240 MHz After searching has finished it will automatically play the first station stored To browse through all stations that have been stored use the Select dial Ref 7 to scroll through them When on your chosen station press down the Select dial Ref 7...

Page 10: ...dial Ref 7 until the number displays that you wish to save the station preset number as To select your choice press down the dial The display will then show Preset x Stored Repeat the same process when making other preset stations To remove a station as a preset simply save a new station over it How to play a preset radio station Press the Preset button Ref 6 Use the Navigation Select dial to scro...

Page 11: ...s makes quiet sounds comparatively louder and loud sounds comparatively quieter DRC only works if it is enabled by the broadcaster for a specific station When you select this option you can use the Navigation Select dial Ref 7 to browse between setting OFF High or Low Select your choice by pressing down the dial Prune Select this function to remove stations that are listed but are unavailable Once...

Page 12: ...urrent station PTY Programme Type Shows the type and description of the programme provided by the DAB station Channel number and Frequency Displays the station s transmission channel number and frequency Bit Rate The data range which the signal is being transmitted Bit Error Rate Provides details of the signal error rate Time and Date Displays the time and date information provided by the broadcas...

Page 13: ...cy band and play the first station it finds with a strong signal To autoscan down the frequency band press and hold the Scan Pair button Ref 5 for a few seconds The radio will display station information when you press the Info button Ref 4 Press multiple times to view all information available See page 14 When you turn the radio on again after it switching off it will automatically tune to the sa...

Page 14: ...al Ref 7 until the number displays that you wish to save the station preset number as To select your choice press down the dial The display will then show Preset x Stored Repeat the same process when making other preset stations To remove a station as a preset simply save a new station over it How to play a preset radio station Press the Preset button Ref 6 Use the Navigation Select dial to scroll...

Page 15: ...ly the strong stations Strong Only Press the Select dial Ref 7 to confirm your choice Audio Setting Select this option to choose between stereo or mono on FM mode Use the Navigation Select dial to scroll between Stereo Allowed or Forced Mono and press the Select dial Ref 7 to confirm your choice System Select this option to enter radio settings You can adjust settings such as time backlight langua...

Page 16: ...show the programme information PTY Programme Type Shows the type and description of the programme provided by the FM station Channel Frequency Displays the station s frequency Stereo or Mono Will display if the radio is set to stereo or mono Time Displays the time Date Displays the date Dynamic Label Segment DLS Displays scrolling text information supplied by the broadcaster ...

Page 17: ...ed You can now begin to enjoy music and media from your Bluetooth device Use the Play Pause Enter Snooze button Ref 9 to pause and play the Bluetooth s device media To disconnect the Bluetooth device from the Fulbourn II simply press the Scan Pair button Ref 5 AUX in Press the Mode button Ref 3 to switch to between DAB FM Bluetooth and AUX in until AUX in mode is displayed Connect an AUX cable int...

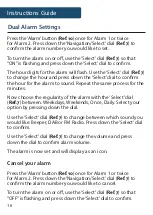
Page 18: ...ow choose the regularity of the alarm with the Select dial Ref 7 between Weekdays Weekends Once Daily Select your option by pressing down the dial Use the Select dial Ref 7 to change between which sound you would like Beeper DAB or FM Radio Press down the Select dial to confirm Use the Select dial Ref 7 to change the volume and press down the dial to confirm alarm volume The alarm is now set and w...

Page 19: ... mode The sleep timer enables you to programme the radio to switch off at a specific time up to 120 minutes from activation To set the timer press the Sleep button Ref 8 With the Navigation Select dial Ref 7 browse between the following sleep timer lengths Off 15 30 45 60 or 90 minutes When your option displayed select it by pressing down the dial To turn the sleep timer off follow the above instr...

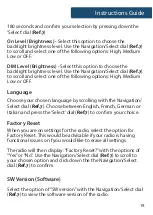
Page 20: ...croll up and down the date and time and press down the Navigation Select dial Ref 7 to confirm after each setting made Once complete it will display Time Date Saved Auto update If DAB mode not yet scanned you can do an automatic set of the clock and date Set 12 24 hour Decide between a 12 hour or 24 hour clock Set Date format Browse between a variety of date formats DD MM YY and MM DD YY Backlight...

Page 21: ...chosen language by scrolling with the Navigation Select dial Ref 7 Choose between English French German or Italian and press the Select dial Ref 7 to confirm your choice Factory Reset When you are on settings for the radio select the option for Factory Reset This would be advisable if your radio is having functional issues or if you would like to erase all settings The radio will then display Fact...

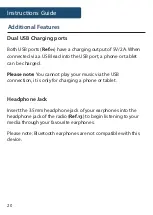
Page 22: ...ne or tablet can be charged Please note You cannot play your music via the USB connection it is only for charging a phone or tablet Headphone Jack Insert the 3 5mm headphone jack of your earphones into the headphone jack of the radio Ref 13 to begin listening to your media through your favourite earphones Please note Bluetooth earphones are not compatible with this device ...

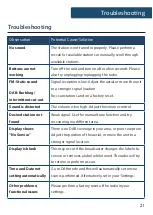
Page 23: ...storted The volume is too high Adjust the volume control Desired station not found Weak signal Use the manual tune function and try rescanning in a different area Display shows No Service There is no DAB coverage in your area or poor reception Adjust the position of the aerial or move the unit to a stronger signal location Display is blank This may occur if the broadcaster changes the label of a s...

Page 24: ... to be valid Once on the web page use the menu to find Register Your Product You will also be given the chance to extend your warranty for an additional 24 months free of charge Warranty Power Supply 5V 2A 100 240V 50 60Hz 0 3A Mode DAB DAB BAND III 5A 13F FM 87 5MHz 108 MHz Bluetooth AUX In Earphone output power 2 mW 32Ω Dimensions 13 5 x 16 5 x 5 cm 399 g ...

Page 25: ...cal products and batteries safely according to your local authority and regulations ADDITIONAL WARNINGS The apparatus shall not be exposed to dripping or splashing and no objects filled with liquid such as vases shall be places on the apparatus Main plug is used to disconnect device and it should remain readily operable during intended use In order to disconnect the apparatus from the main mains c...

Page 26: ......

Page 27: ...www majorityradios co uk ...

Reviews: