56, chemin de la Flambère · 31300 Toulouse · FRANCE · T é l . 3 3 ( 0 ) 5 6 1 3 1 8 6 8 7
F a x 3 3 ( 0 ) 5 6 1 3 1 8 7 7 3 · [email protected] · www.majorcom.fr
56, chemin de la Flambère · 31300 Toulouse · FRANCE · T é l . 3 3 ( 0 ) 5 6 1 3 1 8 6 8 7
F a x 3 3 ( 0 ) 5 6 1 3 1 8 7 7 3 · [email protected] · www.majorcom.fr
12
13
PAM-FMT
PAM-FMT
※ If there is a lot of noise in the radio frequency, adjust and
fix the antenna position appropriately.
2) Auto Scan
- Press the AUTO button to move to Auto Scan mode.
- When Auto Scan mode is activated, AUTO is displayed
in the upper-left area of the OLED DISPLAY.
- Press and hold the FREQUENCY TUNING button to au-
tomatically search for the best-received radio frequency
up/down the current radio frequency.
- When the search is completed, the current radio fre-
quency is displayed and the broadcast is output.
- To deactivate Auto Scan mode, press the AUTO button
again.
3. USING THE PRESET FUNCTION
1) PRESET SETTING
- Search for the radio frequency to save.
- When the search is completed, press the MEMORY but-
ton to go to PRESET Setting mode.
- When PRESET Setting mode is activated, P is displayed
in front of the frequency and the relevant number is blink-
ing.
- Press the PRESET button (1–5) to specify the PRESET
number to save.
※ You can save up to 40 numbers.
- If the PRESET number (P##) is one digit, specify your
desired number and press the MEMORY button to save
the PRESET. If the PRESET number is two digits, your
desired PRESET number is specified and saved at the
same time.
- When the saving process is completed, the message
PRESET SAVE OK appears on the OLED DISPLAY.
- Check the number in front of the current PRESET num-
ber (P##) to confirm whether the PRESET is correctly
set.
2) BROWSING AND CALLING PRESET
- Press the PRESET selection button to select your de-
sired PRESET from P01 to P40.
- Press the PRESET button (1–5) to call the radio fre-
quency of the saved PRESET.
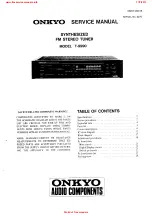
MC
U
EEPR
O
M
Tuner
M
odul
e
El
ec. V
ol
um
e
I2
C
I2
C
M
ute ctr
l
O
LED
IO E
xtender
SP
I/Ctr
l I
O
Fr
ont key
+24V
D
+24V
A
+24V
D
+24V
A
20p connector
for
new P
AM
ser
ies
5p connector
for
ol
d P
AM
ser
ies
Audi
o
Block Diagram
Usermanual V1.1
Usermanual V1.1