background image

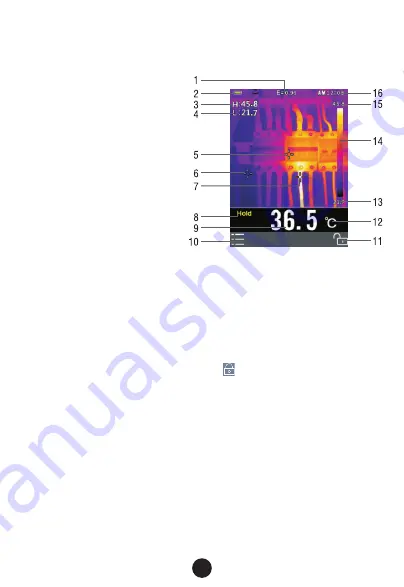
3.3.  The IR Thermal Imaging Display

1.  Current Emiisivity setting
2.  Battery indicator
3.  Hot temperature point 
 

reading

4.  Gold temperature point 
 

reading

5.  Center crosshair
6.  Cold temperature crosshair
7.  Hot temperature crosshair
8.  Frozen Image Icon
9.  Center temperature point 
 

reading

10.  "

OK

" button

11.  "

LOCK

" button

12.  Current temperature unit 
13.  Scene Low Temperature 
14.  Palette scale
15.  Scene High Temperature
16.  Time clock 

_


POWER/BACK/LOCK BUTTON


    Press and hold >2 seconds to cycle the meter power 

ON

 or 

OFF

    press once to exit a menu screen. Also used to lock the current 
    scene temperature range (a soft "    " button will appear on the 
    display above the button when this option is available).

_


OK/MENU BUTTON


    Press once to access the Settings Menu, to confirm an edit, and to 
    save an image when prompted (a soft "

OK

" button will appear on 

    the display above the button when this option is available).

_


UP and DOWN NAVIGATION ARROW BUTTONS


    Scroll the Settings Menu and select a menu item setting.

_


TRIGGER/LED


Flashlight


    Pressing the trigger once will take a snapshot of the current image. 
    Pressing once again will discard the image and return to live image 
    mode. Press and hold to open the LED flashlight, Press and hold 
    again to close the LED flashlight.

3.4.  CONTROL BUTTONS AND TRIGGER

7

Summary of Contents for MTi11

Page 1: ...MTi11 MTi11 Thermal Imager...

Page 2: ...2...

Page 3: ...Switch ON the thermal imager 9 5 2 Lock Unlock scene temperature level span 10 5 3 Capture Save Imagesw using the Internal Memory 10 5 4 Share images using Bluetooth 11 5 5 Review Delete Images 12 5...

Page 4: ...y 50Hz fast Thermal image frame rate Bluetooth image instant share save with iOS and Android smsmart device Scene temperature range Lock function LED flashlight function Up to 8 hours running time wit...

Page 5: ...emperature reading represents the temperature of the spot targeted by the Crosshairs at the same time the hot and cold point temperature will be displayed on the screen _ Short trigger to freeze captu...

Page 6: ...on is located at the top left of the display _ When battery power is low connect to an AC source or a computer USB port using the supplied USB cable USB port is located at top of the unit _ With power...

Page 7: ...een Also used to lock the current scene temperature range a soft button will appear on the display above the button when this option is available _ OK MENU BUTTON Press once to access the Settings Men...

Page 8: ...s Menu and delete the stored images as described in Section 6 Settings Menu Warning All images are deleted when the internal memory is erased 3 5 Measure Save Delete and Review IR Images 4 DESCRIPTION...

Page 9: ...If the unit is sufficiently charged the meter will display the start up screen as shown below The initial displayed image will show until the shutter resets the image After the start up period the un...

Page 10: ...cessfully on the internal memory the image will unfreeze 6 To erase format internal memory please refer to Settings Section 6 Menu 5 2 Lock Unlock scene temperature level span 1 The MTi11 comes with 8...

Page 11: ...smart device or PC Detailed reference in Bluetooth connect 3 Point the unit at an object or an area of interest 4 Press the trigger to capture the image the image will freeze The HOLD icon will appear...

Page 12: ...current picture 5 Press SHARE to transfer the image 6 Save analyze share or report the thermal images on smart devices 5 5 Review Delete Images Use the Review Mode to view or delete stored images 1 A...

Page 13: ...focal length Example If Thermal Imager uses 9mm lens because the Pixel Size of detector is 34um Horizontal FOV is 21 Vertical FOV is 21 the IFOV is 34um 7 5mm 4 53mrad D S theoretical 1 IFOV theoreti...

Page 14: ...revious menu _ If want to exit settings menus press the HOLD button or press the ESC button in root menu _ The Thermal imager has five kinds of palettes such as _ Press the OK button to select one of...

Page 15: ...etect the lowest temperature point 6 4 Measure _ Press OK button to set focus on this option In focus state use UP DOWN button to increase or decrease emissivity s value use ESC OK button to exit focu...

Page 16: ...ption In focus state use UP DOWN button to change LCD s brightness use ESC OK button to exit focus state The available brightness s range is 100 to 10 in 10 steps _ Auto Off Press OK button to set foc...

Page 17: ...evice name will appear 3 Touch the device name listed in Bluetooth devices list to connect the device The detail information about Thermview please refer to Thermview APP help file Thermview for Andro...

Page 18: ...Press OK button to enter photo menu Two options are available Photo Review and Delete Photo 6 10 Memory _ Photo Review Press OK button to enter image browser function and exit settings menus immediat...

Page 19: ...ntains the software s version hardware s version and thermal imager s version 6 11 Information When select Factory Set option after press the OK button the dialog box will be displayed as show below S...

Page 20: ...7 Image Browser 1 Current displayed picture s filename 2 Current picture s index and total number of pictures 3 Temperature of center point 4 Picture display area 1 Use the HOLD button to enter HOLD m...

Page 21: ...mperature 0 C Display Display resolution Battery Battery lift Battery Charger Drop Proof Connect Save image format Operating Temperature Storage Temperature Allowable relative humidity Storage tempera...

Page 22: ...22...

Page 23: ...23...

Page 24: ...Road Tunney Ext 9 Elandsfontein South Africa P O Box 888 Isando 1600 South Africa Telephone 27 11 872 5500 National Contact Number 08 61 62 5678 Sales Facsimile 27 11 822 2806 Admin Facsimile 27 11 82...

Reviews: