background image

|

L A D E N M Ü H L E N

S H O P   G R I N D E R

7. Operating Faults 


10

8. Cleaning 


11


8.1 Cleaning with GRINDZ™ Grinder Cleaner  

11 

    8.2 Cleaning the Hopper   


11

    8.3 Cleaning the Grinder Surface Area 


12

    8.4 Cleaning the Grinder Housing   


12

9. Maintenance and Repair   


12


9.1 Cleaning of the Grinding Gears  


12


9.2 Grinding Disc Replacement 


13


9.3 Re-adjusting the Grinding Fineness 


16

10. Spare Parts 


17

11. Certificate 


17

12. Warranty Conditions 


18

Table of Contents

1. Safety  


5


1.1 Symbols 


5

    1.2 Safety Instructions 


5

    1.3 Purpose of Use 


6

    1.4 User Requirements 


6

2. Technical Data   


6

3. Description 


7

    
4. Safety Devices   


8

5. Set-Up and Basic Adjustment 


8


5.1 Setting-up Area 


8

    5.2 Installation   


8

    5.3 Basic Setting  


9

6. Operation 


9


Seite 3

Summary of Contents for K501

Page 1: ...L A D E N M H L E N S H O P G R I N D E R Operating Instructions K501 Easy modular and fast The professional art of grinding since 1924...

Page 2: ...L A D E N M H L E N S H O P G R I N D E R...

Page 3: ...ng the device into service please read these operating in structions including the safety instructions carefully and observe them at all times Also instruct your personnel accordingly Enclosed you wil...

Page 4: ...1 Cleaning of the Grinding Gears 12 9 2 Grinding Disc Replacement 13 9 3 Re adjusting the Grinding Fineness 16 10 Spare Parts 17 11 Certificate 17 12 Warranty Conditions 18 Table of Contents 1 Safety...

Page 5: ...dings Never put your fingers or objects into the rotating grinding mecha nism underneath the hopper Always pull the power supply plug out of the outlet before carrying out any maintenance or cleaning...

Page 6: ...s manual will be observed In addition working with the device on a safety conscious basis is also expected 2 Technical Data Description K 501 K 501T Voltage Frequency 220 230V 50Hz Phases 110 120V 60H...

Page 7: ...breviated instructions Pos 2 Hopper Pos 3 Grind Adjustment Knob Pos 4 Key plate with grind adjustment scale Pos 5 Dual purpose lever Start Stop and bagholder Pos 6 Spout Pos 7 Vibrating sheet Pos 8 Ho...

Page 8: ...cts could block the coffee supply Magnet Switch The key plate with the grind adjustment scale Pos 4 is secured by a magnetic switch Once that key plate is removed the grinder cannot be started anymore...

Page 9: ...ps described as follows When you have carefully read these operating instructions you can refer to the abbreviated instructions located in the grinder lid in the future 1 Adjust the hopper with the gr...

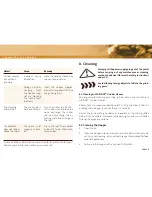
Page 10: ...the setting to the desired grinding fine ness Clean the grinding mecha nism as described and re move the foreign object Ob serve the safety instructions Defect The grinder does not start Cause The pow...

Page 11: ...lease contact your dealer or your authorised customer service centre 8 Cleaning Always pull the power supply plug out of the outlet before carrying out any maintenance or cleaning work on the device O...

Page 12: ...e power supply plug out of the outlet before carrying out any maintenance or cleaning work on the device Check the device regularly for any signs of damage on the power supply cable plug finger protec...

Page 13: ...ll foreign objects from the discs 6 Replace the cover hopper on the grinder casing and relock it by turning it to the right until the insert for the spout is facing to the front Make sure all surfaces...

Page 14: ...er 5 In the upper part of the disc casing unscrew the cover component to release the disc with the circular spring 6 Place the new disc making sure the pin of the casing fits into the gap in the disc...

Page 15: ...nto place Reinsert the key plate 7 For the rotary disc in the lower part of the casing place the service tool on top It locks in with the three eccentrics Use the disc key to loosen the thumb screw in...

Page 16: ...you can go all the way to 1 repeat the process by loosening the screw again turn to 4 tighten the screw and move back slowly towards 1 7 Turn back the hopper one number towards coarse For coffee grind...

Page 17: ...irective 73 23 EWG The EC Electromagnetic Compatibility Directive 2004 108 EG The Directive on the restriction of use of certain hazardous substances in electrical and electronic equipment 2011 65 EU...

Page 18: ...purposes in accor dance with the Operating Instructions 4 This warranty does not cover damages which have occurred through Improper usage improper maintenance lack of servic ing usage for purposes ot...

Page 19: ...L A D E N M H L E N S H O P G R I N D E R...

Page 20: ...MAHLK NIG GmbH Co KG Tilsiter Stra e 142 D 22047 Hamburg Germany Tel 49 0 40 69 69 40 0 Fax 49 0 40 69 39 721 office mahlkoenig de www mahlkoenig de August 2008 Subject to change without prior notice...

Reviews: