


3 - Operation
tDynamo| Three-way Secure Card Reader Authenticator | Installation and Operation Manual
Page 30 of 39 (
D998200257-20
)
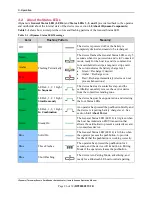
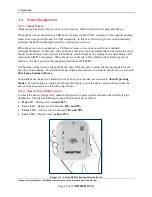
When the device is in Connected mode (see section
), the General Status
LED blinks periodically to indicate the device is ready for the host to send a command or for a cardholder
to swipe a magnetic stripe card. The color of the blink indicates the battery level. See section
Custom host software may also query the device and show its current charge level on the host display at
all times for convenience. For details, see section
3.4.3
How to Charge the Battery
tDynamo has an onboard rechargeable battery to supply its own power when it is not powered through its
USB-C connector or docking stand connectors. The battery must be periodically recharged by connecting
it to the optional docking stand, or to a USB port or stand-alone USB charger using a USB-C cable. Both
the docking stand and the USB-C connector require a USB connection that can provide at least
500mA @
5V
. A full recharge cycle for a completely drained battery takes approximately 4.5 hours.
To charge the device using a USB-C cable, connect it to a USB charger or to a USB host as shown in
section
2.2.2 How to Connect tDynamo to a Host Computer via USB
To charge the device in the docking stand, see section
2.3.3 How to Temporarily Dock tDynamo
3.4.4
How to Power On / Wake Up from Sleep Mode / Power Off
If all LEDs are off, the device is in Powered Off mode. If the General Status LED is solid red and LED 3
is solid green, the device is in Sleep Mode. To power on the device or to wake it from Sleep Mode, tap
the pushbutton. In response, the device lights all of the Status LEDs to perform a quick LED test, then
transitions to either Discoverable Mode or Connected Mode. For details, see section
and section
To power off the device, press and hold the pushbutton for 5 to 10 seconds until all LEDs turn off and the
device beeps twice.
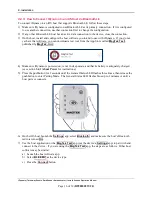
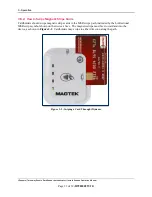
3.4.5
How to Force Reset
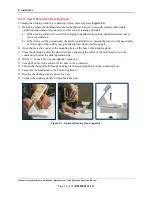
To force the device to reset, use a small tool such as a paperclip to carefully press the reset switch
recessed inside the small hole on the back of the device (see Figure