background image

4

58-601 Pulsar

®

Radar Transmitter

1.0

QuickStart Installation

The QuickStart Installation procedures provide the key
steps for mounting, wiring, and configuring the PULSAR
radar level transmitter. These procedures are intended for
experienced installers of electronic level measurement
instruments. See Complete Installation, Section 2.0, for
detailed installation instructions.

1.1

Getting Started

Before beginning the QuickStart Installation procedures,
have the right equipment, tools, and information available.

1.1.1 Equipment and Tools

No special tools are needed. The following items are
recommended:

• Threaded antenna and transmitter . . . . . . 2" (50 mm)

• Transmitter/antenna connection. . . . . . . . 1

3

4

" (44 mm)

• Transmitter adjustment . . . . . . . . . . . . . . 1

1

8

" (28 mm),

3

32

" (2.5 mm) Hex

• Torque wrench . . . . . . . . . . . . . . . . . . . . . highly desirable

• Flat-blade screwdriver

• Digital multimeter or volt/ammeter . . . . . Optional

• 24 VDC (23 mA) power supply. . . . . . . . Optional

Summary of Contents for pulsar RX5

Page 1: ...Pulse Burst Radar Level Transmitter Model RX5 RX5 software v2 1a Installation and Operating Manual ...

Page 2: ... a manner not specified by the manufacturer protection provided by equipment may be impaired This device complies with Part 15 of the FCC rules Operation is subject to the following two conditions 1 This device may not cause harmful interference and 2 This device must accept any interference received including interference that may cause undesired operation FCC ID LPN R95 Any unauthorized changes ...

Page 3: ...f 17 2 6 Configuring the Transmitter 18 2 6 1 Operating Parameters 18 2 6 2 Setting Up for Shop Configuration 18 2 6 3 Transmitter Display and Keypad 18 2 6 4 Password Protection Default 0 19 2 6 5 Menu Step By Step Procedure 20 2 6 5 1 Radar Transmitter Menu Table 21 2 7 Configuration Using HART 25 2 7 1 Connections 25 2 7 2 Display Menu 25 2 7 3 HART Revision Table 25 2 7 3 1 Model RX5 25 2 7 4 ...

Page 4: ...2 0 for detailed installation instructions 1 1 Getting Started Before beginning the QuickStart Installation procedures have the right equipment tools and information available 1 1 1 Equipment and Tools No special tools are needed The following items are recommended Threaded antenna and transmitter 2 50 mm Transmitter antenna connection 13 4 44 mm Transmitter adjustment 11 8 28 mm 3 32 2 5 mm Hex T...

Page 5: ...sor Reference point bottom of NPT thread top of BSP thread or face of flange _____________ Tank Top Is the Tank Top Flat Horizontal Cylinder Dome Irregular or other non metallic _____________ Tank What is the tank height _____________ Height NOTE Sensor Offset Tank Height Distance from process connection to tank bottom Blocking What is the distance from Sensor Reference point to Maximum Level Maxi...

Page 6: ...he antenna are clean and dry Clean with isopropyl alcohol and cotton swabs if necessary 2 Place the transmitter on the antenna 3 Ensure the housing launcher set screw is loose and the housing can be turned Align the antenna index mark so it is at an angle of 45 to a line from the radar unit to the nearest tank wall Do not optimize the Quality signal strength at one level in the vessel 4 Rotate the...

Page 7: ...nstructions follow Use the information from the operating parameters table before beginning configuration See Configuration Information Section 1 1 2 1 Power up the transmitter Upon initial start up NO FALSE TARGET REJECTION error message will be displayed Once in the vessel the FALSE TARGET routine must be run for proper operation During normal operation the display changes every 5 sec onds to sh...

Page 8: ...nge for the process medium Select the value of Turbulence that corresponds to the application Select the Rate of Change value that corresponds to the maximum rate the level will rise or fall Select the Foam value that corre sponds to the application Examine the list of reflections detected by the transmitter to ensure the actual level reflection is present It may be necessary to rotate the launche...

Page 9: ... for future reference when ordering parts 2 2 Electrostatic Discharge ESD Handling Procedure MAGNETROL electronic instruments are manufactured to the highest quality standards These instruments use electronic components that may be damaged by static electricity present in most work environments The following steps are recommended to reduce the risk of component failure due to electrostatic dischar...

Page 10: ... See Wiring Section 2 5 2 3 2 Equipment and Tools No special tools are needed The following items are recommended Threaded antenna and transmitter 2 50 mm Transmitter antenna connection 13 4 44 mm Transmitter adjustment 11 8 28 mm 3 32 2 5 mm Hex Torque wrench highly desirable Flat blade screwdriver Digital multimeter or volt ammeter Optional 24 VDC 23 mA power supply Optional 2 3 3 Operational Co...

Page 11: ...evels of low dielectric media the metal tank bottom may be detected deteriorating per formance Foam can either absorb or reflect the microwave energy depending upon the depth dielectric density and wall thickness of the bubbles Due to typical variations in the amount depth of foam it is impossible to quantify per formance It may be possible to receive most some or none of the transmitted energy Ex...

Page 12: ...quid should not be allowed closer than 2 inches 50 mm from the bottom of the antenna 2 4 1 1 Location Ideally the Radar transmitter should be mounted providing an unobstructed signal path to the liquid surface where it should illuminate with microwave energy the largest possible surface area See Section 2 4 1 2 Beam Angle Unavoidable obstacles will produce reflections that must be minimized during...

Page 13: ... or 12 300mm Standard antennas no extension are shown below for reference See Section 3 6 5 for dimensional drawings of all antenna designs including nozzle extensions 0 50 13 mm Minimum 2 50 mm Minimum Diameter Dielectric Rod Antenna Coupling 2 50 mm 2 50 mm 8 200 mm Horn Antenna L Dimension 2 8 55 0 68 17 Thread Engagement A C B D 3 76 H Aperture Model Antenna Extension maximum L dimension All A...

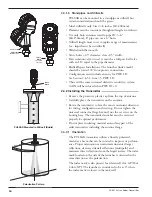
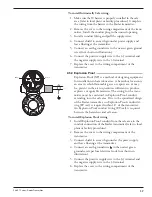
Page 14: ...stic cap from the top of antenna Carefully place the transmitter on the antenna Rotate the transmitter to face the most convenient direction for wiring configuration and viewing Do not tighten the universal connector large hex nut nor the set screw on the housing base The transmitter launcher must be oriented properly for optimal performance Do not place insulating material around any part of the ...

Page 15: ...l vessels and when antenna is mounted close to the tank wall improve ment in signal quality may be attained by rotating the launcher to 90 degrees Signal Loss If the Level signal is lost repeatedly at a specific point in the vessel it is usually a symptom that multipath side wall reflections are causing cancellation by returning to the transmitter exactly 180 out of phase with the Level signal Uti...

Page 16: ...rea is known to be non hazardous 2 5 1 General Purpose or Non incendive Cl I Div 2 A general purpose installation does not have flammable media present Areas rated non incendive Cl I Div 2 have flammable media present only under abnormal conditions No special electrical connections are required If flammable media is contained in the vessel the transmitter must be installed per Cl I Div 1 standards...

Page 17: ... which flammable gases or vapors are or may be present in the air in quantities sufficient to produce explosive or ignitable mixtures The wiring for the trans mitter must be contained in Explosion Proof conduit extending into the safe area Due to the specialized design of the Radar transmitter no Explosion Proof conduit fit ting EY seal is required within 18 of the transmitter An Explosion Proof c...

Page 18: ...t measurements taken at these test points is an approx imate value Accurate current readings should be taken with the digital multimeter in series with the loop 1 When using a HART communicator for configuration a minimum 250 Ω line load resistance is required See the HART communicator manual for more information 2 The transmitter can be configured without the antenna but disregard error messages ...

Page 19: ... exclamation point appears as the last char acter of the first line of the display The password can be changed to any numerical value up to 255 The password is required whenever configuration values are changed The default password installed in the transmitter at the factory is 0 password disabled The last step in the con figuration menu provides the option to enter a new pass word If 0 is entered...

Page 20: ...e transmitter Additional information or an explanation of an action is given in the third column The following drawings are provided as reference for the configuration procedure Use of the included PACTware PC program is highly recommended and invaluable for troubleshooting and advanced calibration A HART RS232 or USB modem purchased separately is required See MAGNETROL PACTware bulletin 59 101 Ta...

Page 21: ...ounted on the side of transmitter housing 9 AntnaExt select Select the Antenna Extension used Select last 3 digits of the Model Number corresponding to the Antenna Extension This relates to the maximum nozzle length where it can be used 0 1 25 mm 1 4 100 mm 2 8 200 mm 3 12 300 mm 10 AntnaMnt select Select the type of Antenna Mounting Select NPT BSP or Flange 11 SnsrOfst xx x units Enter the Sensor...

Page 22: ...choosing Disable Do not proceed with this procedure until confirming LEVEL and QUALITY values in TARGETS screen FALSE TARGET REJECTION should be run with vessel at or near empty when all targets are exposed re run this routine with liquid at a lower level if initial calibration is done with significant liquid in vessel Level Too High message indicates liquid is too close to the antenna to run this...

Page 23: ...ter installation enter 1 15 for multi drop network loop will latch at 4 mA 32 Trim 4 Fine tune the 4 mA point Attach a mA meter to the output If the output does not equal 4 00 mA adjust the value on the display until meter reads 4 00 mA 33 Trim 20 Fine tune the 20 mA point Attach a mA meter to the output If the output does not equal 20 00 mA adjust the value on the display until meter reads 20 00 ...

Page 24: ...st Diagnostic factory setting 57 Distance Correction None do not adjust Diagnostic factory setting 58 Echo Amp None do not adjust Diagnostic factory setting 59 Run Average None do not adjust Diagnostic factory setting 60 Adaptive Filter None do not adjust Diagnostic factory setting 61 Adap Average None do not adjust Diagnostic factory setting 62 Scatter High None do not adjust Diagnostic factory s...

Page 25: ...to the terminal block in the electronics housing of the PULSAR transmitter HART uses the Bell 202 frequency shift key technique of high frequency digital signals It operates on the 4 20 mA loop and requires 250 Ω load resistance A typical connec tion between a communicator and the PULSAR transmitter is illustrated 2 7 2 Display Menu A typical communicator display is an 8 line by 21 character LCD W...

Page 26: ...t 23 Turbulence 22 Dielectric 24 Rate of Change 25 Foam 26 Target Rej Status 27 Target Rej Type 28 Targ Rej Level 29 4 mA Set Point 30 20 mA Set Point 31 Damping 32 System Fault State 33 LOE Fault State 34 LOE Delay 35 SZ Fault State 36 SZ Height 37 Trim Level 38 Pipe ID 39 Date Time Initials 40 Launcher 16 Antenna Mount 1 Launcher 2 Algorithm 4 TVG Type 5 TVG Max 6 Fiducial Position 7 Fiducial Ga...

Page 27: ...ght feed through 3 2 Theory of Operation 3 2 1 Pulse Burst Radar PULSAR is a top mounted downward looking pulse burst radar operating at 5 8 GHz Europe or 6 3 GHz North America Unlike true pulse devices that transmit a single sharp fast rise time waveform of wide band energy PULSAR emits short bursts of 5 8 or 6 3 GHz energy and measures the transit time of the signal reflected off the liquid surf...

Page 28: ...of Radar to vessel level measurement technology The high speed electromagnetic energy 1000 ft µs is difficult to measure over short dis tances and at the resolution required in the process industry ETS captures the EM signals in real time nanoseconds and reconstructs them in equivalent time milliseconds which is much easier to measure with today s technology ETS is accomplished by scanning the tan...

Page 29: ...nt engine finding a reflection it believes is level signal 1 Is high dielectric ε 20 foam present 2 Run False Target Rejection routine with Level below this point or with Empty tank to eliminate false echoes LEVEL Output and LOOP values are all inaccurate Basic configuration data questionable 1 Check validity of all configuration data 2 Check DISTANCE value of device against manually measured dist...

Page 30: ...n Further error information can be obtained by viewing the Status or Diagnostic Factory Menu screens WARNING MESSAGE The second level in the hierarchy of Diagnostics annunciating conditions that are not fatal but may affect measurement A message will occur on the main rotating screen when a Warning is detected but will not affect output current Further error information can be obtained by viewing ...

Page 31: ...se Target Rejection routine Consult Factory if problem persists FidUnclr Fiducial signal quality questionable Ensure transmitter antenna connection is tight Consult Factory Factory Cal Reqd Invalid Calibration Data Transmitter requires re calibration of Factory parameters the instrument will continue to operate with reduced performance Consult Factory Information available only in Status or Diagno...

Page 32: ...the EMC Directive 2004 108 EC COMMUNICATIONS APPROVALS ATEX IEC Entity Parameters Region Agency Frequency US FCC 6 3 GHz Canada IC 6 3 GHz Europe RTTE 5 8 GHz Vi 28 4VDC li 120mA Pi 0 84w Ci 2 2nF Li 430µH PULSAR Model RX5 SIL 1 as 1oo1 Instrument Type B SFF 73 7 PFDavg 9 72E 04 FITS Annual Fail Dangerous Undetected 222 1 94E 03 Fail Dangerous Detected 308 2 70E 03 Safe 314 2 75E 03 Measured media...

Page 33: ...33 58 601 Pulsar Radar Transmitter 3 4 1 Agency FM CSA Drawing and Entity Parameters ...

Page 34: ...003 w HART Terminal Board General Purpose Z30 9143 001 Intrinsically Safe Explosion Proof O ring Viton 012 2201 237 Housing cover without glass 004 9193 002 Housing cover with glass GP IS Z36 4410 001 XP 036 4410 005 Ex d 036 4410 003 3 5 2 Recommended Spare Parts Description Part Number Electronic Module 6 3 GHz Z31 2827 001 w HART 5 8 GHz Z31 2827 003 w HART ...

Page 35: ...on menu driven data entry and system security Indication 2 line 8 character display Digital Communication HART Version 5 compatible Power Measured at instrument terminals General Purpose 16 to 36 VDC Intrinsically Safe 16 to 28 6 VDC Explosion Proof 16 to 36 VDC Housing Material Cast aluminum A356T6 0 2 copper cast 316 SS optional Cable Entry 3 4 NPT M20 Ingress Protection Type 4X IP66 Net Gross W...

Page 36: ...ylene glycols organic oils silicone oils vinegar sour HCs Black liquor hot water steam hot aliphatic amines ethylene oxide propylene oxide molten sodium molten potassium Reference Conditions Reflection from ideal reflector at 70 F 20 C Linearity 0 4 inch 10 mm or 0 1 of tank height whichever is greater Measured Error 0 4 inch 10 mm or 0 1 of tank height whichever is greater Performance will degrad...

Page 37: ...l Halar Antenna 3 4 and 6 Horn Materials 316 SS Hastelloy C Monel and Kynar opt TFE Viton O rings 316 SS Polypropylene Viton O rings All Halar Viton O rings 316 SS Hastelloy C and Monel opt TFE Viton O rings Process Connection 11 2 NPT and BSP ANSI or DIN flanges 11 2 NPT and BSP ANSI or DIN flanges 11 2 NPT BSP ANSI or DIN Flanges 6 ANSI or DIN flanges Maximum Process Temperature 400 F 50 psig 20...

Page 38: ...0 76 1 4 100 mm 5 1 130 14 0 356 5 9 150 2 8 200 mm 9 1 231 18 0 457 9 9 251 3 12 300 mm 13 1 333 22 0 559 13 9 353 Antenna Extension O D Dimension D TFE Rod 1 625 41 PP Rod 1 50 38 All Plastic Rod 1 625 41 DIELECTRIC RODS HORNS 2 8 55 0 68 17 Thread Engagement A C B D 3 76 H Aperture Model Antenna Extension maximum L dimension 3 Horn 4 Horn 6 Horn 8th Digit Dim H Dim H Dim H 0 1 25 mm 2 7 51 1 4 ...

Page 39: ...minum Dual Compartment 45 3 4 NPT IP66 2 Cast Aluminum Dual Compartment 45 M20 IP66 3 Cast 316 SS Dual Compartment 45 3 4 NPT IP66 4 Cast 316 SS Dual Compartment 45 M20 IP66 HOUSING CONDUIT CONNECTION 1 Integral General Purpose Intrinsically Safe FM CSA Non incendive CL1 Div II 3 Integral Explosion Proof FM CSA Class I Div 1 Groups B C D A Integral General Purpose Intrinsically Safe ATEX II 1G EEx...

Page 40: ...f Construction codes A B C and K only B Polypropylene Material of Construction codes A G K and L only C Halar Material of Construction codes G and L only CONFIGURATION STYLE A 316 316L stainless steel B Hastelloy C C Monel G All Plastic wetted surfaces including flanges Configuration Style codes B and C only K 316 316L SS ASME B31 1 and B31 3 meets CRN specifications L All Plastic wetted surfaces ...

Page 41: ...d face flange 64 4 300 ANSI raised face flange 65 4 600 ANSI raised face flange 73 6 150 ANSI raised face flange 74 6 300 ANSI raised face flange 75 6 600 ANSI raised face flange FA DN 100 PN 16 DIN 2527 Form B FB DN 100 PN 25 40 DIN 2527 Form B FD DN 100 PN 64 DIN 2527 Form E GA DN 150 PN 16 DIN 2527 Form B GB DN 150 PN 25 40 DIN 2527 Form B GD DN 150 PN 64 DIN 2527 Form E PROCESS CONNECTION SIZE...

Page 42: ...Electromagnetic Energy The radiation that travels through space as electric and magnetic fields varying with position and time Examples in increasing frequency radio waves microwave infrared light visible light ultraviolet light x rays gamma waves and cosmic waves EM See Electromagnetic Energy EMI Electromagnetic Interference Electrical noise caused by elec tromagnetic fields that may affect elect...

Page 43: ...evel Offset value Linearity The worst case error calculated as a deviation from a perfect straight line drawn between two calibration points Line Powered See Four Wire LOE Loss of Echo Condition where a level measurement is impossible due to the absence of valid reflections from the liquid surface LOE Delay Loss of Echo Delay The amount of time the trans mitter spends looking for a valid Level sig...

Page 44: ...ower number assists in ignoring nearby objects Status The current state of the transmitter s diagnostics screen updates every 10 seconds Targets Objects in the vessel that create reflections of the radar signal microwave energy Targ Rej Target Rejection The ability to ignore reflections from objects in the vessel that are not the liquid level i e false targets e g pipes ladders baffles Tank Ht Tan...

Page 45: ...f Change Distance Correction Amount of Foam Echo Amplitude Targets 1 Q____ _______ Run Average 2 Q____ _______ Adaptive Filter 3 Q____ _______ Adap Average 4 Q____ _______ Scatter High 5 Q____ _______ Rate High Target Rejection Scat Rate 4 mA point Peak Detect Reference 20 mA point Peak Detect Threshold Damping Factor Minimum Threshold Sys Fault ROC min LOE Fault Maximum Rate LOE Delay Maximum dD ...

Page 46: ...58 601 Pulsar Radar Transmitter Notes ...

Page 47: ...58 601 Pulsar Radar Transmitter Notes ...

Page 48: ...umber 4 Reason for Return 5 Application Any unit that was used in a process must be properly cleaned in accordance with OSHA standards before it is returned to the factory A Material Safety Data Sheet MSDS must accompany material that was used in any media All shipments returned to the factory must be by prepaid transportation All replacements will be shipped F O B factory ASSURED QUALITY SERVICE ...

Reviews: