background image

4

EN

PRECAUTIONS

Maintenance

Servicing

Please refer to relevant topics on “TROUBLESHOOTING” on 
page 43 before returning the product. 
If this unit becomes inoperative, do not try to correct the 
problem by yourself. There are no user-serviceable parts 
inside. Turn off, unplug the power plug, and please call our 
toll free customer support line found on the cover of this 
manual to locate an authorized service center.

Cleaning the cabinet

Wipe the front panel and other exterior surfaces of the 
unit with a soft, slightly damp cloth.
Never use a solvent, thinner, benzene or alcohol to clean 
the unit. Do not spray insecticide liquid near the unit. Such 
chemicals may discolor the surface or damage the unit.

Cleaning discs

When a disc becomes dirty, clean it with a cleaning 
cloth. Wipe the disc from the center to out. Do not wipe 
in a circular motion.
Do not use solvents such as benzine, thinner, commercially 
available cleaners, detergent, abrasive cleaning agents or 
antistatic spray intended for analog records.

Cleaning the disc lens

If this unit still does not perform properly although you 
refer to the relevant sections and to “TROUBLESHOOTING” 
in this user manual, the laser optical pickup unit may be 
dirty. Consult your dealer or an authorized service center 
for inspection and cleaning of the laser optical pickup unit.

Disc handling

Handle the discs so that fingerprints and dust do not 
adhere to the surfaces of the discs.
Always store the disc in its protective case when it is not 
used.
Note that discs with special shapes (heart-shaped discs, 
octagonal discs, etc.) cannot be played back on this unit. 
Do not attempt to playback such discs, as they may 
damage the unit.

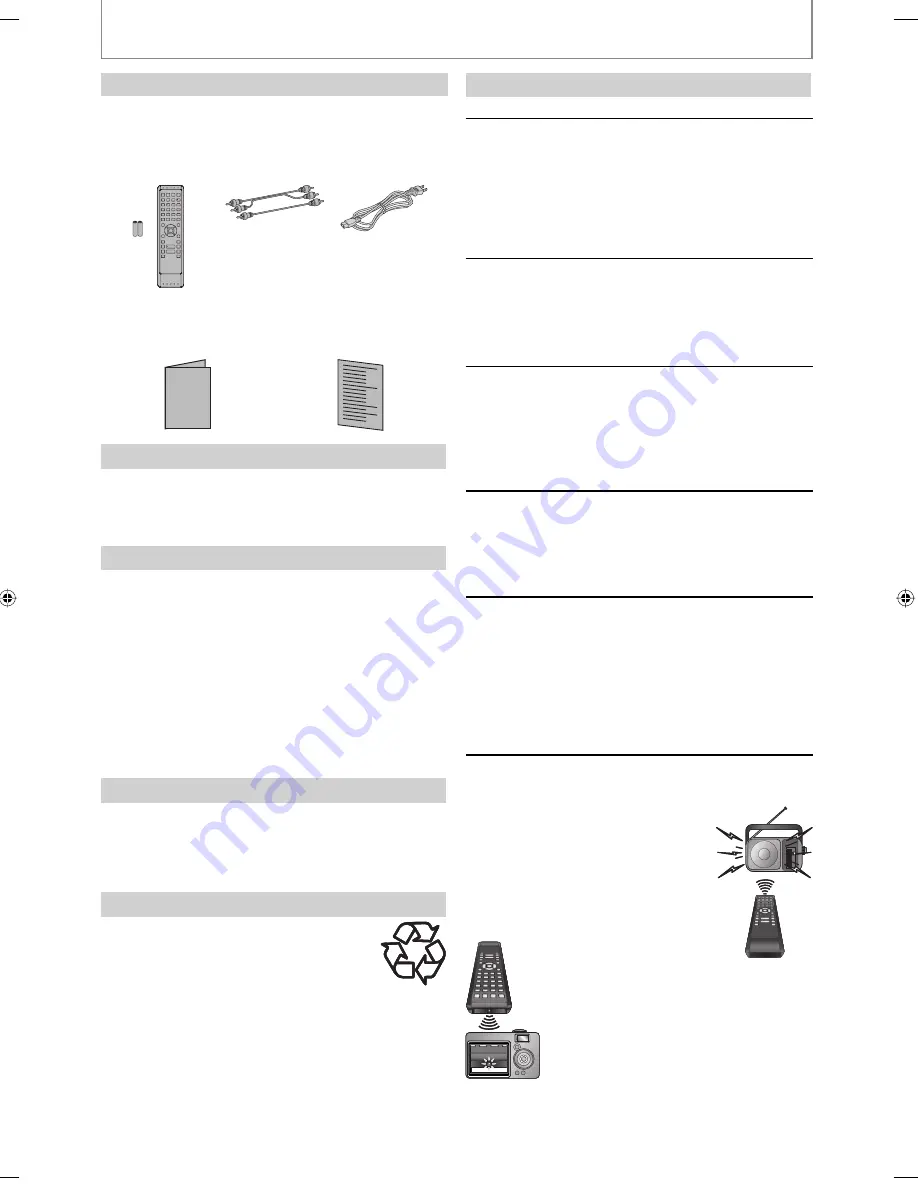
IR signal check

If the remote control is not working properly, you can 
use an AM radio or digital camera (including a cellular 
phone with built-in camera) to see if it is sending out an 
infrared signal.

With an AM radio:

Tune the AM radio station to a non-
broadcasting frequency. Point the 
remote control towards it, push any 
button and listen. If the sound from 
the radio flutters, it is receiving the 
remote control’s infrared signal.

With a digital camera 
(including built-in cell 
phone cameras):

Point a digital camera towards the remote 
control. Push any button on the remote 
control and look through the digital 
camera. If the infrared light appears 
through the camera, the remote control is 
working.

Supplied Accessories

remote control 
with batteries 
(AAx2) (NB812UD)

RCA audio / video 
cables
(WPZ0102TM015 / 
WPZ0102LTE01)

AC cord
(WAV0162LW001)

owner’s manual (EN/ES/FR)
(1VMN25073 / 1VMN25075 
/ 1VMN25293)

quick start guide (EN/ES/FR)
(1VMN25074 / 1VMN25076)

Owner’s Manual

To Avoid the Hazards of Electrical Shock and Fire

Do not handle the power cord with wet hands.
Do not pull on the power cord when disconnecting it 
from an AC outlet. Grasp it by the plug.
Do not put your fingers or objects into the unit.

Installation Location

For safety and optimum performance of this unit:

Install the unit in a horizontal and stable position. Do 
not place anything directly on top of the unit. Do not 
place the unit directly on top of the TV.
Shield it from direct sunlight and keep it away from 
devices of intense heat. Avoid dusty or humid places. 
Avoid places with insufficient ventilation for proper heat 
dissipation. Do not block the ventilation holes on the 
back and sides of the unit. Avoid locations subject to 
strong vibration or strong magnetic fields.
Be sure to remove the disc and unplug the AC power 
cord from the outlet before carrying the unit.

Moisture Condensation Warning

Moisture condensation may occur inside the unit when it 
is moved from a cold place to a warm place or after 
heating a cold room or under conditions of high 
humidity. Do not use this unit at least for 2 hours until its 
inside gets dry.

Note about Recycling

This unit’s packaging materials are recyclable 
and can be reused. Please dispose of any 
materials in accordance with your local 
recycling regulations.
Batteries should never be thrown away or 
incinerated but disposed of in accordance with your 
local regulations concerning chemical wastes.


E5E20UD_E5H20UD-NB500MG9_EN.indd4   4

E5E20UD_E5H20UD-NB500MG9_EN.indd4   4

2008/02/25   9:30:22

2008/02/25   9:30:22

Summary of Contents for NB500MG9

Page 1: ...product more enjoyable If you have read assistance you may access our online help at http www funai corp com or call 1 800 605 8610 while with your product and Model Serial number Playback Function Se...

Page 2: ...cation of antenna discharge unit connection to grounding electrodes and requirements for the grounding electrode Fig A FIGURE A EXAMPLE OF ANTENNA GROUNDING AS PER NATIONAL ELECTRICAL CODE ANTENNA LEA...

Page 3: ...r more of the following measures 1 Reorient or relocate the receiving antenna 2 Increase the separation between the apparatus and receiver 3 Connect the apparatus into an outlet on a circuit different...

Page 4: ...frequency Point the remote control towards it push any button and listen If the sound from the radio flutters it is receiving the remote control s infrared signal With a digital camera including built...

Page 5: ...is trademark of Eastman Kodak Company 2008 Funai Electric Co Ltd All rights reserved No part of this manual may be reproduced copied transmitted disseminated transcribed downloaded or stored in any st...

Page 6: ...1 Resume Playback 21 Playing Back an audio CD and a Disc with JPEG Files 22 Reading the SD Memory Card 23 SPECIAL PLAYBACK 25 Fast Forward Fast Reverse 25 Slow Forward Playback 25 Step by Step Playbac...

Page 7: ...mplifier PIP Some BD video have the PIP picture in picture function which enables you to display the secondary video in the primary video You can call up the secondary video by pressing PIP whenever t...

Page 8: ...he power is off 11 y ySTANDBY ON button Press to turn the unit on or off 1 COMPONENT VIDEO OUT jacks Use to connect a TV with component video inputs with an RCA component video cable 2 HDMI OUT jack U...

Page 9: ...edly to forward the playback step by step 14 HDMI button Press to set the HDMI output mode 15 OPEN CLOSE A button Press to open or close the disc tray 16 PIP button Press to switch picture in picture...

Page 10: ...of used batteries please comply with governmental regulations or environmental public instruction s rules that apply in your country or area Do not recharge short circuit heat burn or disassemble batt...

Page 11: ...arious kinds of information such as title number elapsed time repeat mode etc Playback status icon Mode Disc SD Memory Card Playback is in progress Stop mode Pause mode Fast forward mode Fast reverse...

Page 12: ...ture a component or an HDMI connection is required Refer to HDMI Video Resolution or Component Output setting on page 34 to set the video resolution 2 Analog audio connection is not required for this...

Page 13: ...ch as this unit audio signals are not output from HDMI OUT jack You cannot select the video resolutions which are not supported by the connected TV except when this unit s HDMI OUT jack is connected t...

Page 14: ...lby Digital DTS bitstream or LPCM will be output from DIGITAL OUT jack depending on Digital Out setting Refer to page 37 Audio signals output from HDMI OUT jack Disc type Audio recording format HDMI A...

Page 15: ...nalog Audio Connection AUDIO OUT L R AUDIO IN L R analog audio input jacks RCA audio cable audio this unit AUDIO OUT stereo system Digital Audio Connection COAXIAL DIGITAL AUDIO INPUT digital audio co...

Page 16: ...TS DTS 2ch Downmix LPCM LPCM 2ch Downmix LPCM 2ch Downmix LPCM audio CD 2ch LPCM 2ch LPCM DTS CD DTS 2ch Downmix LPCM For BD titles with secondary or interactive audio these audio will be output as Do...

Page 17: ...malfunction or loss of the card s data Please keep the SD Memory Cards in their cases when you are not using them Do not try to open or modify the card Do not touch the terminal surface with your fin...

Page 18: ...re divided into tracks audio CD audio CD track 1 track 2 track 3 track 4 track 5 Data discs or SD Memory Cards contain JPEG are divided into folders and the folders are subdivided into files group fol...

Page 19: ...yer number Only for 2 layered discs L0 Layer 0 is played back L1 Layer 1 is played back Track File information SD 1 14 0 00 51 B T 1 3 4 2 1 Current track file number Total number of track file 2 Elap...

Page 20: ...ny of BD video and DVD video a menu screen may appear In this case use K L s B to select the desired item then press OK 7 Press STOP C once to stop playback temporarily Refer to Resume Playback on pag...

Page 21: ...g menu operations may vary among discs Refer to the manual accompanying the disc for details Pause 1 During playback press PAUSE F Playback will be paused 2 Press PLAY B to return to normal playback N...

Page 22: ...o return to the first item Icons Folder audio CD track JPEG file It is recommended that files to be played back in this unit are recorded under the following specifications JPEG Upper limit 2 560 x 1...

Page 23: ...Picture CD contact a shop that provides developing service of Kodak Inc 1 When Kodak Picture CD is inserted in this unit Kodak Picture CD menu appear automatically on the TV screen 7 32 H G Photo A P...

Page 24: ...B For miniSD Card and microSD Card the adapter will be required Note Do not remove the card during its playback This unit supports SD Memory Card with FAT12 FAT16 file system and SDHC Memory Card with...

Page 25: ...orward playback mode are blurred refer to page 35 Step by Step Playback 1 In pause mode press PAUSE F repeatedly Every time you press PAUSE F playback will advance one step at a time 2 Press PLAY B to...

Page 26: ...he program screen will appear 2 Use K L to select a track file then press OK e g audio CD Program CD DA Total 0 09 49 1 2 3 4 5 6 7 3 40 2 33 2 22 2 28 2 45 3 41 2 58 6 3 41 1 3 1 1 1 4 6 3 40 2 28 3...

Page 27: ...andom playback screen To cancel the random playback press MODE when the random playback screen is displayed To repeat the current track file in the random selection press REPEAT repeatedly until Track...

Page 28: ...available except the search using SKIP H G Time search is available only in the same track file or title For BD chapter and time search are available only during playback Marker search This feature al...

Page 29: ...you are playing back Switching Audio Soundtrack Some BD and DVD contain multiple audio streams Those are often in different audio languages or audio formats For BD available audio varies depending on...

Page 30: ...Audio Out setting multi LPCM will be output from HDMI OUT jack for BD audio Refer to page 14 In Mix Audio Output mode with HDMI audio being output 2 channel down mixed LPCM will be output from DIGITA...

Page 31: ...hen press OK 3 Use K L to select your desired setting items BD Audio Mode HDMI Audio Out HDMIVideo Resolution Component Output Player Menu TV Aspect Quick Mix Audio Output HDMI Multi Normal Auto 480i...

Page 32: ...ect your desired setting items The setting items which are not available with current situation of this unit will be displayed in gray and you cannot select them 5 Follow the procedure below depending...

Page 33: ...edish Dutch Russian Chinese Japanese Korean Danish Finnish Norwegian Icelandic Hungarian Romanian Turkish Greek Irish Portuguese Polish Czech Slovak Bulgarian Other Disc Menu Sets the language for dis...

Page 34: ...ages the picture is displayed in the center of the 16 9 screen with a 4 3 aspect ratio HDMI Video Resolution Sets the HDMI video resolution Auto HDMI video resolution will be selected automatically de...

Page 35: ...tput An individual picture on the TV screen is called as Frame which consists of two separate images called as Field Some pictures may be blurred at the auto setting in Still Mode setting due to their...

Page 36: ...when playing back BD or DVD recorded in LPCM On LPCM signals are converted to 48 kHz for output Set to On when using digital connections to an AV amplifier that is not compatible with sampling frequen...

Page 37: ...not effective when the HDMI audio signal is output Speaker setting This unit allows you to enjoy multi channel surround sound such as 7 1 channel 5 1 channel surround e g basic layout with 7 1 channe...

Page 38: ...device is not compatible with subwoofer Subwoofer will be displayed in gray Small Center Large Small Subwoofer On Surround Large Small Surround Back Large Small Default Select Default then press OK t...

Page 39: ...o 18m 3 6m Select the distance from the listening position to the speaker to get the ideal delay time Center 0ft to 60ft 12ft 0m to 18m 3 6m Surround 0ft to 60ft 10ft 0m to 18m 3 0m Surround Back 0ft...

Page 40: ...ting Level then press OK 2 Use K L to select your desired option then press OK All To release the limitation Age Setting To set the age limitation After selecting Age Setting use the Number buttons to...

Page 41: ...pears on the TV screen Auto Power Off On If this unit is left with no activity for more than 30 minutes this unit turns off automatically Off Sets off the auto power off Panel Display Sets the brightn...

Page 42: ...ress OK No Exits without any initialization Setup Resets the setup menu to the default Memory Device Initializes the SD Memory Card After confirmation message appears use K L to select Yes then press...

Page 43: ...ack Clean the disc Ensure the disc label is facing up Check if the disc is defective by trying another disc Cancel the ratings control or change the control level Insert a correct disc that can be pla...

Page 44: ...isc supports 7 1 multi channel surround sound output Dolby TrueHD Dolby TrueHD is a lossless coding technology developed for next generation optical discs Blu ray Disc supports 7 1 multi channel surro...

Page 45: ...Latvian Lettish 5868 Lingala 5860 Lithuanian 5866 Language Code Macedonian 5957 Malagasy 5953 Malay 5965 Malayalam 5958 Maltese 5966 Maori 5955 Marathi 5964 Moldavian 5961 Mongolian 5960 Nauru 6047 N...

Page 46: ...5 C to 104 F 40 C Operating humidity Less than 80 no condensation Terminals Rear Audio output Analog RCA jack x 2 L R 2Vrms output impedance more than 1k Video output RCA jack x 1 1Vp p 75 Component...

Page 47: ...47 EN Connections Playback Function Setup Others Introduction MEMO...

Page 48: ...COSMETIC PARTS COMPLETE ASSEMBLY PARTS DEMO OR FLOOR MODELS FUNAI CORP AND ITS REPRESENTATIVES OR AGENTS SHALL IN NO EVENT BE LIABLE FOR ANY GENERAL INDIRECT OR CONSEQUENTIAL DAMAGES ARISING OUT OF OR...

Page 49: ...resolution of the video signal being output from HDMI OUT jack The video resolution changes as follows every time HDMI is pressed 480p 720p 1080i 1080p 1080p24 Note You cannot select the video resolu...

Page 50: ...disc tray guide 6 Press PLAY B to start playback For many of BD video and DVD video a menu screen may appear In this case use K L s B to select the desired item then press OK To pause playback Press...

Reviews: