Magnavox MSD1005 Owner'S Manual Download Page 18

4

4

DISPLAY

TV ASPECT

4:3 LETTER BOX

STILL MODE

AUTO

PROGRESSIVE

OFF

PROGRESSIVE MODE AUTO1
FORMAT

RGB

RGB RANGE

NORMAL

ENTER

– 18 –

EN

Functions

DISPLAY Setting

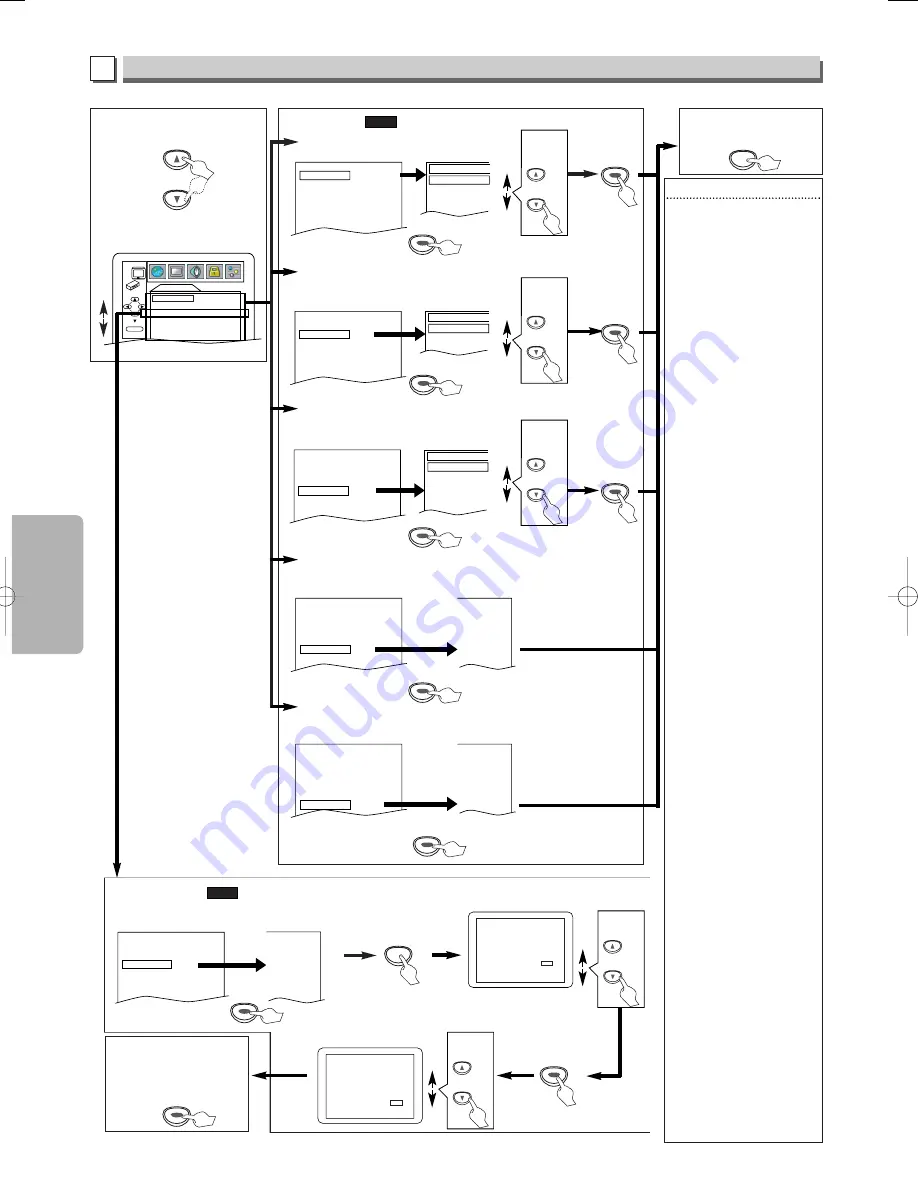
You can change the display functions. Follow steps 1 to 3 in the “CUSTOM Menu” section on page 17.

Select the desired item.

B

DISPLAY menu

5

5

TV ASPECT:
(Default: 4:3 LETTER BOX)

See Hint to the right.

QUICK

TV ASPECT

4:3 LETTER BOX
4:3 PAN & SCAN
16:9 WIDE
16:9 SQUEEZE

TV ASPECT           4:3 LETTERBOX
STILL MODE           AUTO
PROGRESSIVE

        OFF

PROGRESSIVE MODE        AUTO 1
FORMAT

        RGB

RGB RANGE

        NORMAL

Select the
desired
setting.

or

ENTER

ENTER

ENTER

ENTER

ENTER

ENTER

or

6  

6  

To confirm the 

PROGRESSIVE
scanning mode

5

5

PROGRESSIVE:
(Default: OFF)

See Hint to the right.

QUICK

TV ASPECT           4:3 LETTERBOX
STILL MODE           AUTO
PROGRESSIVE     OFF
PROGRESSIVE MODE            AUTO 1
FORMAT

        RGB

RGB RANGE

        NORMAL

4:3 LETTERBOX
AUTO
ON
AUTO 1
RGB
NORMAL

ENTER

ENTER

ENTER

SETUP

Select
YES.

or

ENTER

ENTER

ENTER

NO
YES

NO
YES

Confirm again to use progressive scan.

If Picture is good, Select “YES”.

SELECT:  

K

 / 

L

SET:ENTER

Before proceeding…

1. Make sure your TV has progressive scan.
2. Connect with component video cable

NOTE: If there is no picture or picture is 

distorted after selecting “YES”, 
wait about 15 seconds for auto recovery.

  
A c t i va t e   P r o gr e s s i ve ?  

SELECT:  

K

 / 

L

               SET:ENTER

NO
YES

Select
YES.

or

If you do not press any buttons
for 15 seconds, Progressive
Scan will switch to “OFF”.

If “PROGRESSIVE” is “ON”,
this message appears:

ENTER

ENTER

ENTER

ENTER

ENTER

ENTER

STILL MODE:
(Default: AUTO)

See Hint to the right.

TV ASPECT           4:3 LETTERBOX
STILL MODE           AUTO
PROGRESSIVE

        OFF

PROGRESSIVE MODE        AUTO 1
FORMAT

        RGB

RGB RANGE

        NORMAL

STILL MODE

AUTO
FIELD
FRAME

Select the
desired
setting.

or

ENTER

ENTER

ENTER

PROGRESSIVE MODE:
(Default: AUTO1)

See Hint to the right.

TV ASPECT           4:3 LETTERBOX
STILL MODE           AUTO
PROGRESSIVE

        OFF

PROGRESSIVE MODE        AUTO 1
FORMAT

        RGB

RGB RANGE

        NORMAL

PROGRESSIVE MODE

AUTO1
AUTO2
VIDEO1
VIDEO2
VIDEO3

Select the
desired
setting.

or

ENTER

ENTER

ENTER

ENTER

ENTER

ENTER

FORMAT:
(Default: RGB)

See Hint to the right.

4:3 LETTERBOX
AUTO
OFF
AUTO1
YCbCr
NORMAL

TV ASPECT           4:3 LETTERBOX
STILL MODE           AUTO
PROGRESSIVE

        OFF

PROGRESSIVE MODE        AUTO 1
FORMAT

        RGB

RGB RANGE

        NORMAL

RGB RANGE:
(Default: NORMAL)

See Hint to the right.

4:3 LETTERBOX
AUTO
OFF
AUTO1
RGB
ENHANCED

TV ASPECT           4:3 LETTERBOX
STILL MODE           AUTO
PROGRESSIVE

        OFF

PROGRESSIVE MODE        AUTO 1
FORMAT

        RGB

RGB RANGE

        NORMAL

ENTER

ENTER

ENTER

ENTER

ENTER

ENTER

Hint

Hint

TV ASPECT:

• Select “4:3 LETTER BOX”,

so that black bars may
appear on the top and bot-
tom of the screen.

• Select “4:3 PAN & SCAN”

for a full height picture with
both sides adjusted.

• Select “16:9 WIDE” if a

wide-screen TV is connect-
ed to this unit.

• Select “16:9 SQUEEZE” when

the TV screen is too large
horizontally at “16:9 WIDE”
setting and when it is possible
to adjust the screen size
using the TV’s controls.

STILL MODE:

• Select “AUTO” usually.
• If you select AUTO, automati-

cally select the best resolution
setting (FRAME or FIELD)
based on the data characteris-
tics of the pictures. (default)

• If you select “FIELD”, the

picture in the still mode will
be stabilized.

• If you select “FRAME”, the

picture in the still mode will
be highly defined.

• An individual picture on TV

screen is called a “frame”, which
consists of two separate images
called as “field”.
Some pictures may be blurred at
the AUTO setting in the still mode
due to their data characteristics.

PROGRESSIVE MODE:

• You can select a mode below

for the progressive scan output.

• AUTO1: mode suitable for

images on the film
material.

• AUTO2: mode for images on

the material of 30-
frame film.

• VIDEO1: mode for normal video

material.

• VIDEO2: mode for video 

material with less
movements.

• VIDEO3: mode for video 

material with many
movements.

FORMAT:

• Select an HDMI output mode

between YCbCr and RGB.

• When the connected equipment

is not compatible with YCbCr,
HDMI signal is output as RGB
regardless of the setting.

• This setting is effective only when

you use the HDMI connection.

RGB RANGE:

• Select a HDMI picture mode

between NORMAL and
ENHANCED.

• Select ENHANCED if the black-

white contrast is not clear.

• This setting is effective only for

HDMI RGB output.

PROGRESSIVE:

• You can set “PROGRESSIVE”

to “OFF” either in the Display
menu or by pressing and hold-
ing 

[PLAY 

B

B

]

on the front of the

unit for more than 5 seconds.

• When “PROGRESSIVE” is “ON”,

video signals from VIDEO OUT
and S-VIDEO OUT jacks will be
distorted or not be output at all.

6    

6    

To exit 

the menu

SETUP

E61J2UD_ENSP(NEW).qx33  05.8.1  6:28 PM  Page 18

Summary of Contents for MSD1005

Page 1: ...ting 20 Information Troubleshooting Guide 21 Specifications 22 Language Code List 22 Limited Warranty 22 Espa ol 23 Quick Use Guide Back Cover Table of Contents Before Using Your Unit If your TV has A...

Page 2: ...This equipment may generate or use radio frequency energy Changes or modifications to this equipment may cause harmful interference unless the modifications are expressly approved in the man ual The...

Page 3: ...of the polarized plug 13 Power Cord Protection Power supply cords should be routed so that they are not likely to be walked on or pinched by items placed upon or against them paying particular attent...

Page 4: ...cation About Copyright Symbols Used in This Manual Manufactured under license from Dolby Laboratories Dolby and the double D symbol are trade marks of Dolby Laboratories SERVICING Please refer to rele...

Page 5: ...deo format on our brand s DVD recorder However depending on the recording status of a disc the disc may not be played back at all or normally the picture or sound may not be smooth etc In this case yo...

Page 6: ...o ON in the Display setting Details are on pages 17 18 You also need to set your TV to progressive scanning mode If your TV is not compatible with progressive scanning Use this unit in interlace mode...

Page 7: ...s audio signals are not output from the HDMI output connector When the set s HDMI connector is connected to a DVI D compatible monitor HDCP compatible with an HDMI DVI convert er cable commercially av...

Page 8: ...round sound as heard in the movie theaters Playing a DVD using incorrect settings may generate noise distortion and may also damage the speakers S VIDEO OUT jack Connect an optional S Video cable here...

Page 9: ...Use a display equipment with an HDMI compatible port Progressive video signal will not be output from the COMPONENT VIDEO OUT jacks during the HDMI out put mode If the HDMI cable is not connected corr...

Page 10: ...k one frame at a time To pause disc playback To stop playback To stop playback To skip chapters To skip tracks To begin disc playback To begin disc playback To call up the DVD setup menu Only used to...

Page 11: ...res may stop for a moment This happens while the 1st layer is being switched to the 2nd layer This is not a malfunction Operations described in this section are mainly based on the remote control use...

Page 12: ...then press MENU to call up the file list on the TV screen WMA WMA WMA MP3 MP3 MP3 1 1 folder name 4 folder name 1 folder name 3 folder name 2 folder name 1 DISC NAME FILE LIST FOLDER WMA MP3 ENTER PLA...

Page 13: ...umber of audio channels DISPLAY DISPLAY DISPLAY DISPLAY TRACK 01 3 1 36 0 01 15 T The name of the file currently in play will be displayed Current repeat setting if active T Track repeat G Group folde...

Page 14: ...n 10 minutes Press CLEAR to erase the incorrect input at step 2 Hint Hint Depending on the disc being played this function can also be performed by directly entering the desired chapter number with th...

Page 15: ...Hint Hint Press CLEAR at step 2 to erase the most recently entered track To erase all programmed tracks at once select ALL CLEAR and press ENTER at step 2 While a program is being played back STOP C...

Page 16: ...sc menu Refer to the manual accompanying the discs for details PLAY PLAY SUBTITLE PLAY 1 1 Camera Angles Some DVD discs may con tain scenes which have been shot simultaneously from var ious angles You...

Page 17: ...BITSTREAM ENTER SETUP STOP QUICK SETUP PLAYER MENU ENGLISH TV ASPECT 4 3 LETTER BOX PROGRESSIVE OFF DOLBY DIGITAL BITSTREAM Refer to the sections PLAYER MENU TV ASPECT PROGRESSIVE or DOLBY DIGITAL on...

Page 18: ...O PROGRESSIVE OFF PROGRESSIVEMODE AUTO 1 FORMAT RGB RGB RANGE NORMAL RGB RANGE Default NORMAL See Hint to the right 4 3 LETTERBOX AUTO OFF AUTO1 RGB ENHANCED TV ASPECT 4 3 LETTERBOX STILL MODE AUTO PR...

Page 19: ...ENTAL Setting Parental Control limits the disc viewing that exceed your settings An incorrect password will be not acceptable This feature prevents your children from viewing inappropriate materials P...

Page 20: ...tions Follow steps 1 to 3 in the CUSTOM Menu section on page 17 4 4 Select the desired item OTHERS menu 6 6 To exit the menu ANGLE ICON Default ON Set to ON to show the angle icon when multiple camera...

Page 21: ...ayback from center to edge Clean the disc Disc can t be played Clean the disc Ensure the disc label is facing up Check if the disc is defective by trying another disc Cancel the parental lock or chang...

Page 22: ...e of charge in the USA in the event of defect in materials or workmanship as follows DURATION PARTS FUNAI CORP will provide parts to replace defective parts without charge for one 1 year from the date...

Page 23: ...roducir repetidamente una canci n grupo o disco MP3 WMA Para activar desactivar el nivel del negro Para activar desactivar el ambiental virtual Para disponer el orden de reproducci n o la reproducci n...

Page 24: ...ndomly To set virtual surround on off To call up the Menu on a disc To call up the Top Menu on a disc To magnify part of a picture x2 x4 To return to the previous operation in menu To search chapter t...

Reviews: