


– 20 –
ES
Es
paño
l
5
Si su televisor tiene entradas de
AUDIO / VIDEO vea la sección
“Connection to a TV” en la página 6 en el
manual de manejo. En caso contrario, vea
la sección “Connecting to RF Modulator
(Not Supplied)” en la página del frente en
el manual de manejo.
Español
p
Conexiones
4
Para salir del menú
1
Reproducción
4
4
3
Antes.
Encienda el televisor, amplifica-
dor y otros equipos conectados
a esta unidad. Asegúrese que el
televisor y el
sintonizador
de audio (no
provisto) están
en el canal cor-
recto.
Control remoto
1
SETUP
ENTER
ENTER
ENTER
ENTER
ENTER
ENTER
ENTER
ENTER
ENTER
1
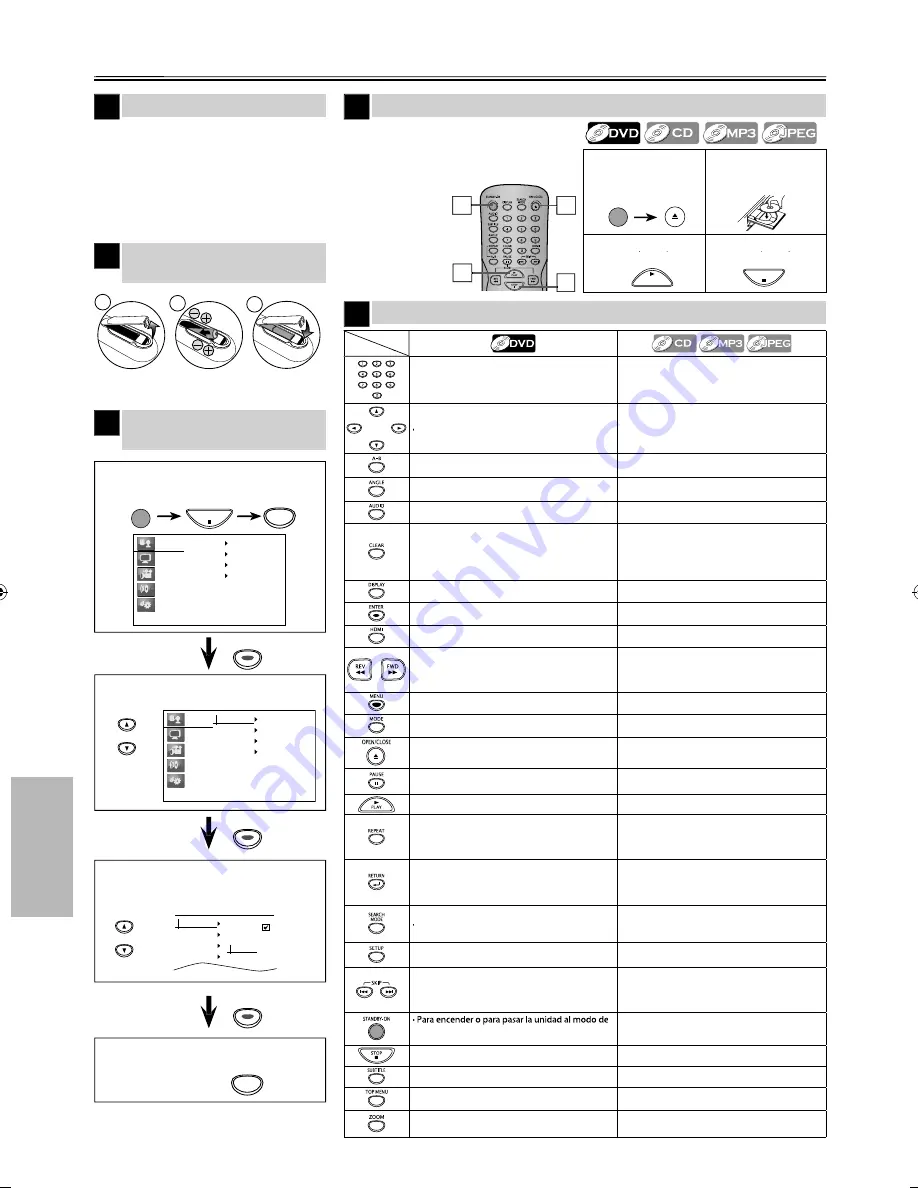
Para abrir o cerrar
la bandeja del
disco
2
Ponga un disco
con la etiqueta
hacia arriba.
3
Para empezar la
reproducción
p
p
4
Para parar la
reproducción
p
STOP
STANDBY-ON
OPEN/CLOSE
PLAY
1
1
Confirme que ha seleccionado
“Language”.
Para cambiar el idioma en la
pantalla
3
STOP
SETUP
STANDBY-ON
2
1
3
Instalación de las pilas en el
control remoto
2
Language
Display
Video
Audio
Others
Player Menu
Subtitle
Audio
Disc Menu
3
Seleccione el idioma deseado para las
indicaciones en la pantalla.
Player Menu
Subtitle
Audio
Disc Menu
English
Français
Español
2
Seleccione “Player Menu”.
Language
Display
Video
Audio
Others
Player Menu
Subtitle
Audio
Disc Menu
• Para especificar valores en el campo de entrada.
• Para seleccionar directamente el capítulo o
título.
• Para especificar valores en el campo de entrada.
• Para seleccionar directamente la canción. (CD)
• Para seleccionar la carpeta / archivo
directamente. (MP3 / JPEG)
Para mover el cursor y determinar la posición.
• Para mover el cursor y determinar la posición.
• Para girar la imagen JPEG.
• Para repetir entre su punto A y B seleccionado.
• Para repetir entre su punto A y B seleccionado.
(CD / MP3)
• Para seleccionar los ángulos de la cámara en
un disco.
------
• Para seleccionar idiomas de audio en un disco.
• Para seleccionar “Estéreo”, “L-ch” o “R-ch”. (CD)
• Para borrar el punto para la repetición A-B
.
• Para borrar los números mal entrados.
• Para borrar el punto para la repetición A-B.
(CD / MP3)
• Para eliminar el Nº de estado en la entrada de
programa.
• Para borrar los números mal entrados.
• Para mostrar el modo de disco actual.
• Para mostrar el modo de disco actual.
• Para seleccionar opciones o valores de
configuración.
• Para seleccionar opciones o valores de
configuración.
• Para establecer el modo de salida HDMI.
• Para establecer el modo de salida HDMI.
• Para buscar en avance/retroceso por un disco.
(×2, ×4, ×8, ×16, ×32)
• Para empezar la reproducción en avance lento
durante el modo de pausa.
• Para buscar en avance/retroceso por un disco.
(×2, ×4, ×8, ×16, ×32)
• Para llamar el menú en un disco.
------
------
• Para disponer el orden de reproducción o la
reproducción aleatoria.
• Para abrir o cerrar la bandeja del disco.
• Para encender la unidad.
• Para abrir o cerrar la bandeja del disco.
• Para encender la unidad.
• Para hacer una pausa en la reproducción.
• Para avanzar la reproducción un cuadro cada vez.
• Para hacer una pausa en la reproducción del
disco.
• Para iniciar o reanudar la reproducción.
• Para iniciar o reanudar la reproducción.
• Para reproducir repetidamente un capítulo o
título.
• Para reproducir repetidamente una canción o
disco. (CD)
• Para reproducir un archivo, carpeta o disco
reiteradamente. (MP3 / JPEG)
• Para volver al menú o pantalla anteriormente
visualizado.
• Para volver al menú o pantalla anteriormente
visualizado.
• Cuando aparezca la lista de archivos, presiónelo
para cambiar a la lista de carpetas. (MP3 / JPEG)
Para buscar un capítulo, título o tiempo.
• Para buscar pistas o archivos.
• Para buscar el tiempo. (CD / MP3)
• Para buscar los grupos. (MP3 / JPEG)
• Para llamar el menú de ajustes de DVD.
• Para llamar el menú de ajustes de DVD.
• Para saltar capítulos o titulo.
• Para saltar pistas o archivos.
• Cuando aparezca la lista de archivos /
carpetas, presiónelo para cambiar de una
página a otra. (MP3 / JPEG)
espera. (Para apagar completamente la unidad,
debe desconectar el cable de alimentacion de CA.)
• Para encender o para pasar la unidad al modo de
espera. (Para apagar completamente la unidad,
debe desconectar el cable de alimentacion de CA.)
• Para parar la reproducción.
• Para parar la reproducción.
• Para seleccionar el idioma de subtítulos de un disco.
------
• Para visualizar el menú de títulos de un disco.
------
• Para ampliar la imagen de vídeo en DVD.
(x2, x3, x4, x1/2, x1/3, x1/4)
• Para ampliar la imagen de vídeo en DVD. (JPEG)
(x2, x3, x4, x1/2, x1/3, x1/4)
Disco
Botón
(Orden alfabético))
* Pilas no provistas.
E6MY3UD̲E6MY3UH̲MDV3300̲F7̲EN̲v1.indd 20
E6MY3UD̲E6MY3UH̲MDV3300̲F7̲EN̲v1.indd 20
2012/01/30 17:44:56
2012/01/30 17:44:56


