


– 18 –
EN
DV
D
FU
NCTI
ON
S
Others Setting
E
Follow steps 1 to 2 on page 15.
Note:
HDMI:
• You cannot select the
video resolutions which
are not supported by the
connected TV, except
when this unit’s HDMI
OUT jack is connected to
a DVI compatible display
devices with an HDMI-DVI
cable (default is 480p in
such case).
• Video and audio signals
may be distorted
temporarily when
switching to / from the
HDMI output mode.
Resolution:
• Auto:
HDMI video resolution will
be selected automatically
depending on the
connected HDMI device.
If you want to change the
resolution manually, press
[HDMI]
repeatedly.
• When you make a
selection, the TV monitor
temporarily goes blank
and then comes back
again. If it does not, press
[HDMI]
to change the
resolution or press and
hold
[PLAY
B
]
on the
front panel for 5 seconds
to change the setting back
to its default.
HDMI Audio:
• This feature is available
only when the display
device is connected by an
HDMI cable.
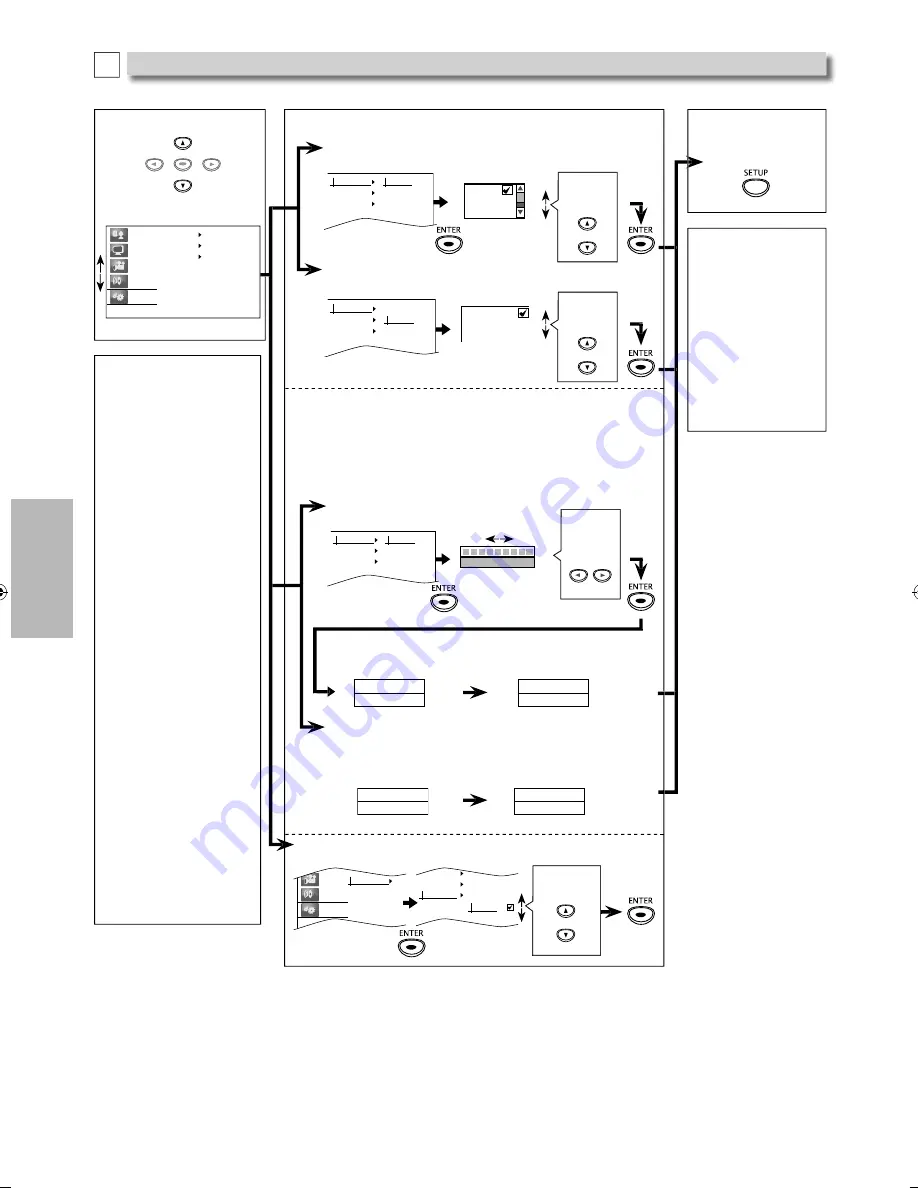
3
Select the desired item.
Language
Display
Video
Audio
Others
HDMI
Parental
Initialize
Others menu
ENTER
Initialize:
Reset to default setting.
Video
Audio
Others
Parental
Initialize
Yes
No
HDMI
Parental
Initialize
Select “Yes”
5
To exit “HDMI” or
“Parental” menu
Note:
Parental:
• If you forget the
password, press
[4]
,
[7]
,
[3]
,
[7]
at step
3 above, then enter
your new password.
Initialize:
• When you do not
wish to initialize, press
[SETUP]
to exit the
menu at step 4.
• The setting for “Paren-
tal” will not be reset.
4
HDMI:
Resolution: (Default: Auto)
You can select the desired “Resolution” among the settings.
HDMI
Parental
Initialize
Resolution
HDMI Audio
Auto
480p
720p
Select the
desired
setting.
HDMI Audio: (Default: Bitstream)
Sets the audio format for the sound output from the HDMI OUT.
HDMI
Parental
Initialize
Resolution
HDMI Audio
Bitstream
LPCM
Off
Select the
desired
setting.
Parental:
Parental level allows you to set the rating levels of your DVD.
Playback will stop if the ratings exceed the levels you set.
*
1
If you have set a password already, “Enter your PIN” will be
displayed and enter the current 4-digit password.
*
2
If you have set a password already, enter your new PIN after
entering the current password.
Rating Level: (Default: 8[Adult])
Sets the rating level for the disc playback.
HDMI
Parental
Initialize
Rating Level
New PIN
8[Adult]
Select the
desired
setting.
New PIN:
You can change your password for parental controls.
Enter New PIN
----
Enter your new 4-digit
password again.
Confirm PIN
----
Enter New PIN
----
Enter your new 4-digit
password again.
Confirm PIN
----
Enter your new
4-digit password
(except for 4737).
*
1
Enter your new
4-digit password.
*
1,2
E6MY3UD̲E6MY3UH̲MDV3300̲F7̲EN̲v1.indd 18
E6MY3UD̲E6MY3UH̲MDV3300̲F7̲EN̲v1.indd 18
2012/01/30 17:44:54
2012/01/30 17:44:54