background image

75

EN

EN

Recording

Playback

Basic Setup

Connections

Editing

Introduction

Function Setup

Others

Español

SPECIAL PLAYBACK

Note

•  When selecting a smaller factor than the current one, 

the zoom area will not be displayed.

•  To exit the zoom menu, press

[RETURN]

repeatedly 

at step 3.

•  To cancel the zoom function, select “x1.0” using 

[

K

L

]

, then press

 [OK]

at step 3.

• When you zoom a picture during a slide show, the 

slide show will be put in the pause mode. Press 

[PLAY 

B

]

 to resume the slide show and the zoom 

function will be turned off.

1) During  playback, press [DISPLAY].

2) Use  [

{

 / 

{ B

] to select 

menu.

e.g.) DVD-video

1/   5

1/   5

DVD

0:01:00 / 1:23:45

Video

3) Use  [

K

 /

L

] to select a desired zoom factor to zoom,

then press [OK]. 

1/   5

1/   5

DVD

× 1.2
× 1.5
× 2.0

0:01:00 / 1:23:45

Video

Zoom menu will appear.
There are four options 
(x1.0, x1.2, x1.5 and x2.0), these are displayed 
excluding the current zoom rate.

Zoom area will be displayed.

4) Use  [

K

 /

L

 / 

{

 / 

{ B

] to select a desired zoom position,

then press [OK].

Zoom playback will start.

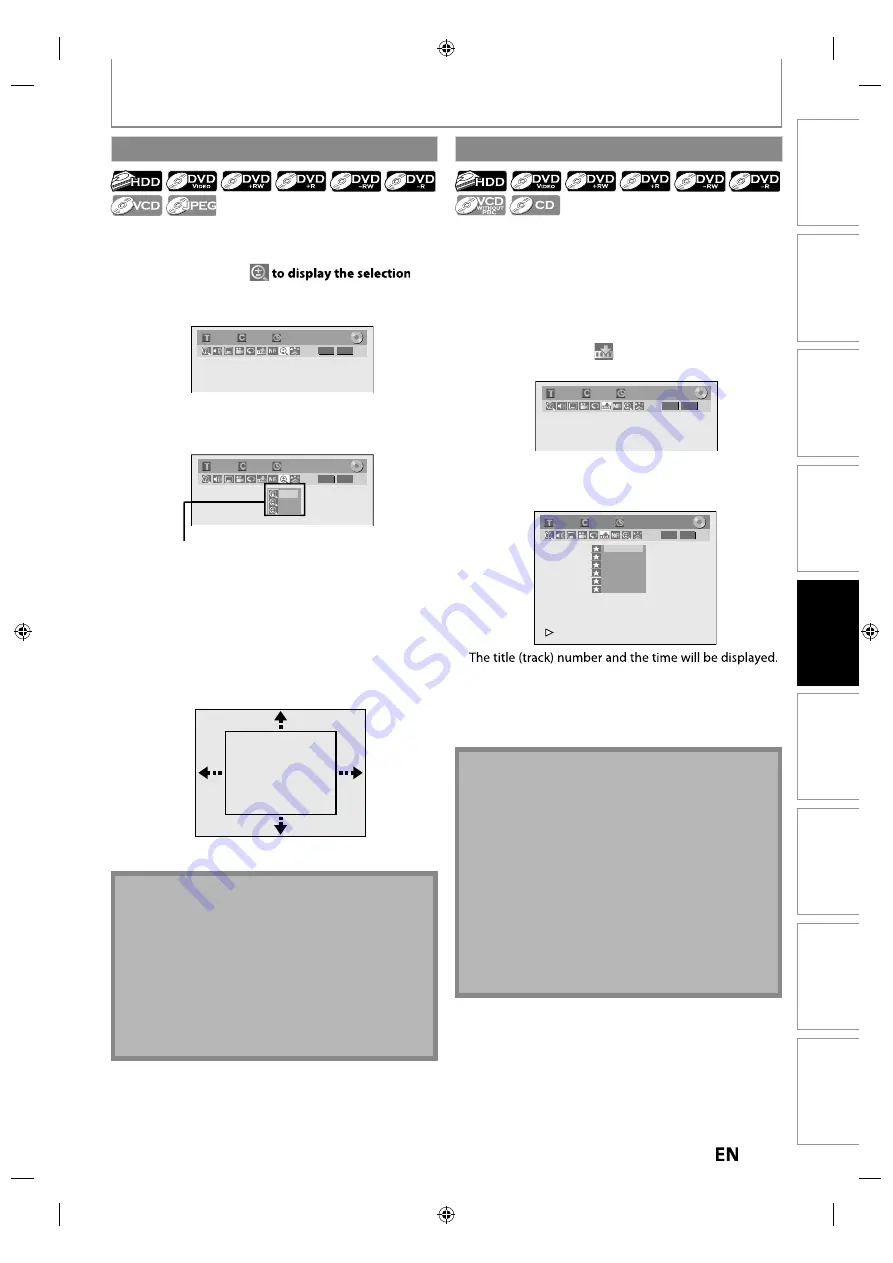
This feature allows you to assign a specific point on a title 
to be called back later.

1)    During  playback, press [DISPLAY] to bring up the 

display menu.

If the display menu is already shown, skip to step 2.

2) Use  [

{

 /

{ B

] to select 

to display the marker list.

e.g.) DVD-video

1/   5

1/   5

DVD

0:01:00 / 1:23:45

Video

3) Use  [

K

 /

L

] to select a desired marker number. 

When it reaches the desired point, press [OK].

1/   5

1/   5

DVD

---
---
---
---
---
---

1

2

3

4

5

6

0:01:00 / 1:23:45

Video

4) To return to the marker later:

Use [

K

 /

L

] to select the desired marker number, 

then press [OK].

Note

•  To clear a marker, select the marker number to be

cleared, then press 

[CLEAR]

.

•  All markers will be erased when you operate these

operations listed below.

– opening the disc tray (DVD/CD only)
– turning the unit to the standby mode (DVD/ CD only)
– make additional recording on the disc (DVD only)
– editing any title (DVD only)
– dividing the title (HDD only)
– deleting a scene of the title (HDD only)
•  You can mark up to 6 points.
• Marker setting is not available when you play back 

the video CD with PBC function.

Zoom

Marker Setting

E2S02UD̲MDR515H̲F7̲EN̲v1.indd   75

E2S02UD̲MDR515H̲F7̲EN̲v1.indd   75

2010/08/17   9:05:47

2010/08/17   9:05:47

Summary of Contents for MDR515H

Page 1: ... HAVE READ YOUR INSTRUCTIONS AND STILL NEED ASSISTANCE YOU MAY ACCESS OUR ONLINE HELP AT WWW MAGNAVOX COM SUPPORT OR WWW FUNAISERVICE COM OR CALL 1 800 605 8610 WHILE WITH YOUR PRODUCT Recording Playback Editing Introduction Connections Basic Setup Function Setup Others Español INSTRUCCIONES EN ESPAÑOL INCLUIDAS 2010 Funai Electric Co Ltd E2S02UD MDR515H F7 EN v1 indd 1 E2S02UD MDR515H F7 EN v1 in...

Page 2: ...F ELECTRIC SHOCK DO NOT OPEN The exclamation point within an equilateral triangle is intended to alert the user to the presence of important operating and maintenance servicing instructions in the literature accompanying the appliance The lightning flash with arrowhead symbol within an equilateral triangle is intended to alert the user to the presence of uninsulated dangerous voltage within the pr...

Page 3: ...not install the unit in direct sunlight near strong magnetic fields or in a place subject to dust or strong vibration Avoid a place with drastic temperature changes Install the unit in a horizontal and stable position Do not place anything directly on top or bottom of the unit Depending on your external devices noise or disturbance of the picture and or sound may be generated if the unit is placed...

Page 4: ...iscs so that fingerprints and dust do not adhere to the surfaces of the discs Always store the disc in its protective case when it is not used HDD handling g HDD is a precision apparatus that is susceptible to vibration strong impact or dirt Depending on the installation environment or handling the unit may become partially damaged or in the worst case recording or replaying may not be available E...

Page 5: ...ranting by implication or otherwise any license or right to use any of the trademarks displayed herein Misuse of any trademarks or any other content in this manual is strictly prohibited Funai shall aggressively enforce its intellectual property rights to the fullest extent of the law Trademark Information Kodak and KODAK Picture CD Compatible are trademarks of Kodak used under license Manufacture...

Page 6: ... in this Owner s Manual 9 FUNCTIONAL OVERVIEW 10 Front Panel 10 Rear Panel 11 Remote Control 12 Front Panel Display 14 Connections CONNECTION 15 Antenna Connection Required 15 Overview 15 Connecting to a TV Using Audio Video jacks 16 Connecting to a TV Using the S Video Out jack 16 Connecting to a TV Using Component Video Out jacks 17 Connecting to a TV with an HDMI Compatible Port 17 Connecting t...

Page 7: ...udio Soundtrack k 80 Switching Virtual Surround System 81 Switching Camera Angles 81 Reducing Block Noise 81 Editing INFORMATION ON EDITING 82 Guide to a Title List 82 Edit Menu 83 How to Access the Edit Menu 83 EDITING 84 Deleting a Title 84 Deleting Selected Titles 86 Putting Names on Titles 87 Chapter Marks Add 88 Chapter Marks Delete 89 Chapter Marks Delete All 90 Dividing a Title 91 Deleting ...

Page 8: ...ing cases the unit will detect it and automatically record to the HDD even when DVD is selected as the recording media If there is no recordable disc in the unit If the disc does not have enough space to complete the recording If the material is copy once program and prohibited to be recorded on a DVD If the disc is not available because the repairing process is canceled halfway This feature is av...

Page 9: ...tem Unlike conventional interlace scanning the progressive scan system provides less flickering and images in higher resolution than that of traditional television signals HDMI High Definition Multimedia Interface You can enjoy clearer audio video output when connecting this unit to a display device with an HDMI compatible port Others Symbols Used in this Owner s Manual To specify for which media ...

Page 10: ...r resume playback 9 IRECORD button Press once to start a recording Press repeatedly to start one touch timer recording 10 CHANNEL buttons Press to change the channel up and down 11 DV IN jack L3 Use to connect the DV output of external device with a DV cable 12 AUDIO input jacks L2 Use to connect external device with an RCA audio cable 13 VIDEO input jack L2 Use to connect external device with an ...

Page 11: ...e 7 S VIDEO OUT jack Use to connect the S video input of a TV monitor AV receiver or other device with an S video cable 8 COMPONENT VIDEO OUTPUT jacks Use to connect a TV monitor with component video inputs with a component video cable 9 AUDIO OUT jacks Use to connect a TV monitor AV receiver or other device with an RCA audio cable 10 S VIDEO IN jack L1 Use to connect the S video output of externa...

Page 12: ...such as leakage and bursting Please observe the following Do not mix alkaline standard carbon zinc or rechargeable ni cad ni mh etc batteries Do not mix new and old batteries together Do not use different kinds of batteries together Although they may look similar different batteries may have different voltages Make sure that the and ends of each battery match the indications in the battery compart...

Page 13: ...ning of the current chapter track or file When playback is in pause press repeatedly to reverse the playback step by step 15 STOP C button Press to stop playback or recording Press to exit from the title list 16 PAUSE F button Press to pause playback or recording 17 REC button Press once to start a recording Press repeatedly to start the one touch timer recording 18 SOURCE button Press to select t...

Page 14: ...lay Flashes when a recording pauses Appears when a disc is in this unit DB Appears during dubbing HDD Appears when the unit is in HDD mode DVD Appears when the unit is in DVD mode 5 Displays the following Elapsed playback time Current title chapter track file number Recording time remaining time Clock Channel number Remaining time for one touch timer recording Selected HDMI output mode Appears whe...

Page 15: ...eive analog TV it should also work for DTV reception Outdoor or attic antennas will be more effective than set top versions ANTENNA OUT jack is for tuner pass through only HDD DVD playback through the RF is not possible Supplied cables used in this connection are as follows RF coaxial cable x 1 Please purchase the rest of the necessary cables at your local store If Your TV has Refer to If you are ...

Page 16: ...cable or This connection is for TV pass through only RF coaxial cable AUDIO IN L R VIDEO IN IN OUT ANTENNA AUDIOOUT L R VIDEO OUT rear of this unit RCA audio cable S video cable VHF UHF antenna cable TV company or ANT IN This connection is for TV pass through only RF coaxial cable RF coaxial cable S VIDEO IN AUDIO IN L R IN IN OUT VIDEO IN AUDIO IN L1 S VIDEO S VIDEO AUDIOOUT OUT L R VIDEO OUT Y A...

Page 17: ...deo audio signals without converting to analog signals No audio connection is required High Speed HDMI cable also known as HDMI category 2 cable is recommended for better compatibility Use an HDMI cable with the HDMI logo a certified HDMI cable for this connection IN OUT ANTENNA HDMI OUT HDMI IN rear of this unit VHF UHF antenna cable TV company or ANT IN This connection is for TV pass through onl...

Page 18: ...more information Note Some devices with an HDMI input may not operate properly with this unit When using an HDCP incompatible display device the image will not be viewed properly Among the devices that support HDMI some devices can control other devices via the HDMI connector this unit can be controlled by another device via the HDMI connector The audio signals from the HDMI connector including th...

Page 19: ...plied cables used in this connection are as follows RF coaxial cable x 1 RCA audio cable L R x 1 RCA video cable x 1 Please purchase the rest of the necessary cables at your local store IN VIDEO IN AUDIO IN L1 S VIDEO AUDIOOUT L R VIDEO OUT R L IN VIDEO IN AUDIO IN L1 S VIDEO AUDIOOUT L R VIDEO OUT R L ANT IN ANT OUT L R VIDEO OUT AUDIO OUT rear of this unit cable satellite box RCA video cable RCA...

Page 20: ...t your local store rear of your RF modulator not supplied IN IN OUT VIDEO IN AUDIO IN L1 S VIDEO S VIDEO AUDIOOUT OUT L R VIDEO OUT Y ANTENNA R L COAXIAL AUDIO IN TO TV ANT IN L R CHANNEL 4 3 VIDEO IN ANT IN Set channel 3 or 4 rear of this unit AUDIOOUT L R VIDEO OUT IN OUT ANTENNA Set channel 3 or 4 RF coaxial cable RF coaxial cable VHF UHF antenna RF coaxial cable cable TV company or RCA video c...

Page 21: ... IN AUDIO IN L1 S VIDEO S VIDEO AUDIOOUT OUT L R VIDEO OUT Y ANTENNA R L COAXIAL COAXIAL HDMI OUT AV receiver amplifier with an HDMI input jack HDMI IN HDMI cable IN IN OUT VIDEO IN AUDIO IN L1 S VIDEO S VIDEO AUDIOOUT OUT L R VIDEO OUT Y ANTENNA R L COAXIAL rear of this unit Dolby Digital PCM Stream PCM Stream 2 channel PCM Dolby Digital 2 channel PCM Dolby Digital LPCM 2 channel PCM Audio format...

Page 22: ... This is the correct viewing channel external input channel for the recorder For some TVs there may be a button on the TV s remote control that accesses the external input channel It may be labeled SOURCE AV or SELECT In such case press it repeatedly Refer to your TV s user manual for details If more than 10 minutes have passed since you have turned on the unit you may see the MAGNAVOX screen save...

Page 23: ... guide is displayed in more than 6 lines use K L to scroll No description provided is displayed when the program guide is not provided 2 59 44 3 31 31 10 42AM 10 10AM 7 10AM CH 10 7 6 5 4 4 4 4 4 3 4 4 2 4 4 1 1 Starting time of the autostart recording 2 Status of the time autostart recording Live Indicates when watching live TV B Indicates when playing back the autostart recording 3 The time that...

Page 24: ...ker Noise Reduction Zoom Surround 6 Indicates the current title number total number of titles the current chapter number total number of chapters and time lapse of the current title playback total duration of the title 7 Indicates the component in use HDD DVD BEFORE YOU START Title Name My Title File Name My File First track name will be displayed Track Name If you press DISPLAY one more time arti...

Page 25: ...bbing is available only when a recordable disc is loaded 7 DISC Playback Mode To set up the disc playback setting DISC Playback Mode is available only when an audio CD a video CD a CD RW R with MP3 JPEG KODAK Picture CD files is inserted into the unit General Setting Playback Display Video Recording Clock Channel HDMI Parental Lock Disc Audio Disc Menu Language Audio Language Subtitle Language Ang...

Page 26: ...only Allows you to select the display time of the slide show mode 10 Delete All Unprotected Titles Allows you to delete all unprotected titles in the HDD title list 11 Delete All Titles Allows you to delete all titles including the protected titles in the HDD title list 12 HDD DVD Allows you to dub from HDD to DVD 13 DVD HDD Allows you to dub from DVD to HDD Disc Edit Edit Disc Name Erase Disc Mak...

Page 27: ... disc to the disc tray guide 3 Press OPEN CLOSE A to close the disc tray It may take a while to load the disc data after the disc tray closes To eject the disc Press OPEN CLOSE A to open the disc tray then remove the disc before turning the unit to the standby mode When inserting a brand new DVD RW DVD RW the unit automatically starts to format If titles have been recorded on the disc the title li...

Page 28: ... analog TV and digital TV are automatically scanned and memorized Only the receivable channels in the area will be memorized Cable Analog When using basic cable The channels broadcasted in analog Cable TV are automatically scanned and memorized Cable Analog Digital When using basic cable The channels broadcasted in analog Cable TV and digital Cable TV are automatically scanned and memorized Auto P...

Page 29: ... type of broadcasting signal then press OK Auto Channel Preset Antenna Cable Analog Cable Analog Digital The unit will start getting channels available in your area When aerial antenna is connected select Antenna When connected to Cable TV select Cable Analog or Cable Analog Digital To cancel the auto channel preset during scanning Press RETURN to go the previous screen or MENU to cancel 5 When sc...

Page 30: ...Audio Select If you are adding or deleting analog TV Cable channels go to ANALOG to continue If you are deleting digital TV Cable channels go to DIGITAL to continue CHANNEL SETTING You may want to add or delete TV channels if your channel lineup changes or if you no longer watch some channels Adding a channel is only available for the analog TV channels Make sure You perform the Auto Channel Scan ...

Page 31: ...elect the channel number to delete Only the major channel is displayed in Manual Channel Preset menu The channel number displayed in the parenthesis is a virtual channel number Use CHANNEL to cycle through only the memorized channels You cannot use B for the digital TV channel selection Use the Number buttons to select a channel directly When a memorized channel is selected Add is checked and high...

Page 32: ...g Auto Clock Setting Cable TV only 1 Press MENU and use K L to select General Setting then press OK General Setting menu will appear 2 Use K L to select Clock then press OK Clock menu will appear 3 Use K L to select Auto Clock Setting then press OK 4 Use K L to select Auto then press OK Auto Clock Setting OFF Auto Manual 5 Press MENU to exit 6 Press STANDBY ON y y to turn the unit to the standby m...

Page 33: ... K L to select Clock then press OK Clock menu will appear 3 Use K L to select Auto Clock Setting then press OK 4 Use K L to select Manual then press OK Auto Clock Setting OFF Auto Manual Enable Manual operation to select the DTV Channel for receiving the Clock Data and selecting your Time Zone below 5 Press to highlight CH Press K L to select DTV then press B Set Channel No DTV 1 6 Use the Number ...

Page 34: ...K General Setting menu will appear 2 Use K L to select Clock then press OK Clock menu will appear 3 Use K L to select Clock Setting then press OK 4 Use K L to select calendar or time then press OK Clock Setting JAN 01 2010 FRI 12 00 AM 5 Use B to select an item to set and use K L to select the contents to suit your preference then press OK when you finish setting all the contents Clock Setting JAN...

Page 35: ...nnel Select channels by using CHANNEL or the Number buttons found on remote control CHANNEL Use CHANNEL to change the channel the Number buttons Press the channel number with the Number buttons to select a channel you want to watch Analog TV Channels Enter the channel number with the Number buttons to select a channel you want to watch For 1 digit number e g 2 ch 0 2 2 or 2 leave it for 2 seconds ...

Page 36: ...ital TV broadcasting the audio language you have selected will be recorded Note You cannot change the audio language for the recording of digital TV broadcasting Pressing AUDIO does not control external device audio When there is only one audio channel on the broadcast pressing AUDIO does not display anything TUNER SETTINGS Selecting TV Audio This section describes how to switch the TV audio When ...

Page 37: ...eo SAP Stereo Outputs main audio SAP secondary audio program Outputs sub audio 5 Press MENU to exit Note on recording analog TV audio When you record an analog TV program available in second audio or stereo you have to select either Stereo or SAP in General Setting menu beforehand Refer to the following table to check an appropriate setting Selected audio Broadcast audio Disc recording Audio outpu...

Page 38: ...e K L to select Caption Service then press OK DTV CC Caption Service Recording 5 Use K L to the desired DTV closed caption then press OK Caption Service OFF Service1 Service2 Service3 Service4 Service5 Service6 OFF Select if you do not want DTV CC This is the default Service 1 to Service 6 Select one of these before changing any other item in the closed caption menu Choose Service 1 under normal c...

Page 39: ...C Style then press OK Language Screen Saver FL Dimmer DTV CC CC Style V Chip 4 Use K L to select User Setting then press OK CC Style User Setting Font Size Font Style Font Opacity Font Color Edge Type Edge Color Back Opacity Back Color 5 Use K L to select ON then press OK User Setting ON OFF TUNER SETTINGS Digital TV can also change the style of its closed caption such as font color or size etc In...

Page 40: ... Translucent Flash Font Color Font color of the displayed caption can be switched as below Font Color White Black Red Green Blue Yellow Magenta Cyan Edge Type Edge type of the displayed caption can be switched as below Edge Type None Raised Depressed Uniform L Shadow R Shadow Edge Color Edge color of the displayed caption can be switched as below Edge Color White Black Red Green Blue Yellow Magent...

Page 41: ...8x 16x SONY DVD R 4x 8x 16x DVD RW 4x TDK DVD R 4x 8x 16x Performance of any other discs are not guaranteed You can play back DVD RW on most DVD players without finalizing However if you have added or deleted chapters or made chapters hidden you must perform Make Edits Compatible before being able to see those effects on other units Refer to page 99 for more details To play back discs other than D...

Page 42: ...creen You cannot record a copy protected program using this unit Copy protected signal is included in DVD video some satellite and cable broadcasts You cannot record copy once only program s on DVD Recording Mode INFORMATION ON RECORDING HDD is a special device which has high recording density and is suited for long time recording or high speed cueing but by contrast has many factors which can cau...

Page 43: ...nu will appear 2 Use K L to select Recording then press OK Recording menu will appear 3 Use K L to select Auto Chapter then press OK 4 Use K L to select a desired time option then press OK Auto Chapter OFF 5 minutes 10 minutes 15 minutes 30 minutes 60 minutes 5 Press MENU to exit Note The interval for auto chapter may be up to two minutes different from the time option you set A blank chapter may ...

Page 44: ...s recording or when there is a timer program which starts in 15 minutes If titles have been recorded on the disc the title list is displayed Press STOP C to exit the title list 2 Press REC MODE repeatedly to select a recording mode Refer to Recording Mode on page 42 DVD SP 2Hr 0h58m 3 Select the appropriate external input channel by pressing SOURCE or CHANNEL Press DTV TV to select analog TV or di...

Page 45: ...Yes or if you do not reply in 1 minute Note When you press REC recording starts immediately and continues until the HDD or disc is full record 12 hours to HDD or you stop recording This unit cannot record images as aspect ratio of 16 9 The 16 9 images will be recorded as 4 3 When the unit clock has not been set the space for a date and time of title names will be blank When you record a TV program...

Page 46: ...ds 6 hours earliest recording will be overwritten Note In the autostart recording when you display the DTV program information the information will be recorded as the part of the picture If there is not enough recordable space on HDD to record from the selected point to current point you cannot record the content of autostart recording When you record the content of the autostart recording the rec...

Page 47: ...thin a month in advance Daily or weekly program recordings are also available Before recording make sure Set the clock before setting a timer programming If you are recording to a disc insert a recordable disc with enough recordable space Guide to Timer Programming Display Timer Programming 1 1 SP 1 00 FEB 05 10 10 30 AM 69 1 SP Skip Date Start End CH FEB 05 10 30AM 11 30AM DTV69 1 New Program THU...

Page 48: ...vailable for one program in the timer program list Alternate recording DVD only In the following cases the unit will detect it and automatically record to the HDD even when DVD is selected as the recording media If there is no recordable disc in the unit If the disc does not have enough space to complete the recording If the material is copy once program and prohibited to be recorded on a DVD If t...

Page 49: ...B To correct the timer program 1 Use K L to select the program you want to correct then press OK 2 Use K L to select Program Change then press OK 3 Correct the timer program by using K L B then press OK 4 Press TIMER PROG to exit 1 Press STOP C on the remote control 2 Confirmation message will appear Select Yes then press OK To stop the timer recording immediately press C STOP on the unit To stop ...

Page 50: ...lready 49 titles recorded E44 Already 254 chapters recorded E45 Copy prohibited program E46 It is impossible to record additionally on a disc recorded by other units when setting Make Recording Compatible to OFF E47 Already 600 titles recorded on the HDD E49 There was no disc space on the HDD at the starting time for the HDD timer recording E50 HDD recording is canceled due to the insufficiency of...

Page 51: ... the setting will not be accepted and be cleared for redoing If the starting time is earlier and the ending time is later than the current time the recording will start right after you press OK at step 8 on page 48 You cannot change the audio language for the timer recording of digital TV broadcasting Timer recording whose recording time exceeds 12 hours cannot be made It is prohibited to turn the...

Page 52: ...ts running 8 Press STOP C to stop recording Title name is also overwritten This operation may take a while to be completed You can overwrite the existing title from the selected position 1 Follow the steps 1 2 and 4 on the left 2 Use K L to select Play then press OK Playback will start 3 Press PAUSE F at the point from which you want to start overwriting 4 Press REC FI DVD display menu channel and...

Page 53: ...nning of the title overwrite recording A existing title B after overwriting When overwriting in the middle of the title 30 180 seconds will be cut off 30 180 seconds will be cut off overwrite recording A existing title B after overwriting overwrite recording A existing title B existing title C after overwriting title name A title name A title name B title name A title name C title name B title nam...

Page 54: ...playback picture of the title being dubbed the audio cannot be changed During high speed dubbing however the playback picture will not appear Dubbing of a copy once only program is not possible with this unit If you stop the dubbing halfway the contents will be dubbed up to the point where you stop the dubbing except for the high speed dubbing With high speed dubbing nothing will be dubbed if you ...

Page 55: ... the external device properly to the unit by using either L2 and L3 Front or L1 Rear input jacks When connecting an external device of monaural output to this unit use AUDIO L jack of L2 Front or L1 Rear Use S video or the RCA audio video cables for this connection When connecting a DVC digital video camcorder use DV IN jack of L3 Front Supplied cables used in this connection are as follows RCA au...

Page 56: ... you are connecting the digital video camcorder to the DV IN jack of this unit refer to pages 57 59 You can also select L1 or L2 channel by using the Number buttons e g For L1 press 0 0 1 3 Press REC MODE repeatedly to select a recording mode Refer to Recording Mode on page 42 4 Press IRECORD on the unit to start recording 5 Start playback on the external device to record from 6 Press CSTOP on the...

Page 57: ...tion When the unit is ready for dubbing Start Rec will appear When the unit is dubbing Pause Rec will appear 5 Channel position When you select L3 DV IN by using SOURCE or CHANNEL L3 DV IN will appear L3 DV IN AB 1234 0 12 34 1 1 1 1 RW Control DVD DV Audio Stereo1 Start Rec L3 DV IN AB 1234 0 12 34 1 1 1 1 RW DVD SP 2Hr 1h00m DVD SP 2Hr 1h00m 2 3 1 4 5 6 7 what mode of DVC Switch the mode on the ...

Page 58: ...3 DV IN 2 Press REC MODE repeatedly to select a recording mode Refer to page 42 3 Press DISPLAY 4 Press OK to display the item selection Use K L to select DV Input then press OK L3 DV IN AB 1234 0 12 34 1 1 1 1 RW DVD DV Input DVD HQ 1Hr 1h00m 5 Press PLAY B to find where you wish to start dubbing Then press STOP C where you wish to start dubbing Before recording from DVC see page 55 for connectio...

Page 59: ...en The recording will resume when the unit detects the video signal again When the DVC is in camera mode refer to Guide to DV and On Screen Display on page 57 Date time and cassette memory data will not be recorded Pictures with a copy guard signal cannot be recorded A DV terminal is a terminal that can use the transmission mode conforming to the IEEE 1394 standards called Fire Wire It serves as t...

Page 60: ... HDD Use K L to select DVD HDD then press OK e g HDD DVD HDD DVD DVD HDD Dubbing 4 Use K L to select Add then press OK HDD DVD 1 1 3000 MB Dubbing List Add Delete All Dubbing Start If you have registered any dubbing before they will be listed in the dubbing list 5 Use K L s B to select a desired title then press OK At the upper left of each title the number will appear in the order of selection DU...

Page 61: ... the dubbing direction the available recording mode varies When dubbing from HDD to DVD you can select High to perform the high speed dubbing refer to Recording Mode for Dubbing on page 54 for more details 9 Use K L to select Yes then press OK Start Dubbing Yes No Dubbing will start It may take awhile to prepare for the dubbing To stop the dubbing in progress Press CSTOP on the front panel Press S...

Page 62: ... Titles Dubbing 4 Use K L to select Yes then press OK Start Dubbing Yes No Dubbing of the selected title will start To stop the dubbing in progress Press CSTOP on the front panel Press STOP C for 2 seconds on the remote control DUBBING This function lets you select one specific title from the title list for dubbing One Title Dubbing HDD to DVD only E2S02UD MDR515H F7 EN v1 indd 62 E2S02UD MDR515H ...

Page 63: ...rotected This operation may take a while to be completed To prevent accidental recording editing or erasing of the titles you can protect them from the Disc Edit menu Note To cancel the disc protection When you insert a disc protected with this unit Disc Protect ON OFF will appear instead of OFF ON at step 3 Disc Edit Edit Disc Name Erase Disc Make Edits Compatible Disc Protect ON OFF To release t...

Page 64: ...mpleted 5 Finalizing is completed You will need to finalize DVD R DVD RW or DVD R to play them back on other DVD players Finalizing may take several minutes up to an hour A shorter recording period on the disc will require a longer time period for finalization Do not unplug the power cord during finalization Note Once you started finalization no controls are available You cannot cancel or stop the...

Page 65: ...t Disc Full or End of Timer Rec then press OK Auto Finalize Disc Full End of Timer Rec 5 Use K L to select ON then press OK e g Disc Full Disc Full ON OFF Your setting will be activated 6 Press MENU to exit You can finalize discs automatically using this function You can use this function to finalize discs after finishing timer recordings and at the end of the disc space Note This function is not ...

Page 66: ...t on your DVD If these region symbols do not appear on your DVD you cannot play back the DVD in this unit The number inside the globe refers to region of the world A DVD labeled for a specific region can only play back on the unit with the same region code Region Codes Logos Playable discs Media Playable files MP3 CD RW R JPEG CD DA audio CD video CD CD RW CD R DVD video DVD RW DVD R DVD RW Finali...

Page 67: ...tion temporarily to perform those operations by following the instruction below 1 Press MENU 2 Use K L to select DISC Playback Mode then press OK DISC Playback Mode menu will appear 3 Use K L to select PBC Video CD only then press OK 4 Use K L to select ON or OFF then press OK Your setting will be activated You can play back interactive software using menu screens Refer to instructions in the vide...

Page 68: ...2 Press PLAY B to start playback If you are playing back a DVD video or video CD with PBC function a menu may appear Refer to Using the Title Disc Menu on page 72 3 Press STOP C once to stop playback temporarily Refer to Resume Playback on page 73 Note Some discs may start playback automatically You can select images or information on the menu screen by activating PBC playback control function pag...

Page 69: ...LE 3 Use K L s B to select a desired title then press OK HDD title list Title List 1 6 JAN 4 10 12 00AM CH10 SP 12 00AM 1 00 00 MON JAN 4 10 CH10 SP 1 4 5 6 2 3 DVD title list 1 SP 2Hr 2 3 NOV 21 10 11 00AM CH12 SP SUN NOV 21 10 0 20 44 NOV 22 10 11 35AM CH13 EP MON NOV 22 10 0 10 33 EMPTY SPACE 1 37 52 SP 2Hr For video CD when PBC Video CD only in the DISC playback Mode menu is set to ON the vide...

Page 70: ...c DVD RW Total Titles 3 Disc Space Used 0 30 48 Disc Protect OFF Make Edits Compatible Needed e g DVD R No Disc Name Disc DVD R Total Titles 5 Disc Space Used 1 30 48 Disc Protect OFF Finalize Finalized 1 Disc name Default No Disc Name 2 Disc type DVD RW DVD R DVD RW DVD R 3 Total number of title include EMPTY SPACE 4 Total time of recorded disc space 5 Status of disc protection ON is protected di...

Page 71: ...select a desired folder or track file then press OK e g File list File List DISC NAME 1 2 Folder1 Folder2 JPEG file1 JPEG file2 JPEG file3 JPEG file4 JPEG file5 JPEG file6 When selecting track file Playback will start When selecting the folder Not available for audio CD The files in the folder will appear Use K L to select the file or folder you want to play back then press OK Press PLAY B OK or B...

Page 72: ...107 KODAK Picture CD The Picture CD is a service to convert photographs taken by a conventional film camera into digital data and write the data on a CD You can enjoy picture images on the TV set by playing back the Picture CDs For details of KODAK Picture CD contact a shop that provides developing service of Kodak Inc 1 Press TITLE Picture CD 1 2 4 5 6 1 2 3 Image 1 To exit the Picture CD thumbna...

Page 73: ...approx speed 2x 20x 40x reverse approx speed 5x 20x 40x 1 During playback press D or E Every time you press D or E approximate speed will be changed as follows Fast forward or fast reverse playback across titles for HDD DVD or files for MP3 is not possible 20x normal speed playback 2x 20x 5x 40x 40x For video CD approximate forward reverse speeds are 2x 8x 16x For audio CD MP3 files approximate sp...

Page 74: ...f the title you are recording will start from the beginning Elapsed playback time will be displayed in the front panel display 2 Press STOP C once to stop the playback The front panel display will switch back to show the elapsed recording time If you press STOP C twice it will stop the recording With regard to HDD you can continue recording a program while playing back another title To do so press...

Page 75: ...ayback will start This feature allows you to assign a specific point on a title to be called back later 1 During playback press DISPLAY to bring up the display menu If the display menu is already shown skip to step 2 2 Use B to select to display the marker list e g DVD video 1 5 1 5 DVD 0 01 00 1 23 45 Video 3 Use K L to select a desired marker number When it reaches the desired point press OK 1 5...

Page 76: ...edly Group MP3 JPEG files only The current folder will be played back repeatedly You can play back a disc randomly instead of playing back in the original order 1 Press MENU 2 Use K L to select DISC Playback Mode then press OK DISC Playback Mode menu will appear For MP3 use K L to select Music then press OK For JPEG use K L to select Photo then press OK 3 Use K L to select Random Play then press O...

Page 77: ...E F TV program will be paused and sound will be muted 2 Press PLAY B to resume the TV program you were watching from where you have paused To rewind or fast forward the TV program When watching TV program through this unit s tuner press H E REPLAY G D or SKIP While playing back the autostart recording pressing H or G skips playback point 5 minutes backward or forward To go back to the specific tim...

Page 78: ...of the current track file press H Press it repeatedly to go to the previous track file The track file will move backward one at a time For JPEG files press it once to go to the previous file Note During CD playback you can enter a track number directly using the Number buttons for track search without displaying the menu Track search using DISPLAY is not available when you play back the video CD w...

Page 79: ... be highlighted To move to the number next to press B When time search is not available and time counter are not displayed 3 Use K L B or the Number buttons to enter a desired time to search then press OK After the search playback will start automatically Note Time search is available only in the same track file or title Time search is not available when you play back the video CD with PBC functio...

Page 80: ...k a DVD video recorded with 2 or more soundtracks these are often in different languages you can switch them during playback When playing back video CD audio CD you can switch L R stereo L left or R right 1 During playback press DISPLAY then proceed to step 2 or press AUDIO then proceed to step 3 If the display menu is already shown skip to step 2 2 Use B to select to display the selection menu 3 ...

Page 81: ...sc contains multi angle scenes 1 During playback press DISPLAY 2 Use B to select then press OK e g DVD video 1 5 1 5 DVD 0 01 00 1 23 45 Video Angle icon appears when a switching camera angle is available Angle will switch each time you press OK This function reduces noise in the playback picture 1 During playback press DISPLAY 2 Use B to select to display the selection menu e g DVD video 1 5 1 5 ...

Page 82: ...d here 10 Capacity indicator Indicating the position and the amount of each title in the disc The portion for the selected title is highlighted It may not indicate the precise capacity of the disc If the duration of a title is too short it may not be reflected in the capacity indicator 11 Index pictures A cut from the recorded content is displayed here 12 Submenu Submenus for the selected menu are...

Page 83: ... 10 11 00AM CH12 SP SUN NOV 21 10 0 20 44 NOV 22 10 11 35AM CH13 EP MON NOV 22 10 0 10 33 EMPTY SPACE 1 37 52 SP 2Hr SP 2Hr 3 Use K L to select Edit then press OK 1 2 3 NOV 21 10 11 00AM CH12 SP SUN NOV 21 10 0 20 44 Overwrite NOV 22 10 11 35AM CH13 EP MON NOV 22 10 0 10 33 EMPTY SPACE 1 37 52 SP 2Hr SP 2Hr Edit Play Edit Title Delete Edit Title Name Chapter Mark Index Picture Title Dividing Hide ...

Page 84: ...EP MON NOV 22 10 0 10 33 EMPTY SPACE 1 37 52 SP 2Hr SP 2Hr 3 Use K L to select Edit then press OK 1 2 3 NOV 21 10 11 00AM CH12 SP SUN NOV 21 10 0 20 44 Overwrite NOV 22 10 11 35AM CH13 EP MON NOV 22 10 0 10 33 EMPTY SPACE 1 37 52 SP 2Hr SP 2Hr Edit Play Note For DVD RW DVD RW the available disc space will increase only when the last recorded title in the title list is deleted For DVD R DVD R the d...

Page 85: ...tle Name Chapter Mark Index Picture Title Dividing Hide Chapter NOV 21 10 11 00AM CH12 SP 1 1 05 00 Confirmation message will appear 5 Use K L to select Yes then press OK The title is now deleted Title List 1 1 Title 2 12 00AM 1 00 00 MON JAN 4 10 CH10 SP 1 4 5 2 3 1 2 3 EMPTY SPACE 0 21 14 SP 2Hr NOV 22 10 11 35AM CH13 EP MON NOV 22 10 0 10 33 EMPTY SPACE 1 37 52 SP 2Hr SP 2Hr E2S02UD MDR515H F7 ...

Page 86: ...ow deleted Title List 1 1 Title 1 12 00AM 1 00 00 MON JAN 4 10 CH10 SP 1 4 2 3 To remove the trash mark from the title Select the title with the trash mark then press OK You can delete titles which you do not need anymore Please be advised that the titles once deleted cannot be brought back 1 Press HDD then press TITLE 2 Use K L B to select any title then press OK Title List 1 1 Title 1 12 00AM 1 ...

Page 87: ...tomatically Press to to go back to the previous character set To delete letters press CLEAR repeatedly Holding CLEAR will delete all letters Use s B to move the cursor to the left and right You can enter up to 30 letters Note Undefined letters in a title name are shown by If you delete them adjoining letters may change to or other character Press the corresponding number key repeatedly to choose t...

Page 88: ...ation may take a while to be completed You can put chapter marks in each title Once a chapter is marked you can use it for the chapter search feature Note for adding or deleting chapter marks Maximum number of chapter marks in a title is 99 for HDD DVD and the maximum number of chapter marks in total is no limit for HDD 254 for DVD If the number of the chapter marks exceed the limit you cannot add...

Page 89: ...Add NOV 21 10 11 00AM CH12 SP 1 Chapter 2 3 Edit Chapter Mark 1 05 00 4 Use K L to select Delete then press OK 5 Use K L to select Yes then press OK Edit Chapter Mark Delete No Yes NOV 21 10 11 00AM CH12 SP 1 Chapter 1 2 F 1 05 00 The selected chapter mark is now deleted To delete more chapter marks repeat steps 3 to 5 6 Press RETURN once or repeatedly to go back to the title list For DVD the data...

Page 90: ...er Mark Delete All No Yes NOV 21 10 11 00AM CH12 SP 1 Chapter 2 3 F 1 05 00 All chapter marks are now deleted Chapter 1 1 Edit Chapter Mark NOV 21 10 11 00AM CH12 SP 1 Delete Delete All Add 1 05 00 5 Press RETURN once or repeatedly to go back to the title list Data will be written onto the disc momentarily This operation may take a while to be completed Chapter Marks Delete All E2S02UD MDR515H F7 ...

Page 91: ...ically Title name s of the divided titles are identical and index pictures are reset to the first scene at this point You can divide one title into 2 new titles Note If an internal HDD or a DVD contains the maximum number of titles HDD 600 DVD RW RW 49 you cannot divide any titles With DVD RW RW you cannot divide the titles if the total number of chapters has already reached 254 When you search fo...

Page 92: ... automatically moves to End 4 Play back the title up to the point where you want to set an end point then press OK At the end of a title playback will be in pause mode Press PLAY B to resume playback from the beginning of the title Edit Scene Delete Start End Preview Delete JAN 4 10 12 00AM CH10 LP 1 1 30 00 End point is now set and the highlight automatically moves to Preview The portion for dele...

Page 93: ...o Start or End and try setting them again If you are satisfied with the result proceed to step 6 Before editing Edited start point end point 6 Use K L to select Delete then press OK Edit Scene Delete Start End Preview Delete JAN 4 10 12 00AM CH10 LP 1 1 30 00 7 Use K L to select Yes then press OK Edit Scene Delete Yes No JAN 4 10 12 00AM CH10 LP 1 1 30 00 The selected scene is now deleted 8 Press ...

Page 94: ...N 1 10 12 00AM CH10 LP 1 1 30 00 The title is now protected If the title is already protected ON OFF will appear instead Press OK to release the title from protection The protected title will be marked with icon 4 Press RETURN once or repeatedly to go back to the title list To prevent the accidental editing or erasing of the titles you can protect them using the Edit menu Protecting a Title E2S02U...

Page 95: ...on may take a while to be completed If you want hidden chapters to be Visible select the chapter to be shown Then use K L to select Visible at step 4 on page 95 Data will be written onto the disc momentarily After the data is written the title list is displayed Note Hidden will be displayed in the preview window while previewing the hidden chapter When you make all chapters in the title Hidden Hid...

Page 96: ...is now set 5 Press RETURN once or repeatedly to go back to the title list Data will be written onto the disc momentarily This operation may take a while to be completed Note If the selected picture for an index picture is overwritten the index picture is reset to the first scene of the title When you search for the point at step 2 you can also use the special playback functions such as G D etc You...

Page 97: ... RW Total Titles 3 Disc Space Used 0 30 48 Disc Protect OFF Make Edits Compatible Needed 4 To enter a disc name follow the steps of Guide to Edit Title Name on page 87 When you finish entering a title name press OK 5 Use K L to select Yes then press OK Data will be written onto the disc momentarily This operation may take a while to be completed The disc name is now updated Note You cannot select ...

Page 98: ...rotect OFF ON 4 Use K L to select Yes then press OK When you press Yes all the contents in the disc will be erased Are you sure to erase the disc Yes No momentarily This operation may take a while to be completed You can erase all titles on a disc Note When you select Yes at step 4 all contents of the disc will be erased Erasing Disc E2S02UD MDR515H F7 EN v1 indd 98 E2S02UD MDR515H F7 EN v1 indd 9...

Page 99: ... Erase Disc Make Edits Compatible Disc Protect OFF ON 4 Use K L to select Yes then press OK Activate the Make Edits Compatible Yes No Data will be written onto the disc momentarily This operation may take a while to be completed If you have added or deleted chapters or made chapters hidden you must perform Make Edits Compatible to see those effects on another unit Making Edits Compatible E2S02UD M...

Page 100: ...otected Titles to delete only unprotected titles Select Delete All Titles to delete all titles including protected titles Delete All Unprotected Titles Delete All Titles HDD Menu 4 Use K L to select Yes then press OK Delete entire titles Yes No All titles are now deleted Deleting All Titles in HDD E2S02UD MDR515H F7 EN v1 indd 100 E2S02UD MDR515H F7 EN v1 indd 100 2010 08 17 9 06 25 2010 08 17 9 0...

Page 101: ... Icon ON OFF Set whether or not to display the angle icon Still Mode Auto Field Frame Set the type of still image in pausing playback Variable Skip Replay Variable Skip 5 seconds 15 seconds 30 seconds 1 minute 5 minutes Set the amount of skip time when you press SKIP Variable Replay 5 seconds 15 seconds 30 seconds 1 minute 5 minutes Set the amount of rewind time when you press REPLAY Display pages...

Page 102: ...yan Set edge color of the displayed caption Back Opacity Solid Transparent Translucent Flash Set back opacity of the displayed caption Back Color White Black Red Green Blue Yellow Magenta Cyan Set back color of the displayed caption V Chip MPAA Rating X NC 17 R PG 13 PG G NR Set the viewing limitation according to US movie ratings TV Rating TV MA TV 14 TV PG TV G TV Y7 TV Y None Set the viewing li...

Page 103: ... Insert chapter marks at a preset time interval s Auto Finalize page 65 Disc Full ON OFF Set the unit to finalize the disc automatically End of Timer Rec ON OFF Make Recording Compatible page 43 ON OFF Set to prohibit additional recording OFF or to replace the title list after recording ON Clock pages 32 34 Clock Setting Set the clock Auto Clock Setting OFF Auto Manual Set the clock automatically ...

Page 104: ...Recording Clock Channel HDMI 3 Use K L to select a desired item then press OK 1 2 3 4 5 6 7 8 Parental Lock Disc Audio Disc Menu Language Audio Language Subtitle Language Angle Icon Still Mode Variable Skip Replay 4 Refer to 1 to 8 on pages 105 107 and set the selected item 5 When you finish with the setting press MENU to exit Playback E2S02UD MDR515H F7 EN v1 indd 104 E2S02UD MDR515H F7 EN v1 ind...

Page 105: ... If there is a DVD in the unit when you set up the parental lock press OPEN CLOSE A to activate the parental lock level A A password has not been set yet Use K L to select Yes Use the Number buttons to enter a new password except for 4737 then press OK Change Password Yes No Password Input Yes Your setting will be activated B A password has been set already Use the Number buttons to enter the curr...

Page 106: ... Digital Default Stream Use K L to select a setting then press OK Dolby Digital PCM Stream Your setting will be activated PCM Converts the Dolby Digital into PCM 2 channel When your amplifier decoder is NOT compatible with Dolby Digital set to PCM Stream Outputs Dolby Digital signals When your amplifier decoder is compatible with Dolby Digital set to Stream With regard to DVD playback if the audio...

Page 107: ...e Default Auto DVD only Select Auto usually Use K L to select a setting then press OK Still Mode Auto Field Frame Your setting will be activated Auto Optimum resolution setting Field or Frame will be selected Field Images in the still mode will be stabilized Frame Images in the still mode will be highly defined Note Frame is 1 completed video image made up of 2 fields There are 30 frames per secon...

Page 108: ... and 5 refer to pages 38 40 5 When you finish with the setting press MENU to exit 1 Language Default English Set the language for the on screen display Use K L to select a setting then press OK Language English Français Español 2 Screen Saver Default 10 minutes Set the time to activate the screen saver function on the TV screen Use K L to select a setting then press OK Screen Saver OFF 1 minute 5 ...

Page 109: ...ng D Canadian French Rating You can set the viewing limitation according to MPAA rating US movie ratings TV Rating US TV program ratings Canadian English Rating Canadian English language Ratings Canadian French Rating Canadian French language Ratings 1 Use K L to select the desired rating then press OK repeatedly to switch between view and block When it is blocked a key icon will appear e g MPAA r...

Page 110: ... downloadable rating information the message below will appear Downloadable Rating is currently not available This message will also appear when you try to access Downloadable Rating after you have cleared the downloadable rating information and the new information has not been downloaded since To set the rating Use K L to select Block Setting then press OK to show the various types of ratings Use...

Page 111: ...K L to select Video then press OK 3 Use K L to select a desired item then press OK Progressive Scan TV Aspect Video Input 1 2 3 Submenu will appear 4 Refer to 1 to 2 on page 112 and set the selected item For 3 refer to page 55 5 When you finish with setting press MENU to exit Video Instructions continue on the next page E2S02UD MDR515H F7 EN v1 indd 111 E2S02UD MDR515H F7 EN v1 indd 111 2010 08 17...

Page 112: ...unittotheTV Refertopages17 18 Ifnot use the RCA video cable and set the progressive scan to OFF or press and hold MENU for more than 3 seconds during HDD DVD playback When selecting No or not pressing any buttons on the unit or remote control within 15 seconds at step 3 progressive scan remains to be OFF interlace scan 2 TV Aspect Default 4 3 Letter Box Use this feature to adjust the aspect ratio ...

Page 113: ... color space for your display device Use K L to select a setting then press OK When the connected device is not compatible with the Y Cb Cr HDMI signal is output as RGB regardless of the setting Format RGB YCbCr 2 HDMI Audio Default ON If you do not want to output the audio through HDMI Such as when you digitally output the audio through the COAXIAL DIGITAL AUDIO OUTPUT jack to your audio system e...

Page 114: ...e TV also is turned on and the appropriate external input channel will be selected automatically The appropriate external input channel can also be selected on your TV automatically when you press PLAY B G H DISC MENU TIMER PROG DTV TV MENU CHANNEL the Number buttons or DUBBING when the unit s power is on Standby When you press and hold STANDBY ON y y for 2 seconds it turns off the power to the st...

Page 115: ... page 3 Repairing appears on the TV screen Repairing formatting or editing even after Repairing disappears a repairing process will begin automatically just after turning the unit on again It may take several minutes up to several hours In case you intend to cancel the repairing process Repairing Do you want to cancel a repairing process When selecting Yes the disc may not be usable Yes No If you ...

Page 116: ...es Check if the connections are made securely and correctly HDD DVD Recording is impossible It is prohibited to make a recording from 2 minutes before the programmed start time of a timer recording This unit cannot record programs that contain copy protection signal This is not a malfunction The space of the recording media may be used up Try deleting unnecessary titles or exchange it with the rec...

Page 117: ...tion DVD Playback cannot be performed Check if the playable disc is inserted Check if the disc is loaded correctly with the labeled side facing up Discs made on other devices or on personal computers cannot be played back on this unit unless it is finalized on the device Even if it is finalized the performance of those discs are not guaranteed on this unit The disc may be dirty or flawed Clean the...

Page 118: ...the finalization by following the steps on page 64 The capacity of the disc doesn t increase even if the recorded program is deleted With DVD RW RW the disc space will increase only when the last title is deleted With DVD R R deleting a title will not increase the disc space Dubbing cannot be executed Check if the disc is compatible for recording refer to page 41 REMOTE CONTROL The remote control ...

Page 119: ...rd more than 49 titles on one disc The maximum is 49 You are trying to record onto the disc on which the number of recording titles comes up to the maximum 49 Delete unnecessary titles pages 84 85 Recording Error You cannot record more than 254 chapters on one disc The maximum is 254 You are trying to record onto the DVD RW or DVD RW on which the number of recording chapters comes up to the maximu...

Page 120: ...ean 5761 Kurdish 5767 Laothian 5861 Latin 5847 Latvian Lettish 5868 Lingala 5860 Lithuanian 5866 Macedonian 5957 Malagasy 5953 Malay 5965 Malayalam 5958 Maltese 5966 Maori 5955 Marathi 5964 Moldavian 5961 Mongolian 5960 Nauru 6047 Nepali 6051 Norwegian 6061 Occitan 6149 Oriya 6164 Oromo Afan 6159 Panjabi 6247 Pashto Pushto 6265 Persian 5247 Polish 6258 Portuguese 6266 Quechua 6367 Rhaeto Romance 6...

Page 121: ... method of compressing files You can copy MP3 files on CD RW R from the computer and play back the files on this unit PBC playback control p y video CD only y This function enables you to play back interactive software using a menu screen See also Video CD PCM pulse code modulation p The most common system of encoding digital audio found on CD and DAT Excellent quality but requires a lot of data c...

Page 122: ...erage ATSC NTSC Terrestrial Cable VHF 2 13 UHF 14 69 2 13 A W W 1 W 94 analog W 1 W 84 A 5 A1 5A Terminals Front Audio input RCA jack x 2 j 2V rms input impedance more than 22kΩ p p Video input RCA jack x 1 j 1Vp p 75Ω p p S video input Mini DIN 4 pin x 1 p Y 1Vp p 75Ω C 286mVp p 75Ω p p p p DV input DV input jack 4 pin IEEE 1394 Rear VHF UHF Cable TV input and output F type yp 75Ω unbalanced Audi...

Page 123: ...arato Sin embargo según sea la condición del medio el equipo podría no leer el disco correctamente Verbatim DVD R 8x DVD RW 4x DVD R 8x DVD RW 2x JVC DVD RW 4x Maxell DVD R 4x 8x 16x DVD R 8x 16x SONY DVD R 4x 8x 16x DVD RW 4x TDK DVD R 4x 8x 16x El comportamiento de cualquier otro disco no está garantizado Usted puede reproducir discos DVD RW en la mayoría de los reproductores de DVD sin finaliza...

Page 124: ...de TV por cable o ANT IN cable coaxial de RF cable coaxial de RF No incline el conector para introducirlo en la toma HDMI y compruebe que el tipo de toma corresponde con el tipo de conector HDMI OUT parte trasera de la unidad IN IN OUT VIDEO IN AUDIO IN L1 S VIDEO S VIDEO AUDIOOUT OUT L R VIDEO OUT Y ANTENNA R L COAXIAL cable HDMI Esta conexión es de Pasar a través de la televisión solamente Cable...

Page 125: ...rada a la cual está conectado el aparato 2 Utilice K L para seleccionar su idioma deseado y luego presione OK para establecerlo Initial Setup Language English Français Español Elija idioma de preparación 3 Utilice K L para seleccionar el tipo de señal de emisión y luego presione OK Ajuste inicial Ajuste Auto escaneará los canales terrrestres Esto tarda unos momentos en finalizar Ajuste de Canal Ve...

Page 126: ...a del televisor la longitud deseada de grabación 30 minutos a 6 horas Comenzará la grabación a un toque con temporizador grabación normal 0h30m 1h00m 5h30m 6h00m I 0h30m Para cambiar la duración de la grabación durante la grabación a un toque con temporizador Presione REC repetidamente hasta que aparezca la duración deseada Para cancelar la grabación a un toque con temporizador dentro del tiempo e...

Page 127: ...one OK El copiado comenzará Para detener el copiado en curso Presione CSTOP en el panel frontal Presione STOP C en el control remoto durant 2 segundos A la hora de realizar una copia del HDD al DVD aparecerá un mensaje de confirmación seleccione Sí Copiado a un toque Con el copiado a un toque usted puede comenzar a copiar de inmediato con sólo un toque Para copiar el contenido de un DVD que está f...

Page 128: ...LL IN NO EVENT BE LIABLE FOR ANY GENERAL INDIRECT OR CONSEQUENTIAL DAMAGES ARISING OUT OF OR OCCASIONED BY THE USE OF OR THE INABILITY TO USE THIS PRODUCT THIS WARRANTY IS MADE IN LIEU OF ALL OTHER WARRANTIES EXPRESS OR IMPLIED AND OF ALL OTHER LIABILITIES ON THE PART OF FUNAI ALL OTHER WARRANTIES INCLUDING THE WARRANTY OF MERCHANTABILITY AND FITNESS FOR A PARTICULAR PURPOSE ARE HEREBY DISCLAIMED ...

Reviews: