background image

 cut here 


EN

– 27 –

Quick Use Guide

If your TV has AUDIO/VIDEO input jacks, see the section 
“Connection to a TV” on page 6 of the owner’s manual. If not, see 
the section “Connecting to RF Modulator (Not Supplied)” on the 
front page of the owner’s manual.

1

Connections

Clock Setting

5

Turning on Unit for the First Time

VCR/DVD Switching

4

3

Installing the Batteries for the Remote Control

2

VCR MODE 

Press 

[VCR 

 ] 

on the remote control.

(The VCR SOURCE light illuminates.)

DVD MODE 

Press 

[DVD   ]

 on the remote control.

(The DVD SOURCE light illuminates.)

1

Press 

[SETUP]

 and select “CLOCK SET“.

Then press 

[

B

]

 to go to next step.

•  If the clock is not set, “CLOCK SET” menu appears when you press 

[SETUP]

. In this case, go to step 2.
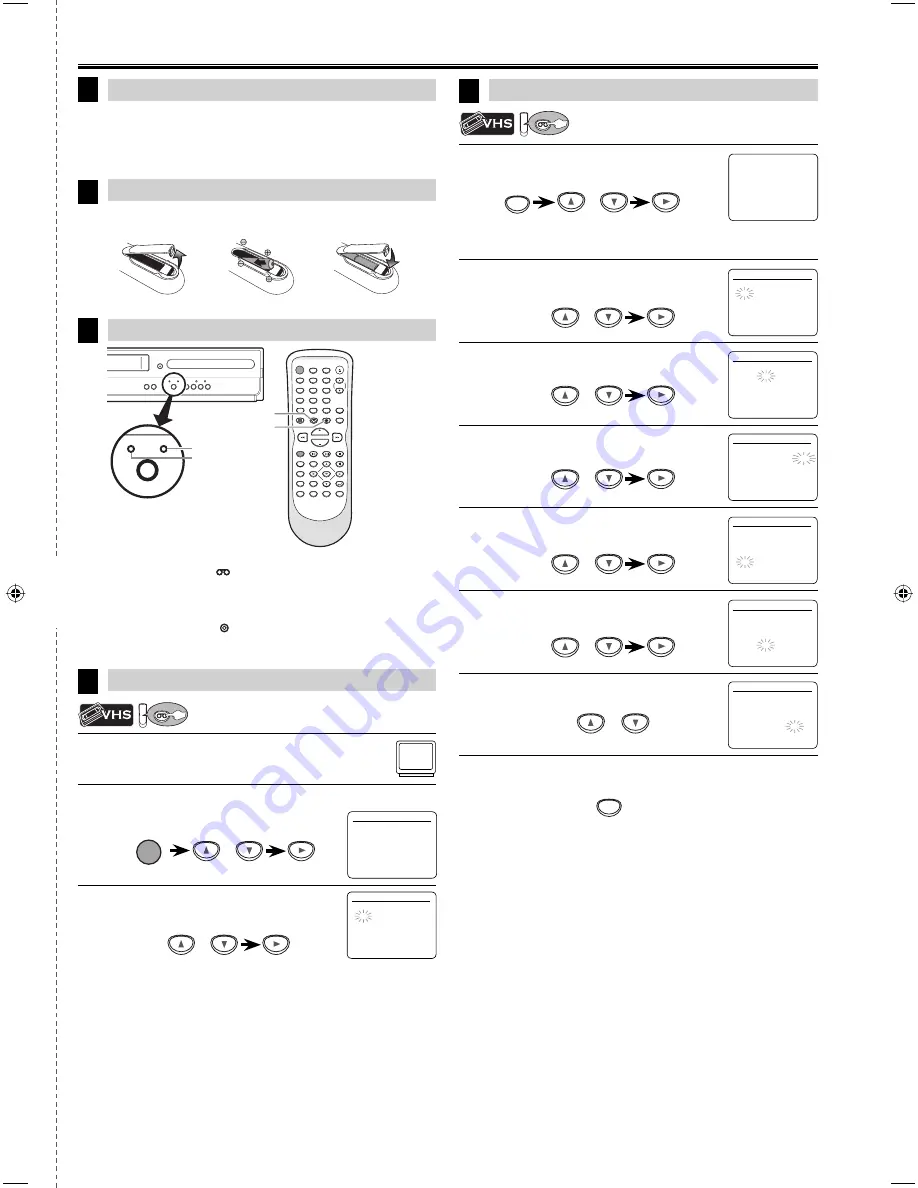
2

Select the current month.
Then press 

[

B

]

 to go to next step.

3

Select the current day.
Then press 

[

B

]

 to go to next step.

4

Select the current year.
Then press 

[

B

]

 to go to next step.

5

Select the current hour.
Then press 

[

B

]

 to go to next step.

6

Select the current minute.
Then press 

[

B

]

 to go to next step.

7

Select “AM” or “PM”.

8

Press 

[SETUP]

 to exit the “CLOCK SET” menu.

or

SETUP

or

or

or

or

or

or

             - M E N U -

 
 TIMER 

PROGRAMMING

 SATELLITE 

LINK


AUTO REPEAT      [OFF]


B

 CLOCK SET

 LANGUAGE 

SELECT


VCR

VCR


VCR

VCR

TRACKING

SOURCE

VCR

DVD

P-SCAN

PLAY

PREV

STOP

PLAY

NEXT

OPEN/CLOSE

G


B

C

H

B

B

y

SOURCE

VCR

DVD

STANDBY-ON

OPEN/CLOSE

DISPLAY

VCR

DVD

MODE

TRACKING

PLAY

STOP

RECORD

NEXT

PREV

PAUSE

DISC MENU

TITLE

SEARCH

AUDIO

SETUP

ZOOM

ANGLE

SUBTITLE

OK

REPEAT

A-B

SPEED

TIMER SET

1

2

3

4

5

6

7

8

9

0

+10

RETURN

CLEAR

INPUT

DVD button

VCR button

DVD SOURCE light

VCR SOURCE light

1

Be sure your TV’s input is set to VIDEO. (Name may 
vary with TV manufacturer. See your TV manual for 
details.)

2

Press 

[

K

 / 

L

]

 to select your on-screen language.

Then press 

[

B

]

 to continue.

3

When “CLOCK SET” menu appears, 
go to step 2 in “Clock Setting” on this page.

or

STANDBY-ON

LANGUAGE SELECT


B

 ENGLISH 

      [ON]

 FRANCAIS

 ESPAÑOL

or

2

3

1

CLOCK SET

 MONTH   DAY 


YEAR


1 0  / 

- - 


- - - -

 HOUR  

MINUTE 

AM/PM

  - 

- : - 


-

CLOCK SET

 MONTH   DAY 


YEAR


1 0  /  0 7 


- - - -

 HOUR  

MINUTE 

AM/PM

  - 

- : - 


-

CLOCK SET

 MONTH   DAY 


YEAR


1 0  /  0 7 

TUE  2 0 0 8

 HOUR  

MINUTE 

AM/PM

  - 

- : - 


-

CLOCK SET

 MONTH   DAY 


YEAR


1 0  /  0 7 

TUE  2 0 0 8

 HOUR  

MINUTE 

AM/PM


0 5 

- - 

 - -

CLOCK SET

 MONTH   DAY 


YEAR


1 0  /  0 7 

TUE  2 0 0 8

 HOUR  

MINUTE 

AM/PM

  0 

5 : 4 


-

CLOCK SET

 MONTH   DAY 


YEAR


1 0  /  0 7 

TUE  2 0 0 8

 HOUR  

MINUTE 

AM/PM

  0 

5 : 4 


M AM


B

 PM

CLOCK SET

 MONTH   DAY 


YEAR


1 0  / 

- - 


- - - -

 HOUR  

MINUTE 

AM/PM

  - 

- : - 


-

SETUP

E8E62UD-DV225MG9.indd   27

E8E62UD-DV225MG9.indd   27

2008/02/13   16:27:46

2008/02/13   16:27:46

Summary of Contents for DV225MG9 - DVD Player And 4 Head Hi-Fi Stereo...

Page 1: ...7 Using Track Search 17 Using Title Chapter Search 17 Using Time Search 17 Marker Setting 17 Repeat Random Programmed Playback 18 Repeat Playback 18 Repeat A B Playback 18 Random Playback 18 Programmed Playback 18 Special Settings 19 Subtitle Language 19 Audio Language 19 Camera Angles 19 Black Level Setting 19 Stereo Sound Mode 19 Virtual Surround 19 DVD Setting 20 LANGUAGE Setting 20 DISPLAY Set...

Page 2: ...not occur in a particular installation If this equipment does cause harmful interference to radio or television reception which can be determined by turning the equipment off and on the user is encouraged to try to correct the interference by one or more of the following measures 1 Reorient or relocate the receiving antenna 2 Increase the separation between the equipment and receiver 3 Connect the...

Page 3: ... still fail to fit contact your electri cian to replace your obsolete outlet Do not defeat the safety purpose of the polarized plug 12 Power Cord Protection Power supply cords should be routed so that they are not likely to be walked on or pinched by items placed upon or against them paying particular attention to cords at plugs convenience receptacles and the point where they exit from the applia...

Page 4: ...articular specifies that the cable ground should be connected to the grounding system of the building as close to the point of cable entry as practical Note Remember to read the instructions along with the video head cleaner before use Clean video heads only when problems occur Maintenance Servicing Please refer to relevant topics on the Troubleshooting Guide on page 23 before returning the produc...

Page 5: ...lay back the unfinalized DVD RW R recorded in the video format on our brand s DVD recorder However depending on the recording status of a disc the disc may not be played back at all or normally the picture or sound may not be smooth etc In this case you need to finalize the disc with the DVD recorder Refer to the manual accompanying the DVD recorder 7 Only discs recorded in the video format and fi...

Page 6: ... high quality picture for DVD playing You must select the connection COMPONENT VIDEO OUT above and progressive scanning mode To set the mode set PROGRESSIVE to ON in DISPLAY menu so that the P SCAN indicator on this unit lights up Refer to pages 20 21 for more details When PROGRESSIVE is ON video signals from the unit s VIDEO OUT and S VIDEO OUT jacks will be distorted or not be output at all for ...

Page 7: ...TV rear of the unit external tuner cable satellite box L1 Rear panel terminals L2 Front panel terminals Refer to Front Rear Terminals on page 9 for more information L1 Note Your cable satellite box can be accessed only by connecting it to L1 rear panel jacks of the unit Even if the unit is turned off the signal from the external tuner is output to the TV through the unit Connection Setting Supplie...

Page 8: ...GLISH ON FRANCAIS ESPAÑOL M E N U TIMER PROGRAMMING SATELLITE LINK AUTO REPEAT OFF B CLOCK SET LANGUAGE SELECT CLOCK SET MONTH DAY YEAR 1 0 HOUR MINUTE AM PM CLOCK SET MONTH DAY YEAR 1 0 0 7 HOUR MINUTE AM PM CLOCK SET MONTH DAY YEAR 1 0 0 7 TUE 2 0 0 8 HOUR MINUTE AM PM CLOCK SET MONTH DAY YEAR 1 0 0 7 TUE 2 0 0 8 HOUR MINUTE AM PM 0 5 CLOCK SET MONTH DAY YEAR 1 0 0 7 TUE 2 0 0 8 HOUR MINUTE AM P...

Page 9: ...m here to the digital audio input jack of your digital audio receiver For enhanced DVD viewing DVD VCR video and audio connections required to view cassette tapes Note Audio and video cables are included for both VCR and DVD viewing You can enhance your DVD picture and sound quality with an S video cable a component video cable or a digital audio coaxial cable Please purchase the necessary cables ...

Page 10: ... To arrange the playing order or play randomly To set virtual surround on off OK To move the cursor and deter mine its position To move the cursor and deter mine its position To select an item on the VCR menu To advance to the next VCR menu To go back one step during clock and timer programming OPEN CLOSE To open or close the disc tray To open or close the disc tray To eject the cassette tape from...

Page 11: ...e g or h F FWD g or REW h on this unit Press it again and the unit will search in super high speed in the SLP mode only To freeze the picture on TV screen during playback still mode Press PAUSE F Each time you press the button the picture will be forwarded by one frame If the picture begins to vibrate vertically in the still mode stabilize the picture by using TRACKING K L If the picture is distor...

Page 12: ...ctivate rear input jacks Select L2 to activate front input jacks 3 Press SPEED to select the desired tape speed 4 Press RECORD until desired recording time is selected 5 Press STOP C to stop recording 6 Press OPEN CLOSE A to eject the recorded cassette tape Recording You CANNOT dub a DVD to a video cassette tape To stop recording temporarily pause mode Press PAUSE F During the recording in pause m...

Page 13: ...operates as follows If a cassette tape runs out before an one touch timer recording or a timer recording is finished the unit ejects the cassette tape Press TIMER SET on the remote control or STOP EJECT C A on the unit then press VCR to activate the VCR function again Once the unit turns to the timer standby mode no VCR functions are available until TIMER SET is pressed To cancel the timer standby...

Page 14: ...r to page 7 1 Press SPEED to select the desired tape speed 2 In stop mode press SETUP 3 Select SATELLITE LINK Then press B to go to next step 4 Set the desired start hour Then press B to go to next step The hour can be selected from 1 12 with AM or PM When the external tuner signal is stopped recording will be stopped M E N U TIMER PROGRAMMING B SATELLITE LINK AUTO REPEAT OFF CLOCK SET LANGUAGE SE...

Page 15: ...ress STOP first and then PLAY Resume ON Note may appear at the top right on the TV screen when the operation is prohibited by the disc or this unit Some DVD may be played from title 2 or 3 due to specific programs During the playback of a 2 layered disc pictures may stop for a moment This happens while the 1st layer is being switched to the 2nd layer This is not a malfunction You can change the on...

Page 16: ...itle remaining time of the current title layer numbers appears only when playing a two layered disc L0 Layer 0 is playing L1 Layer 1 is playing current playback status appears only in a case multi angle is available on the DVD 1 2 3 4 DISPLAY DISPLAY DISPLAY DV DVD 4 12 0 03 21 0 02 15 T 4 12 0 13 45 0 45 40 T TR Track current track number total tracks current repeat setting if active T Track repe...

Page 17: ...set a marker or To return to the marker later and then press CLEAR Opening the disc tray or turning off the power will erase all markers Selecting AC at step 2 in the section To set a marker or To return to the marker later will also erase all markers SEARCH SEARCH or or RETURN For the disc with less than 10 tracks press the track number directly For discs with more than 10 but less than 99 tracks...

Page 18: ...e first track in the original order However your programmed playback can be restarted when you follow the above steps Your programs are still stored until either the disc tray is open or power is turned off To repeat the current track in the program press REPEAT repeatedly until TRACK appears during playback To repeat the entire program press REPEAT repeatedly until ALL appears during playback Not...

Page 19: ...nge the subtitle language setting If you choose any other languages will be displayed instead Refer to page 24 Some discs will only allow you to change the subtitle from the disc menu Refer to the manual accompanying the discs for details Note For audio CD virtual surround will not be effective if the sound mode is set to something other than STEREO Refer to Stereo Sound Mode For DVD when playing ...

Page 20: ... ASPECT PROGRESSIVE or DOLBY DIGITAL from QUICK menu quickly AUDIO ORIGINAL ENGLISH FRENCH SUBTITLE OFF ENGLISH FRENCH DISC MENU ENGLISH FRENCH SPANISH PLAYER MENU ENGLISH FRANÇAIS ESPAÑOL LANGUAGE menu P20 A Step 5 P21 B Step 5 P21 C Step 5 SETUP LANGUAGE AUDIO SUBTITLE DISC MENU PLAYER MENU ORIGINAL OFF ENGLISH ENGLISH 3 Select the desired item 1 Press SETUP in the stop mode SETUP CUSTOM LANGUAG...

Page 21: ...C ON DOWN SAMPLING ON DOLBY DIGITAL BITSTREAM ON ON PCM DRC ON DOWN SAMPLING ON DOLBY DIGITAL BITSTREAM ON OFF BITSTREAM Note DRC This function is available only on the discs which are recorded in the Dolby Digital format DOWN SAMPLING When playing back a 96kHz disc with the copyright protection or when virtual surround is set to 1 or 2 the sound will be down sampled at 48kHz even if the DOWN SAMP...

Page 22: ... children Parental Levels Parental level allows you to set the rating levels of your DVD software Playback will stop if the ratings exceed the levels you set Follow steps 1 to 3 in the CUSTOM Menu section on page 20 To Change the Password for Parental Controls You can change your password for parental controls Follow steps 1 to 3 in the CUSTOM Menu section on page 20 D PARENTAL menu PASSWORD CHANG...

Page 23: ...cture but the audio is OK Head cleaning may be necessary Refer to Auto Head Cleaning Make sure the VCR is not in the VCR menu mode No or poor playback picture Fine tune your TV Video or color fades in and out when making a copy of a cassette tape You cannot copy a copyrighted cassette tape Cannot remove the cassette tape Check if this unit is in the VCR mode If not press VCR on the remote control ...

Page 24: ... one 1 year from the date of original retail purchase Certain parts are excluded from this warranty LABOR FUNAI CORP will provide the labor without charge for a period of ninety 90 days from the date of original retail purchase LIMITS AND EXCLUSIONS This warranty is extended only to the original retail purchaser A purchase receipt or other proof of original retail purchase will be required togethe...

Page 25: ...e está encendida la luz VCR SOURCE MODO DVD Pulse DVD en el control remoto Compruebe que está encendida la luz DVD SOURCE M E N U PROGRAMAR CONEXIÓN SATÉLITAL AUTOREPETIR OFF B AJUSTE DE RELOJ SELEC IDIOMA Si su televisor tiene entradas de AUDIO VIDEO vea la sección Connection to a TV en la página 6 en el manual de manejo En caso contrario vea la sección Connecting to RF Modulator Not Supplied en ...

Page 26: ...Para seleccionar L1 o L2 MODE Para activar desactivar el nivel del negro Para activar desactivar el ambien tal virtual Para disponer el orden de reproduc ción o la reproducción aleatoria Para activar desactivar el envol vente virtual OK Para mover el cursor y determinar su posición Para mover el cursor y determinar su posición Para seleccionar un ítem en el menú de la grabadora de vídeo Para avanz...

Page 27: ...ETUP or or or or or or M E N U TIMER PROGRAMMING SATELLITE LINK AUTO REPEAT OFF B CLOCK SET LANGUAGE SELECT VCR VCR VCR VCR TRACKING SOURCE VCR DVD P SCAN PLAY PREV STOP PLAY NEXT OPEN CLOSE G B C H B B y SOURCE VCR DVD STANDBY ON OPEN CLOSE DISPLAY VCR DVD MODE TRACKING PLAY STOP RECORD NEXT PREV PAUSE DISC MENU TITLE SEARCH AUDIO SETUP ZOOM ANGLE SUBTITLE OK REPEAT A B SPEED TIMER SET 1 2 3 4 5 ...

Page 28: ...unter and L1 or L2 DVD To select DVD output mode To activate DVD mode To select the DVD output mode To activate DVD mode INPUT To select input L1 or L2 MODE To set black level on off To set virtual surround on off To arrange the playing order or play randomly To set virtual surround on off OK To move the cursor and deter mine its position To move the cursor and deter mine its position To select an...

Reviews: