background image

46

FORMAT

Button

CURSOR

Buttons

U

SING THE

P

ICTURE

-

FORMAT

C

ONTROL

Using the Onscreen Submenus: Features

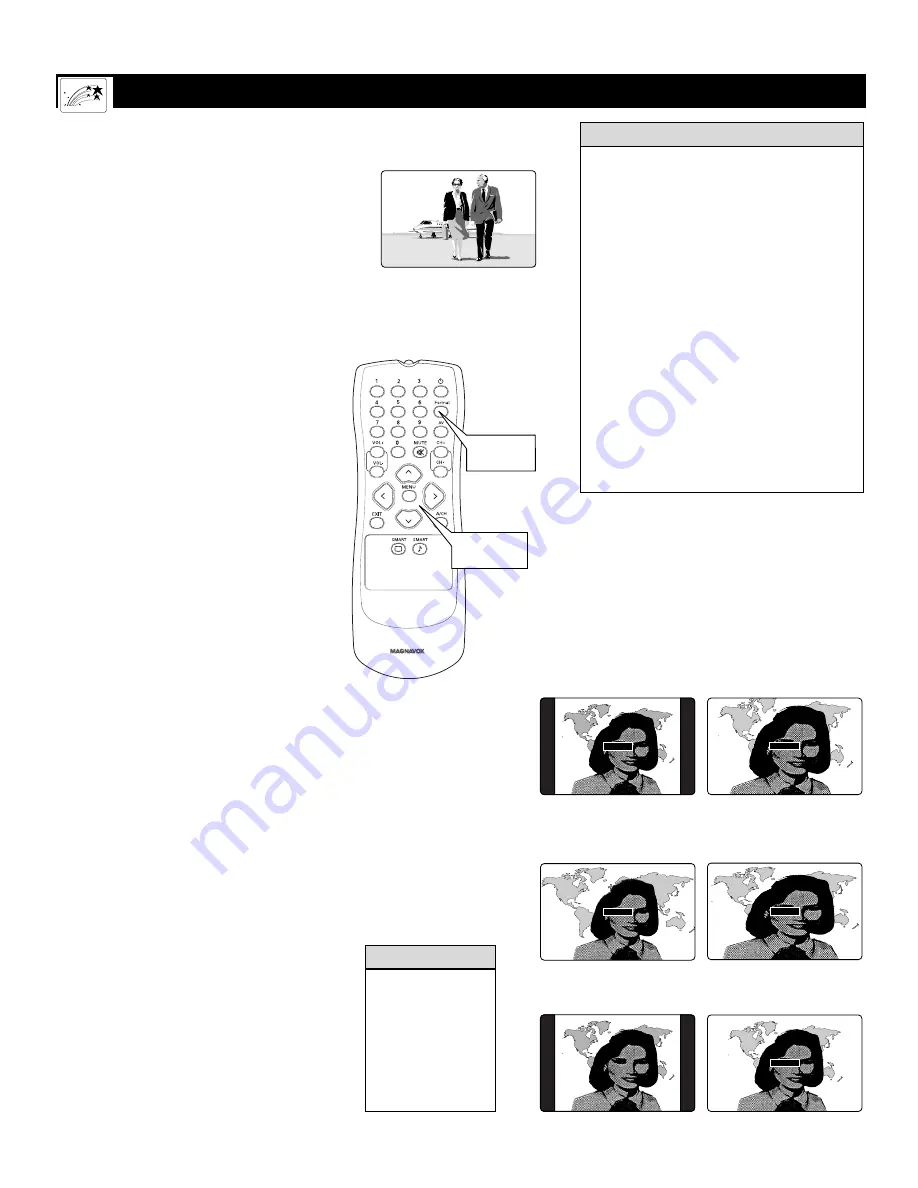
Picture-format Modes

4:3 

shows the conventional (4:3 aspect ratio)

picture in its original format. Border bars are
displayed on the sides. (See the warning above.)

EXPAND 4:3 

expands, or zooms, the picture

both vertically and horizontally, eliminating or
reducing the size of border bars. Picture infor-
mation is lost around the edges.

PANORAMA 

stretches the outer portions of

the picture horizontally and causes some verti-
cal expansion.

WIDE SCREEN 

expands the picture horizon-

tally. No vertical expansion occurs.

AUTO 

senses the presence of borders bars and

zooms the picture to reduce or eliminate the
bars. The amount of zoom varies based on the
original picture, but this option can provide
more expansion than EXPAND 4:3.

AUTO

works best with video programs that

were originally “letterboxed.” Formatted to pre-
serve the original theatrical aspect ratio, these
programs are presented with border bars at top
and bottom.

Selecting a Picture Format

Using the Remote Control

Use your TV’s picture-format modes with video
sources you connect to the ANTENNA, AV1,
CVI, AV2, or AV3 (side panel) inputs on the TV.
While watching a video source—with no
onscreen menu or display present—press the
CURSOR BUTTON RIGHT or LEFT as many
times as necessary to select the picture format
you desire. Or press the FORMAT button to
perform the same function.

• The term 

aspect ratio 

refers to the rela-

tionship between the width and height of
a TV screen. Historically, TV screen
width has been 33 percent greater than its
height, amounting to a 4:3 aspect ratio.
The width of your widescreen TV, how-
ever, is nearly 80 percent greater than its
height, which means its aspect ratio is
16:9. This screen corresponds well with
the tendency of the eyes to feel more
comfortable with fields of view and
action planes that are horizontally orient-
ed. The wide screen is also proportionally
truer to the formats in which movies are
filmed and presented in theaters.

• Although the term 

widescreen

can have

various meanings, it is most commonly
used to refer to a picture format or screen
that has a greater aspect ratio than the
conventional 4:3.

H

ELPFUL

H

INTS

To prevent uneven
picture-tube aging,
do not leave border
bars or other sta-
tionary images on
screen for extended
periods of time. See
page 49.

W

ARNING

Pictures appear more
lifelike, dramatic, and 
theatrical on your TV's
wide screen.

Y

our TV’s wide screen (16:9 aspect ratio)
delivers a home-cinema experience not pos-

sible with a conventional (4:3 aspect ratio) set.
High-definition (HD) programs originating in
16:9 format and other widescreen-format video
sources appear more lifelike, dramatic, and the-
atrical. Border bars are diminished or eliminat-
ed. Most anamorphic-DVD programs will fill
the wide screen without border bars.

Use your HD set-top box or progressive-scan-
capable DVD player to control the picture for-
mats of video sources connected to the TV’s HD
AV4 input.

For flexibility with video sources connected to
your TV’s standard inputs—ANTENNA, AV1,
CVI, AV2, or AV3 (side panel)—access your TV’s
picture-format modes. View a video source in
standard (4:3) format or enlarge it to fill the
screen in various ways using EXPAND 4:3,
PANORAMA, WIDE SCREEN, or AUTO.

EVENING WORLD NEWS

TONIGHT'S HEADLINES

4:3

EVENING WORLD NEWS

TONIGHT'S HEADLINES

PANORAMA

4:3 

Shows the conventional picture 

in its original format. Border bars 

are displayed on the sides. See the 

Warning on this page (below, left).

PANORAMA

Stretches the outer parts of the 

picture horizontally and causes 

some vertical expansion.

EVENING WORLD NEWS

TONIGHT'S HEADLINES

EXPAND 4:3

EVENING WORLD NEWS

TONIGHT'S HEADLINES

WIDE SCREEN

EXPAND 4:3

Zooms the picture

vertically and horizontally.

WIDE SCREEN

Expands the picture

horizontally. No vertical

expansion occurs.

AUTO

Senses the presence of picture borders and zooms the

picture to reduce or eliminate the borders.

EVENING WORLD NEWS

TONIGHT'S HEADLINES

AUTO

EVENING WORLD NEWS

TONIGHT'S HEADLINES

The picture-format modes are available for use only with video 
sources connected to the ANTENNA, AV1, CVI, AV2, and AV3 
(Side Panel) inputs on the TV. Control the picture formats of 
video sources connected to the HD inputs through the set-top 
box (for HD programming) or pro-gressive-scan-capable DVD 
player (for DVD programs)

Summary of Contents for 51MP392H - 51" Widescreen Hd Ready Tv

Page 1: ...3135 035 22984 English S M A R T V E R Y S M A R T User Guide 51MP392H 51MP3964H Rear Projection TV Model No _____________ Serial No _____________...

Page 2: ...be required from you to obtain warranty service Product Safety Notification By registering your product you ll receive notification directly from the manufac turer in the rare case of a product recall...

Page 3: ...dropped or the enclosure damaged 17 Tilt Stability All televisions must comply with recommended international global safety standards for tilt and stability properties of its cabinet design Do not co...

Page 4: ...ial Cable Lead in from Antenna Cable TV Company Coaxial Cable Coaxial Cable Lead in from Cable TV Company Outdoor or Indoor Antenna CombinationVHF UHF The combination antenna receives normal broadcast...

Page 5: ...n Sound submenu The three facto ry set controls Voice Music and Theatre enable you to tailor the TV sound to enhance the particular programming you are watching Channel Edit allows you to add or remov...

Page 6: ...antenna cable TV or components having only RF outputs to the antenna input on the TV RF coaxial cables are available in push on or screw on type Signal Splitter Allows you to route an antenna or cable...

Page 7: ...vices 4 VIDEO composite jacks INPUT AV 1 INPUT AV 2 and TV s side jack panel AV3 compatible with 480i signals only Use to connect accessories having composite video outputs such as VCRs video game pla...

Page 8: ...connections Dedicated audio input jacks are located with the HD INPUT AV 4 video jacks VIDEO Pb Pr VIDEO S VIDEO L AUDIO L R AUDIO L R G Y R Pr B Pb V H SYNC L R AUDIO HD INPUT AV 4 INPUT AV 2 OUTPUT...

Page 9: ...Connect a cable TV or antenna signal to the ANT IN jack on the rear of the VCR 2 Connect from the OUT jack on the rear of the VCR to the ANTENNA IN 75 jack on the rear of the TV 3 Connect the VIDEO O...

Page 10: ...V 4 Connect from the cable box OUTPUT jack to the ANT IN jack on the rear of the VCR 5 Connect the VIDEO OUT jack on the VCR to the INPUT AV 1 VIDEO jack on the rear of the TV 6 Connect the AUDIO OUT...

Page 11: ...Center at 1 800 531 0039 1 Connect from the L eft and R ight AUDIO OUTPUT jacks on the rear of the TV to the L eft and R ight AUX TV INPUT jacks on the rear of the hi fi system VIDEO Pb Pr VIDEO S VI...

Page 12: ...t capability to make the connection shown in this example you must be sure to switch the DVD player to interlaced If necessary refer to the DVD player s direc tions for use manual for help If you want...

Page 13: ...layers for changing from interlaced to progressive scan mode Other DVD players may allow the mode to be changed by pressing a button on the DVD player s remote control or by using the DVD player s ons...

Page 14: ...device with S VIDEO output to the INPUT AV 2 S VIDEO jack on the rear of the TV 2 Connect the DVD VCR AUDIO OUT jacks on the rear of the accessory device to the INPUT AV 2 AUDIO input jacks on the re...

Page 15: ...changing either the receiver s or TV s color space See the receiver s directions for use manual for information on setting its color space HELPFUL HINTS BNC to RCA Adapter BNC Connector Adapter Fitte...

Page 16: ...stomer Care Center at 1 800 531 0039 1 Connect from the VIDEO output on the camcorder to the VIDEO input in the TV s side panel 2 Connect from the AUDIO outputs on the camcorder to the side panel AUDI...

Page 17: ...n you can access a different signal source input The signal source input jacks are located on the back and side panels of your TV See pages 6 and 7 Using the Remote Control TV SWAP PIP CH DN UP FREEZE...

Page 18: ...the STATUS EXIT button to exit the menu The SmartSound option you selected is then active Using the Remote Control TV SWAP PIP CH DN UP FREEZE SOUND POWER PICTURE VCR ACC ACTIVE CONTROL HELPFUL HINTS...

Page 19: ...will not be changed Only when you go into the PICTURE submenu and change the settings will those settings be reflected in the PERSONAL SmartPicture option HELPFUL HINT You can use an SmartPicture opt...

Page 20: ...rrent channel and one previously watched channel USING ALTERNATE CHANNEL Using the Remote Control TV SWAP PIP CH DN UP FREEZE SOUND POWER PICTURE VCR ACC ACTIVE CONTROL 5 10 Watch channel Change chann...

Page 21: ...COLOR 30 PICTURE SHARPNESS TINT PICTURE BRIGHTNESS COLOR PICTURE 30 SHARPNESS TINT PICTURE BRIGHTNESS COLOR PICTURE SHARPNESS 30 TINT PICTURE BRIGHTNESS COLOR PICTURE SHARPNESS TINT 0 PICTURE COLOR P...

Page 22: ...ance of onscreen motion It also helps smooth out jagged lines that are sometimes seen on curved and angled surfaces in the picture 1 Press the MENU button on the remote to show the onscreen menu 2 Pre...

Page 23: ...light portions of the picture more noticeable Normally you will probably want to select MED In certain circumstances however you may prefer MIN or MAX 1 Press the MENU button on the remote control to...

Page 24: ...programs 1 Press the MENU button on the remote control to show the onscreen menu 2 Press the CURSOR BUTTON DOWN once to highlight SOUND 3 Press the CURSOR BUTTON RIGHT to enter the SOUND sub menu 4 T...

Page 25: ...2 Press the CURSOR BUTTON DOWN once to highlight SOUND 3 Press the CURSOR BUTTON RIGHT to enter the SOUND sub menu 4 Press the CURSOR RING DOWN repeatedly until AVL is highlighted Then press the CURS...

Page 26: ...ions of the options below 1 Press the MENU button on the remote control to show the onscreen menu 2 Press the CURSOR BUTTON DOWN once to highlight SOUND 3 Press the CURSOR BUTTON RIGHT to enter the SO...

Page 27: ...rd Follow these steps to select the STEREO mode 1 Press the MENU button on the remote control to show the onscreen menu 2 Press the CURSOR BUTTON DOWN once to highlight SOUND 3 Press the CURSOR BUTTON...

Page 28: ...rogram sound TV stations are free to use SAP for any number of purposes such as the broadcast of a second language or other audio information If an SAP signal is not present with a selected program th...

Page 29: ...f the TV s sound This creates a deeper fuller sound Follow these steps to turn BASS BOOST ON 1 Press MENU button on the remote control to show the onscreen menu 2 Press the CURSOR RING DOWN once to hi...

Page 30: ...ontrol to show the onscreen menu 2 Press the CURSOR BUTTON DOWN twice to highlight FEATURES 3 Press the CURSOR BUTTON RIGHT to enter the FEATURES submenu 4 Press the CURSOR BUTTON RIGHT again to shift...

Page 31: ...o switch to another channel and if you want turn the TV off The Timer s DISPLAY control allows you to show the time constantly in the upper right corner of the screen 1 Press the MENU button on the re...

Page 32: ...e MENU button on the remote control to show the onscreen menu 2 Press the CURSOR BUTTON DOWN twice to highlight FEA TURES 3 Press the CURSOR BUTTON RIGHT to enter the FEATURES sub menu 4 Press the CUR...

Page 33: ...ss the MENU button on the remote control to show the onscreen menu 2 Press the CURSOR BUTTON DOWN twice to highlight FEA TURES 3 Press the CURSOR BUTTON RIGHT to enter the FEATURES sub menu 4 Press th...

Page 34: ...the MENU button on the remote control to show the onscreen menu 2 Press the CURSOR BUTTON DOWN twice to highlight FEA TURES 3 Press the CURSOR BUTTON RIGHT to enter the FEATURES sub menu 4 Press the...

Page 35: ...he following violence sexual situations coarse language or suggestive dialog R Restricted specifically designed for adults Anyone under the age of 17 should view programs that are rated R only with an...

Page 36: ...ter and confirm the new Code to activate it SETTING UP THE AUTOLOCK ACCESS CODE Your AutoLock access code allows you to enter the AutoLock submenus to set up or turn off blocking Your access code is a...

Page 37: ...ALL is highlighted 5 Press the CURSOR BUTTON RIGHT to clear all of your blocked channels and ratings 6 Press the STATUS EXIT button to exit the menu PICTURE SOUND FEATURES INSTALL TIMER AutoLock CLOSE...

Page 38: ...t the channels or program sources you want to block 1 Press the MENU button on the remote control to show the onscreen menu 2 Press the CURSOR BUTTON DOWN twice to highlight FEATURES 3 Press the CURSO...

Page 39: ...reen menu 2 Press the CURSOR BUTTON DOWN twice to highlight FEATURES 3 Press the CURSOR BUTTON RIGHT Then press the CURSOR BUTTON DOWN once to highlight the AutoLock control 4 Press the CURSOR RING RI...

Page 40: ...s may include mild fantasy and comic violence FV TV G General Audience likely to be considered suitable for children of all ages Such programs have little or no violence no strong language and little...

Page 41: ...menu BLOCKING will be highlighted 8 Press the CURSOR RING RIGHT or LEFT to turn BLOCKING ON or OFF 9 Press the STATUS EXIT button to exit the menu Using the Onscreen Submenus Features PICTURE SOUND FE...

Page 42: ...ING RIGHT or LEFT to turn BLOCK UNRATED ON or OFF 10Press the STATUS EXIT button to exit the menu When the BLOCK UNRATED control is turned ON attempts to view unrated pro grams will bring to the scree...

Page 43: ...ON or OFF 10Press the STATUS EXIT button to exit the menu Using the Onscreen Submenus Features PICTURE SOUND FEATURES INSTALL TIMER AutoLock CLOSED CAP FORMAT TIMER AutoLock CLOSED CAP FORMAT TIME ST...

Page 44: ...uage D If you turn off a main rating but turn on a subrating of that main rating control programs having the subrating will be blocked however the main rating will not appear within the AutoLock revie...

Page 45: ...boxes to show dialogue and conversations while the TV program is in progress 1 Press the MENU button on the remote control to show the onscreen menu 2 Press the CURSOR BUTTON DOWN twice to highlight F...

Page 46: ...meanings it is most commonly used to refer to a picture format or screen that has a greater aspect ratio than the conventional 4 3 HELPFUL HINTS To prevent uneven picture tube aging do not leave borde...

Page 47: ...ss the STATUS EXIT button to exit the menu PICTURE SOUND FEATURES INSTALL TIMER AutoLock CLOSED CAP FORMAT FEATURES TIMER AutoLock CLOSED CAP FORMAT 4 3 OR FORMAT EXPAND 4 3 OR FORMAT PANORAMA TIMER A...

Page 48: ...Signals G Y 1 0 Vp p 75 ohms compatible with sync on green R Pr 700 mVp p 75 ohms B Pb 700 mVp p 75 ohms H 3 Vp p 1 0 V 1 kohm when using separate H and V sync V 3 Vp p 1 0 V 1 kohm when using separa...

Page 49: ...PUT 700mVp p 75 ohms Pr INPUT 700mVp p 75 ohms The Pb INPUT jack can also receive signals from outputs labeled Cb or B Y The Pr INPUT jack can also receive sig nals from outputs labeled Cr or R Y S VI...

Page 50: ...ocation on the TV screen All picture tubes age with use with their light output diminish ing over time But by maintaining normal use mixing televi sion picture types you will create conditions in the...

Page 51: ...wall switch The TV has no power Check the TV s power cord Unplug the TV wait 10 seconds then reinsert the plug into the outlet and push the remote control power or TV power standby button again The lo...

Page 52: ...trol or on the TV See pages Q 2 TV buttons and Q 3 remote control buttons Check the Mute button on the remote See page Q 3 for the location of the Mute button Check the Audio Out and Speaker controls...

Page 53: ...viewing pleasure Interlaced A picture scanning technique that improves the appearance of onscreen motion It also helps smooth jagged lines that are sometimes seen on curved and angled surfaces in the...

Page 54: ...i fi system 11 Satellite receiver standard 12 14 S Video device 14 VCR 9 VCR and cable box 10 Convergence Controls Red blue Q 7 Restore factory Q 7 Multipoint red blue Q 7 Save multipoint settings Q 7...

Page 55: ...55 This page intentionally left blank...

Page 56: ...because of improper installation connections to improper voltage supply abuse neglect misuse accident unauthorized repair or other cause not within the control of Magnavox A product that requires mod...

Reviews: