background image

9

EN

IN

TR

OD

UC

TIO

N

PR

EP

AR

AT

IO

N

W

AT

CH

IN

TV
OP

TIO

NA

SE

TT

ING
OP

ER

AT

ING

 D

VD

DV

SE

TT

ING

TR

OU

BLE

SH

OO

TIN

G

IN

FO

RM

AT

IO

N

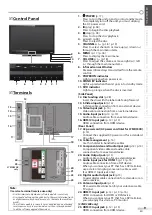
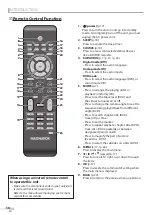
1. 

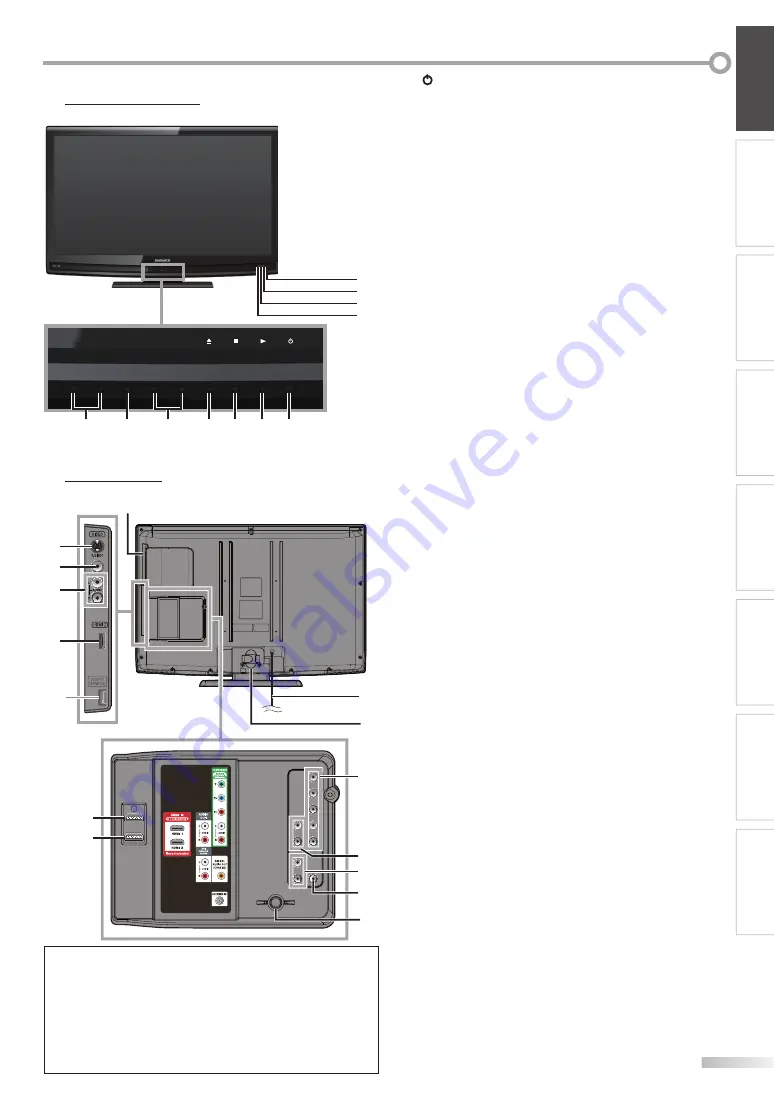
y  

POWER

 (p. 17)

Press to turn the unit on and go into standby mode.

To completely turn off the unit, you must unplug 

the AC power cord.

2. 

B  

(play)


(p. 38)

Press to begin the disc playback.

3. 

C  

(stop)


(p. 38)

Press to stop the disc playback.

4. 

A  

(eject)


(p. 38)

Press to eject the disc.

5.  CHANNEL 

+

 / 

-

 (p. 18 / p. 19)

Press to select channels or move up (

+

) / down (

-

through the main menu items.

6.  MENU

 (p. 17 / p. 46)

Press to display the main menu.

7.  VOLUME 

+

 / 

-


(p. 18)

Press to adjust the volume or move right (

+

) / left 

(

-

) through the main menu items.

8.  Infrared sensor Window

Receives infrared rays transmitted from the remote 

control.

9.  POWER ON indicator

Lights up green when power is on.

10. STAND BY indicator

Lights up red when the unit goes into standby mode.

11. DVD indicator

Lights up orange when the disc is inserted.

[Side Panel]

12. Disc loading slot

 (p. 38)

Insert the disc with the label side facing forward.

13. S-Video Input jack

 (p. 14)

S-Video cable connection from an external device. 

14. Video Input jack

 (p. 15)

Video cable connection from an external device.

15. Audio Input jack

 (p. 14 / p. 15)

Audio cable connection from an external device.

16. HDMI 2 Input jack 

(p. 12 / p. 13)

HDMI connection from HDMI device.

[Rear Panel]

17. AC power cord (AC power cord Inlet for 37MD350B)

(p. 16)

Connect the supplied AC power cord for a standard 

AC outlet.

18. Cable management

 (p. 16)

Use this holder to bundle the cables.

19. Component video and Audio Input jack

 (p. 12 / p. 14)

Component video cable and audio cable 

connection from an external device.

20. Audio Output jack

 (p. 15)

Audio cable connection for an external device.

21. Audio Input jack for HDMI 1

 (p. 13 / p. 16)

Audio cable connection from a DVI device. 

When you connect your PC that has a DVI terminal,

use a stereo mini plug conversion cable as well.

(For HDMI 1 Input jack only)

22. Digital audio Output jack

 (p. 15)

Coaxial digital cable connection for a decoder or an 

audio receiver.

23. Antenna Input jack

 (p. 12)

RF coaxial cable connection for your antenna or cable 

TV signal.

24. HDMI 1 Input jack

 (p. 12 / p. 13 / p. 16)

HDMI connection for HDMI or DVI device.

When you connect your PC that has a DVI terminal, 

you can enjoy this unit as a PC monitor.

[37MD350B only]

25. HDMI 3 Input jack

 (p. 12 / p. 13)

HDMI connection from HDMI device.

5

5

Terminals

5

5

Control5Panel

MENU

VOLUME

-

CHANNEL

+

-

POWER

+

VOLUME

8

9

11

10

5

1

6

4

3

2

7

24
25

20
21
22

23

19

12

18

17

15

13
14

16

*

Note:

*

 service terminal (service use only)

•    Use this terminal only when a software update is necessary.

•    User should not connect any devices to the service terminal such 

as digital camera, keyboard, mouse, etc. (because these will not 

work).

•    The software update is, in most cases, handled by an authorized  

service person or in some circumstances the user may be asked 

to do the software upgrade themselves.

37MD350B

only

Summary of Contents for 32MD350B - 32" Class Lcd Hdtv

Page 1: ...l usuario 37MD350B 32MD350B LCD TV DVD Quick Use Guide Inside Guide d usage Rapide Incluse Gu a de Uso R pido Incluida English Fran ais Espa ol 1 866 341 3738 1 866 341 3738 1 866 341 3738 MODEL NUMBE...

Page 2: ...will be required from you to obtain warranty service Product Safety Notification By registering your product you ll receive notification directly from the manufacturer in the rare case of a product r...

Page 3: ...tandards for tilt and stability properties of its cabinet design Do not compromise these design standards by applying excessive pull force to the front or top of the cabinet which could ultimately ove...

Page 4: ...s product incorporates copyright protection technology that is protected by U S patents and other intellectual property rights Use of this copyright protection technology must be authorized by Macrovi...

Page 5: ...place Under conditions of high humidity After heating a cold room NOTE ABOUT RECYCLING This unit s packaging materials are recyclable and can be reused Please dispose of any materials in accordance w...

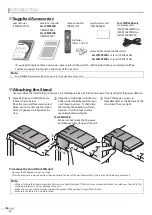
Page 6: ...the main unit shown by arrow then slide the stand in the direction as shown by arrow until it stops and the mounting holes are aligned For32MD350B Make sure not to put the AC power cord between the s...

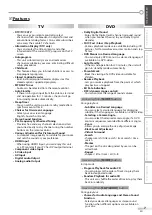
Page 7: ...t AV Input Digital audio Output Analog audio Output 5 5Features TV DVD Dolby Digital Sound Enjoy Dolby Digital multi channel surround sound when you connect the unit to your Dolby Digital decoder Stil...

Page 8: ...ual 5 Supplied Accessories 6 Attaching the Stand 6 Features 7 Control Panel 9 Terminals 9 Remote Control Function 10 Installing the Batteries 11 PREPARATION Antenna Connection 12 Connection to Cable R...

Page 9: ...MD350B p 16 Connect the supplied AC power cord for a standard AC outlet 18 Cable management p 16 Use this holder to bundle the cables 19 Component video and Audio Input jack p 12 p 14 Component video...

Page 10: ...language DVD or sound mode CD 5 MODE p 7 Press to arrange the playing order or playback randomly CD Press to set the black level DVD and the virtual surround on or off Press to change the camera angle...

Page 11: ...o return to the previous channel 14 VOL p 18 Press to adjust the volume 15 Number buttons p 18 Press to select channels Press to select chapter title DVD or track CD directly dot Press to shift the su...

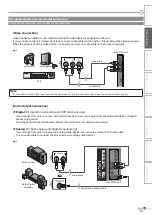
Page 12: ...Receiver or Satellite Box Use an HDMI or an component video cable to connect the HDMI or the Component video Input jack of the unit to the HDMI or the component video output jack of the cable receive...

Page 13: ...ccepts signals in compliance with EIA861 HDMI DVI Connection Use an HDMI DVI conversion cable to connect the unit to external video devices equipped with DVI output jack e g STEREO PCM DVI OUT AUDIO O...

Page 14: ...ity for video devices connected to the unit If you connect to the unit s S Video Input jack connect audio cables to the Audio L R jacks below the Video connector e g CHAPTER 15 REPEAT A B TITLE 5 AUDI...

Page 15: ...tput Connection Digital for digital broadcasting and DVD functions only If you connect this unit to an external digital audio device you can enjoy multi channel audio like 5 1ch digital broadcasting s...

Page 16: ...pplied cables are used in this connection Please purchase the necessary cables at your local store 5 5Cable Management Keep the cables through this holder to avoid tangle them 5 5Plug In the AC Power...

Page 17: ...gy efficiency for home setting and it can be adjusted through a choice of picture and sound quality according to your preference When the initial setup is completed the lowest memorized channel with t...

Page 18: ...tween multiple channels broadcast by a single network Note No Signal will appear on the TV screen after the subchannel broadcast is over Audio only program message will appear on the TV screen when yo...

Page 19: ...n of the input modes 5 5Switching5Audio5Mode This section describes how to switch the audio in the analog mode and how to switch the audio language in the digital mode TV Press SAP AUDIO to display th...

Page 20: ...A Day of Memories KABC KABC A quarter century ago which may now qualify as the good old days of newspapering run of paper sales accounted for 80 percent of the industry s advertising revenues Departm...

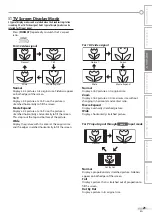
Page 21: ...stretched horizontally and vertically to fill the screen This crops out the top and bottom of the picture Wide Display the picture with its center at the original size and the edges stretched horizont...

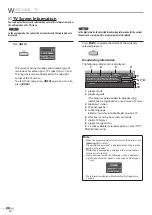
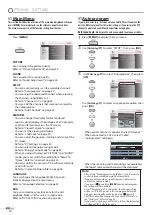
Page 22: ...e the unit is in stop mode Refer to DVD SETTING section on page 46 5 5Autoprogram If you switch wires e g between antenna and CATV or if you move the unit to a different area after the initial setting...

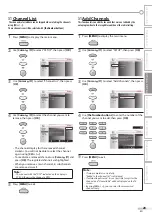
Page 23: ...ed When you remove a main channel its subchannels are removed as well Note The channel with the DTV indicated on the display is ATSC Otherwise the channel is NTSC 5 Press MENU to exit 5 5Add Channels...

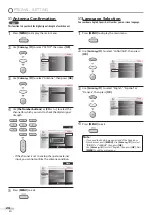
Page 24: ...hange PICTURE SOUND FEATURES LANGUAGE DVD SETUP Indicator is available for digital broadcasting only CH 5 Press MENU to exit 5 5Language Selection You can choose English Spanish or French as your on s...

Page 25: ...Adjust the picture quality Smart Picture Use Cursor K L to select the desired setting then press OK Personal Standard Sports Movie and Game Color Temperature PICTURE SOUND SETUP FEATURES LANGUAGE Tin...

Page 26: ...tant loudness differential between the TV commercials and the programs Use Cursor K L to select the desired option then press OK Auto Volume Leveling reduces volume differences between channels and pr...

Page 27: ...ce 4 Use Cursor K L to select Caption Service then press OK DVD PICTURE SOUND SETUP LANGUAGE FEATURES Digital Caption Service Caption Style Off Off Caption Service 5 Use Cursor K L to select the desir...

Page 28: ...font color or size etc 4 Use Cursor K L to select Caption Style then press OK Digital Caption Service Caption Style Off Off Caption Service PICTURE SOUND SETUP FEATURES LANGUAGE DVD 5 Use Cursor K L t...

Page 29: ...lor Edge color of the displayed caption can be switched as below Font Style Font Size Red Green Blue Yellow Font Color Font Opacity Magenta Cyan User Setting Background Color Background Opacity Edge C...

Page 30: ...k Canadian English Rating Canadian French Rating Region ratings lock Change PIN US Movie ratings lock B D C A A Channel Lock B B US Movie ratings lock C C USTV ratings lock D D Change PIN a page 31 a...

Page 31: ...GE Video Component HDMI1 HDMI2 DVD 11 1DTV FEATURES 7 Press MENU to exit B US Movie ratings lock US Movie ratings lock is the rating system created by MPAA Motion Picture Association of America 5 Use...

Page 32: ...tep below Use Cursor K L s B to select the desired rating then press OK repeatedly to switch between View and Block Back BACK View Block Select FV V S L D TV MA TV 14 TV PG TV G TV Y7 TV Y OK DVD PICT...

Page 33: ...Change PIN DVD PICTURE SOUND SETUP FEATURES LANGUAGE 6 Press the Number buttons to enter the new 4 digit PIN Code Enter PIN Code again in Confirm PIN entry field Confirm PIN Enter PIN PIN Code Back BA...

Page 34: ...nt to adjust then press OK Vertical Position Horizontal Position Position Reset 0 0 DVD PICTURE SOUND SETUP LANGUAGE FEATURES 5 Adjust the setting Position Reset Use Cursor K L to select Reset then pr...

Page 35: ...OK When set to On power consumption is reduced by decreasing backlight brightness Off On DVD PICTURE SOUND SETUP LANGUAGE FEATURES On Select if you want to reduce the power consumption Off Sets the ba...

Page 36: ...ocation Current Software Info On Home Closed Caption DVD PICTURE SOUND SETUP FEATURES LANGUAGE 3 Use Cursor K L to select Current Software Info then press OK Child Lock PC Settings Energy Saving Mode...

Page 37: ...ly the sound recorded on the normal CD layer can be delivered The sound recorded on the high density super audio CD layer cannot be delivered Do not use a single CD adaptor which makes 3 inches 8 cm t...

Page 38: ...to any key commands 5 5Disc Menu DVD Some discs contain disc menus which describe the contents of the disc or allow you to customize disc playback or title menu which lists the titles available on th...

Page 39: ...de are blurred Refer to page 49 Slow forward slow reverse speed varies with disc Approximate speed is 1 1 16x 2 1 8x and 3 1 2x The sound will be muted during this function 5 5Zoom DVD The zoom functi...

Page 40: ...track search can only be performed during playback or when the unit has kept the resume information It cannot be performed in the stop mode The total number of chapters titles tracks in your disc wit...

Page 41: ...t at step 3 Time search can only be performed during playback or when the unit has kept the resume information It cannot be performed in the stop mode Direct Search Press the Number buttons to select...

Page 42: ...Cursor K L to select a desired track then press OK to store Additional tracks may be on other screens Use Cursor K L to go on to the next previous pages Repeat this step until you have selected all t...

Page 43: ...ng is active C Chapter repeat T Title repeat A B A B repeat bit rate indication for the amount of audio and video data currently being read layer number appears only when playing a 2 layered disc L0 L...

Page 44: ...ow you to change the audio setting from the disc menu Refer to the manual accompanying the discs for details If your language is not shown after pressing SAP AUDIO several times the disc may not have...

Page 45: ...ing other than STEREO Refer to Stereo Sound Mode on page 45 Turn down the level or select OFF if the sound is distorted Marker Setup Thisfeatureallowsyoutoassignaspecificpointonadisctobecalledbacklate...

Page 46: ...ENGLISH FRENCH SPANISH GERMAN ITALIAN SWEDISH SUBTITLE LANGUAGE ENTER OK ENGLISH FRENCH SPANISH GERMAN ITALIAN SWEDISH DUTCH DISC MENU DISC MENU 1 Default ENGLISH Select the desired language in DVD m...

Page 47: ...ilable only on the discs which are recorded in the Dolby Digital format AUDIO ENTER OK DRC ON DOWN SAMPLING ON DOLBY DIGITAL BITSTREAM ON Compress the range between soft and loud sounds OFF No effects...

Page 48: ...PARENTAL LEVEL ALL PASSWORD CHANGE 6 Use Cursor K L to select the desired item then press OK PARENTAL ENTER OK ALL 8 ADULT 7 NC 17 6 R 5 PGR 4 PG13 3 PG PARENTAL LEVEL PARENTAL LEVEL ALL All parental...

Page 49: ...ect the desired item then press OK ANGLE ICON Default ON Set to ON to show the angle icon when multiple camera angles are available during DVD playback OTHERS ENTER OK ANGLE ICON ON STILL MODE AUTO AU...

Page 50: ...ish DAN 5047 Dutch DUT 6058 English ENG 5160 Esperanto 5161 Estonian 5166 F H Faroese 5261 Fiji 5256 Finnish FIN 5255 French FRE 5264 Frisian 5271 Galician 5358 Georgian 5747 German GER 5051 Greek GRE...

Page 51: ...selected channel cannot be viewed by the Child Lock setting Refer to Child Lock on page 30 The unit requires some kind of antenna input An indoor antenna VHF UHF an external antenna VHF UHF or an RF...

Page 52: ...eyboard to wake up your computer Make sure that the sound is not muted Press MUTE so that the volume bar and current volume level will appear on the TV screen Make sure that the volume is NOT set to 0...

Page 53: ...CC 4 or Off D V D Completely distorted picture or black white picture with DVD Make sure the disc is compatible with the unit Picture freezes momentarily during playback Check the disc for finger prin...

Page 54: ...g SDTV Standard Definition TV Standard digital format that is similar to the NTSC picture quality S Video Offers higher quality images by delivering each signal color c and luminance y independently o...

Page 55: ...e default language will be English 5 5Other Specifications Terminals Antenna Input VHF UHF CATV 75 unbalanced F type Audio Input RCA jack L R x 6 500mV rms Video Input RCA jack x 1 1V p p 75 S Video I...

Page 56: ...l product or part not cov ered by this warranty Recovery or reinstallation of programs data or other information is not covered under this Limited Warranty This warranty does not apply a to damage cau...

Page 57: ...Fran ais...
Reviews: