background image

IMPORTANT SAFETY INSTRUCTIONS

Read before operating equipment

1.

Read these instructions.

2.

Keep these instructions.

3.

Heed all warnings.

4.

Follow all instructions.

5.

Do not use this apparatus near water.

6.

Clean only with a dry cloth.

7.

Do not block any of the ventilation openings. Install in accordance
with the manufacturers instructions.

8.

Do not install near any heat sources such as radiators, heat registers,
stoves, or other apparatus (including amplifiers) that produce heat.

9.

Do not defeat the safety purpose of the polarized or grounding-type
plug. A polarized plug has two blades with one wider than the other.
A grounding type plug has two blades and third grounding prong.
The wide blade or third prong are provided for your safety. When
the provided plug does not fit into your outlet, consult an electrician
for replacement of the obsolete outlet.

10.

Protect the power cord from being walked on or pinched particularly
at plugs, convenience receptacles, and the point where they exit from
the apparatus.

11.

Only use attachments/accessories specified by the manufacturer.

12.

Use only with a cart, stand, tripod, bracket, or table       

specified by the manufacturer, or sold with the appara-   
tus. When a cart is used, use caution when moving the

cart/apparatus combination to avoid injury from tip-over.

13.

Unplug this apparatus during lightning storms or when unused for
long periods of time.

14.

Refer all servicing to qualified service personnel. Servicing is required
when the apparatus has been damaged in any way, such as power-
supply cord or plug is damaged, liquid has been spilled or objects
have fallen into apparatus, the apparatus has been exposed to rain
or moisture, does not operate normally, or has been dropped.

15.

This product may contain lead and mercury. Disposal of these materi-
als may be regulated due to environmental considerations. For dispos-
al or recycling information, please contact your local authorities or
the Electronic Industries Alliance: www.eiae.org

16.

Damage Requiring Service 

- The appliance should be serv-

iced by qualified service personnel when:

A.

The power supply cord or the plug has been damaged; or

B.

Objects have fallen, or liquid has been spilled into the appli-
ance; or

C.

The appliance has been exposed to rain; or

D.

The appliance does not appear to operate normally or
exhibits a marked change in performance; or

E.

The appliance has been dropped, or the enclosure damaged.

17.

Tilt/Stability

- All televisions must comply with recommended

international global safety standards for tilt and stability properties of
its cabinet design.
• Do not compromise these design standards by applying excessive
pull force to the front, or top, of the cabinet which could ultimately
overturn the product.
• Also, do not endanger yourself, or children, by placing electronic
equipment/toys on the top of the cabinet. Such items could unsus-
pectingly fall from the top of the set and cause product damage
and/or personal injury.

18.

Wall or Ceiling Mounting 

- The appliance should be mount-

ed to a wall or ceiling only as recommended by the manufacturer.

19.

Power Lines 

- An outdoor antenna should be located away from

power lines.

20.

Outdoor Antenna Grounding 

- If an outside antenna is

connected to the receiver, be sure the antenna system is grounded so
as to provide some protection against voltage surges and built up
static charges.
Section 810 of the National Electric Code, ANSI/NFPA No. 70-1984,
provides information with respect to proper grounding of the mast
and supporting structure, grounding of the lead-in wire to an anten-
na discharge unit, size of grounding connectors, location of antenna-
discharge unit, connection to grounding electrodes, and requirements
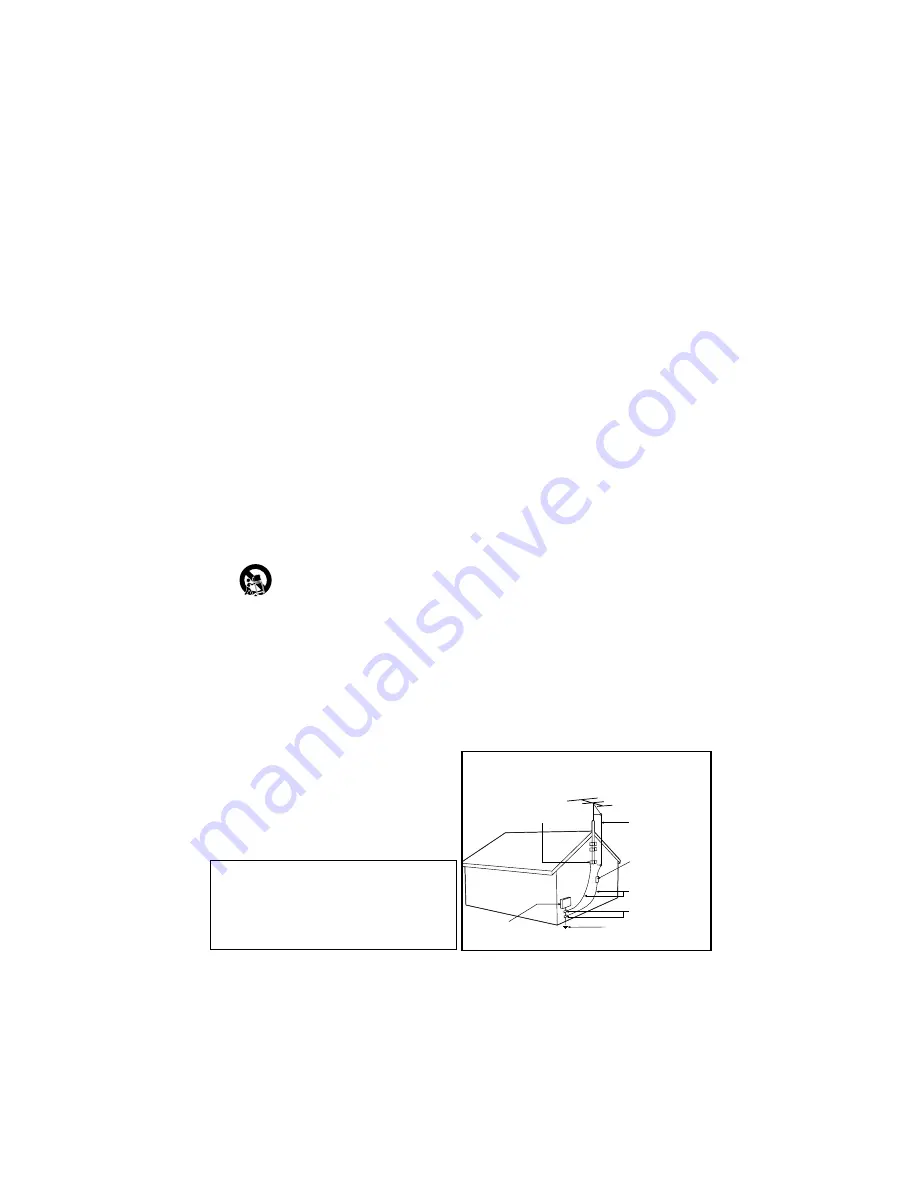
for the grounding electrode. See Figure below.

21.

Object and Liquid Entry

- Care should be taken so that

objects do not fall and liquids are not spilled into the enclosure
through openings.comply with recommended international global safety
standards for tilt and stability properties of its cabinet design.

22.

Battery Usage CAUTION - 

To prevent battery leakage that

may result in bodily injury, property damage, or damage to the unit:
• Install all batteries correctly, with + and - aligned as marked on
the unit.
• Do not mix batteries (old and new or carbon and alkaline, etc.).
• Remove batteries when the unit is not used for a long time.

ANTENNA LEAD IN WIRE

ANTENNA DISCHARGE UNIT 

(NEC SECTION 810-20)

GROUNDING CONDUCTORS 

(NEC SECTION 810-21)

GROUND CLAMPS

POWER SERVICE GROUNDING ELECTRODE SYSTEM 

(NEC ART 250, PART H)

GROUND CLAMP

ELECTRIC SERVICE EQUIPMENT

Note to the CATV system installer:

This

reminder is provided to call the CATV system
installer's attention to Article 820-40 of the NEC
that provides guidelines for proper grounding and, in
particular, specifies that the cable ground shall be
connected to the grounding system of the building,
as close to the point of cable entry as practical.

Example of Antenna Grounding
as per NEC - National Electric Code

Summary of Contents for 27MS4504 - 27" Stereo Tv

Page 1: ...MS4504R Read your Quick Use Guide and or User Manual first for quick tips that make your using your Philips product more enjoyable If you have read your instructions and still need assistance you may...

Page 2: ...ation point calls attention to features for which you should read the enclosed literature closely to prevent operating and maintenance problems WARNING TO PREVENT FIRE OR SHOCK HAZARD DO NOT EXPOSE TH...

Page 3: ...e has been dropped or the enclosure damaged 17 Tilt Stability All televisions must comply with recommended international global safety standards for tilt and stability properties of its cabinet design...

Page 4: ...4 Headphone Jack 8 Automatically Program TV 13 Basic Remote Operation 3 Basic Television Operation 3 Cable Cable Box Basic Connection 1 2 Care and Cleaning 28 Channel Edit 14 Closed Caption Control 24...

Page 5: ...s threaded screw it down finger tight ANT 75 L Mono Monitor out VIDEO S VIDEO AV1 in Y Pb Pr AV2 in AUDIO R COMPONENT VIDEO INPUT 1 Back of TV Cable signal coming from Cable Company Jack Panel Back of...

Page 6: ...ble box to CH 3 or 4 Tune the TV to the same chan nel and change channels at the cable box Cable Box w Audio Video Outputs This connection will supply Stereo sound 4Connect the Cable Company sup plied...

Page 7: ...ies 2 AA in the remote Be sure the and ends of the batteries line up correctly inside of case is marked 7Reattach the battery lid TELEVISION REMOTE CONTROL BATTERY INSTALLATION Remember the tuned chan...

Page 8: ...cks on the rear of the VCR either one or two or accessory device being used 5Turn the VCR either one or two or accessory device and the TV ON 6Press the CH or CH buttons to set theTV to its AV1or AV2...

Page 9: ...f the AUDIO red and white CABLES to the AUDIO left and right OUT jacks on the rear of the VCR 3Turn the VCR and the TV ON 4Press the CH or CH buttons to set theTV to its SVHS2 channel Go to your lowes...

Page 10: ...l 1 then change channels down to find the correct source channel 5Insert a DVD disc into the DVD player and press the PLAY button on the DVD Player The description for the component video connec tors...

Page 11: ...ble to the Monitor out VIDEO plug Connect the other end to the VIDEO IN plug on the second VCR 4Connect one end of the red and white Audio cable from the Monitor out AUDIO L and R plugs on the TV to t...

Page 12: ...white jack on the SIDE of the television 3Turn the TV and the accessory device ON 4Press the CH or CH buttons to set the TV to its Front channel Go to your lowest chan nel for example channel 1 then...

Page 13: ...H Button Alternate Channel Press to switch between the last channel and the present channel Details are on panel 27 STATUS EXIT Button Press to see the current channel number Press to remove a menu CC...

Page 14: ...ns Press to increase or decrease the sound MENU Button Press to see the menu Press repeatedly to return to previous menus or remove the menus Arrow 2 3 5 Buttons Press to select or adjust items in the...

Page 15: ...ess the CURSOR RIGHT button repeatedly to select ENGLISH or ESPA OL Spanish 6When finished press the STATUS EXIT button to remove the menu from the TV s screen The Language control only makes the TV s...

Page 16: ...UP or DOWN buttons to scroll the Install features until the words TUNER MODE is high lighted 5Press the CURSOR RIGHT button to select either ANTENNA CABLE or AUTO mode 6When finished press the STATUS...

Page 17: ...r TV can automatically set itself for local area or Cable TV chan nels This makes it easy for you to select only the TV stations in your area when the CHANNEL or buttons are pressed Note Make sure the...

Page 18: ...been skipped 7Using the CURSOR DOWN button scroll the menu to highlight the word SKIPPED 8Now use the CURSOR RIGHT 3 button to toggle between ON or OFF If ON is selected the channel is skipped when sc...

Page 19: ...ns to obtain natural skin tones 6Color Temp Press the CURSOR RIGHT 3 3 or LEFT 2 2 buttons to select NORMAL COOL or WARM picture preferences NOR MAL will keep the whites white COOL will make the white...

Page 20: ...r buttons to turn the control On or Off When On the control will enhance the low frequency sounds 3Balance Press the or but tons to adjust the level of sound com ing from the left and right speakers 4...

Page 21: ...the TV Expand 4 3 Enlarges the picture to fill out the entire screen area eliminating the letter box effect 6When finished press the STA TUS EXIT button to remove the menu from the TV s screen Note Th...

Page 22: ...tains material that parents may find unsuitable for children under the age of 13 MOVIE RATINGS Continued R Restricted This is programming is specifi cally designed for adults Anyone under the age of 1...

Page 23: ...nels and get a better understanding of the rating terms for certain programming First let s start by learning how to set a per sonal access code 1Press the MENU button on the remote to show the on scr...

Page 24: ...ct the channels or the A V Inputs you want to block out or censor Once you ve entered your access code and the SmartLock features are displayed on the screen 1Press the CURSOR UP 5or DOWN buttons unti...

Page 25: ...ked chan nels All channels will be viewable If BLOCK ALL is selected press the CURSOR RIGHT 3 button to turn the control ON or OFF When ON is selected ALL available channels will be blocked from viewi...

Page 26: ...display the MOVIE RAT ING options G PG PG 13 R NC17 or X 3Press the CURSOR UP 5 or DOWN buttons to highlight any of the Movie Rating options When highlighted all these options can be turned ON which...

Page 27: ...sy violence S sexual situations L coarse language or D suggestive dialogue 4Press the CURSOR RIGHT 3 button on the remote to turn the TV Y or TV G rating ON or OFF Or press the CURSOR RIGHT 3 button t...

Page 28: ...on the Movie Ratings or Parental TV Guidelines can be blocked if this fea ture is set to ON and the BLOCKING feature is set to OFF NO RATING ALL programming with NO content advisory data can be blocke...

Page 29: ...Mute CC Off CC1 CC2 CC Off 1 2 3 POWER CH CH VOL VOL STATUS EXIT SLEEP MUTE SMART PICTURE SOUND SURF A CH 4 5 6 7 8 9 0 CC MENU MAGNAVOX 3 1 2 Your TV can be set to automatically turn itself off at a...

Page 30: ...picture options for watching sporting events WEAK SIGNAL Preset pic ture options for watching pro grams where the reception is not at its best MULTIMEDIA Preset picture options for use with video gami...

Page 31: ...the channel numbers once and flip between the two channels with the touch of only one button After entering the two channels numbers so that one is the last viewed channel and the other is the current...

Page 32: ...remote control If you re attempting to hook up auxiliary equipment check the audio jack connec tions located on the front of the TV Remote Does Not Work Check the batteries If necessary replace them w...

Page 33: ...n aging of the picture tube Stock market tickers presented at the bottom of the TV screen Shopping channel logos and pric ing displays bright and shown con stantly or repeatedly in the same loca tion...

Page 34: ...s pr s de chez vous NOTA Si Ud reside en una de nuestras zonas para sucursales Philips de servicio al de f bri ca ver directorio m s abajo Ud puede comunicarse con la sucursal de servicio m s cer cana...

Page 35: ...O EL PAIS PARA LA RECEPCION DE PRO DUCTOS NECESITADOS DE REPARACIONES COMUNICARSE CON EL CENTRO DE SERVICIO DE FABRICA MAS CERCANO PARA ESTOS LUGARES DENTRO DE UN RADIO DE 80 A 120 KM 50 A 75 MILLAS D...

Page 36: ...e the product the local Magnavox service organiza tion will attempt to provide service although there may be a delay if the appropriate spare parts and technical manual s are not readily available MAK...

Reviews: