background image

S

ETTING

U

P A

S

MART

L

OCK

™ A

CCESS

C

ODE

19

1

2

3

POWER

CH

CH

VOL

VOL

STATUS

EXIT

SLEEP

MUTE

SMART

PICTURE

SOUND

SURF

A/CH

4

5

6

7

8

9

0

CC

MENU

MAGNAVOX

Main

Picture

Sound

Features

Install

SmartLock

Format

Features

SmartLock

Format

Timer

Start Time

Stop Time

Channel

Activate

Display

Features

SmartLock

Format

Access Code

  - - - -

SmartLock

Block Channel

Setup Code

Clear All

Block All

Movie Rating

TV Rating

OffStop Time

Channel

Activate

Display

Features

SmartLock

Format

Access Code

 XXXX

Features

SmartLock

Format

Access Code

 XXXX

Incorrect

Features

SmartLock

Format

New Code

  - - - -

Features

SmartLock

Format

Confirm Code

 XXXX

1

3

5

2

4

6

7

2

4

Some models refer to SmartLock as

SmartLock, your TV may show SmartLock

instead of SmartLock in the on-screen

menu. These features are the same.

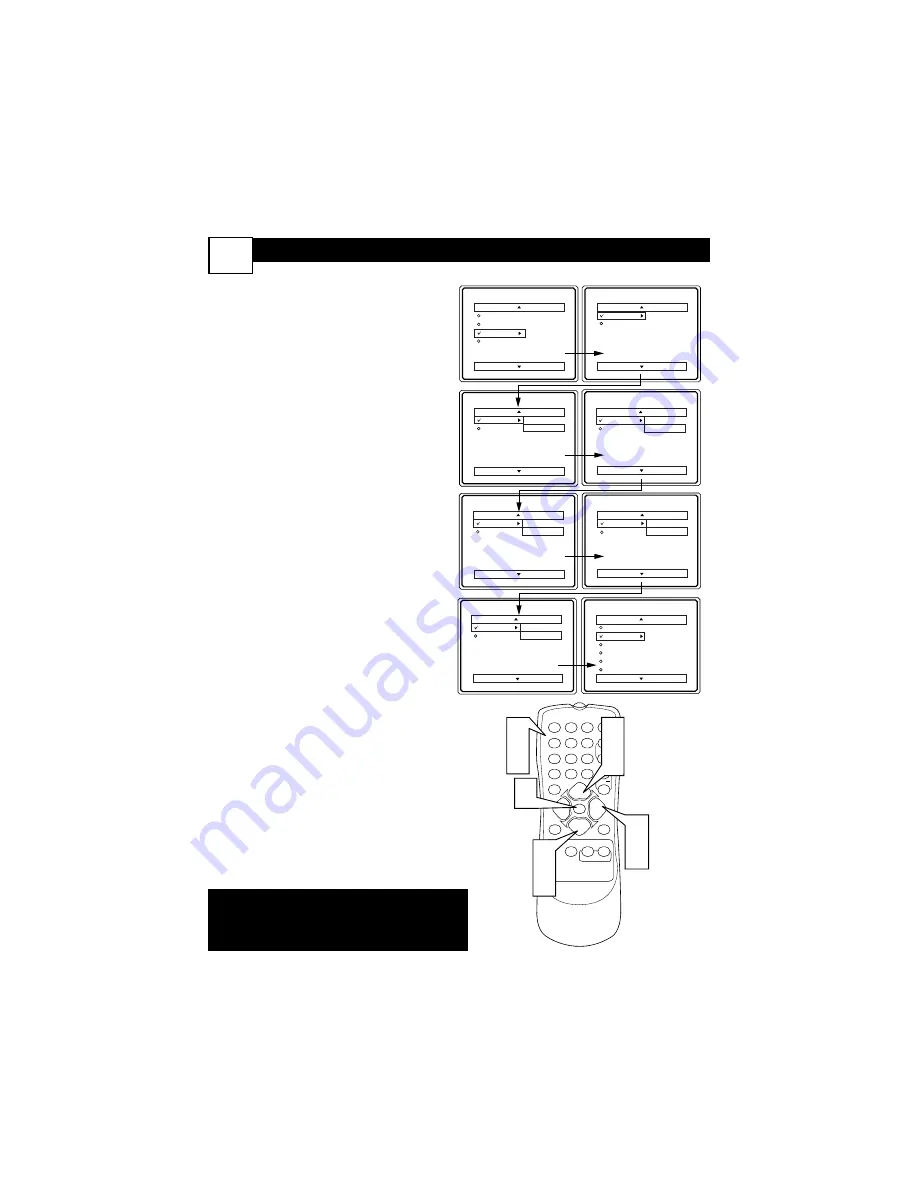
O

ver the next few panels you’ll learn how
to block channels and get a better

understanding of the rating terms for certain
programming. 

First, let’s start by learning how to set a per-
sonal access code:

1

Press the MENU button 

on the

remote to show the on-screen
menu.

2

Press the CURSOR UP 

5

or

DOWN

▼ 

buttons

until the word

FEATURES

is highlighted.

3

Press the CURSOR RIGHT 

3

button 

to display the FEATURES

menu options.

4

Press the CURSOR UP 

5

or

DOWN

▼ 

buttons

until the

words SmartLock™ are highlighted.

5

Press the CURSOR RIGHT 

3

button.

The screen will read,

“ACCESS CODE - - - - .”

6

Using the NUMBERED buttons,
enter 0, 7, 1, 1. “XXXX”

appears on the Access Code screen
as you press the numbered buttons.

“INCORRECT CODE”

will

appear on the screen, and 

you will

need to enter 0, 7, 1, 1 again.

7

The screen will ask you to enter a
“New Code.” 

Enter a “new” 4

digit code using the NUM-
BERED buttons. 

The screen will

then ask you to CONFIRM the code
you just entered.

Enter your new

code again. “XXXX” 

will appear

when you enter your new code and
then display the SmartLock™ menu
options.

Proceed to the next panel to learn more...

Summary of Contents for 27MS4504 - 27" Stereo Tv

Page 1: ...MS4504R Read your Quick Use Guide and or User Manual first for quick tips that make your using your Philips product more enjoyable If you have read your instructions and still need assistance you may...

Page 2: ...ation point calls attention to features for which you should read the enclosed literature closely to prevent operating and maintenance problems WARNING TO PREVENT FIRE OR SHOCK HAZARD DO NOT EXPOSE TH...

Page 3: ...e has been dropped or the enclosure damaged 17 Tilt Stability All televisions must comply with recommended international global safety standards for tilt and stability properties of its cabinet design...

Page 4: ...4 Headphone Jack 8 Automatically Program TV 13 Basic Remote Operation 3 Basic Television Operation 3 Cable Cable Box Basic Connection 1 2 Care and Cleaning 28 Channel Edit 14 Closed Caption Control 24...

Page 5: ...s threaded screw it down finger tight ANT 75 L Mono Monitor out VIDEO S VIDEO AV1 in Y Pb Pr AV2 in AUDIO R COMPONENT VIDEO INPUT 1 Back of TV Cable signal coming from Cable Company Jack Panel Back of...

Page 6: ...ble box to CH 3 or 4 Tune the TV to the same chan nel and change channels at the cable box Cable Box w Audio Video Outputs This connection will supply Stereo sound 4Connect the Cable Company sup plied...

Page 7: ...ies 2 AA in the remote Be sure the and ends of the batteries line up correctly inside of case is marked 7Reattach the battery lid TELEVISION REMOTE CONTROL BATTERY INSTALLATION Remember the tuned chan...

Page 8: ...cks on the rear of the VCR either one or two or accessory device being used 5Turn the VCR either one or two or accessory device and the TV ON 6Press the CH or CH buttons to set theTV to its AV1or AV2...

Page 9: ...f the AUDIO red and white CABLES to the AUDIO left and right OUT jacks on the rear of the VCR 3Turn the VCR and the TV ON 4Press the CH or CH buttons to set theTV to its SVHS2 channel Go to your lowes...

Page 10: ...l 1 then change channels down to find the correct source channel 5Insert a DVD disc into the DVD player and press the PLAY button on the DVD Player The description for the component video connec tors...

Page 11: ...ble to the Monitor out VIDEO plug Connect the other end to the VIDEO IN plug on the second VCR 4Connect one end of the red and white Audio cable from the Monitor out AUDIO L and R plugs on the TV to t...

Page 12: ...white jack on the SIDE of the television 3Turn the TV and the accessory device ON 4Press the CH or CH buttons to set the TV to its Front channel Go to your lowest chan nel for example channel 1 then...

Page 13: ...H Button Alternate Channel Press to switch between the last channel and the present channel Details are on panel 27 STATUS EXIT Button Press to see the current channel number Press to remove a menu CC...

Page 14: ...ns Press to increase or decrease the sound MENU Button Press to see the menu Press repeatedly to return to previous menus or remove the menus Arrow 2 3 5 Buttons Press to select or adjust items in the...

Page 15: ...ess the CURSOR RIGHT button repeatedly to select ENGLISH or ESPA OL Spanish 6When finished press the STATUS EXIT button to remove the menu from the TV s screen The Language control only makes the TV s...

Page 16: ...UP or DOWN buttons to scroll the Install features until the words TUNER MODE is high lighted 5Press the CURSOR RIGHT button to select either ANTENNA CABLE or AUTO mode 6When finished press the STATUS...

Page 17: ...r TV can automatically set itself for local area or Cable TV chan nels This makes it easy for you to select only the TV stations in your area when the CHANNEL or buttons are pressed Note Make sure the...

Page 18: ...been skipped 7Using the CURSOR DOWN button scroll the menu to highlight the word SKIPPED 8Now use the CURSOR RIGHT 3 button to toggle between ON or OFF If ON is selected the channel is skipped when sc...

Page 19: ...ns to obtain natural skin tones 6Color Temp Press the CURSOR RIGHT 3 3 or LEFT 2 2 buttons to select NORMAL COOL or WARM picture preferences NOR MAL will keep the whites white COOL will make the white...

Page 20: ...r buttons to turn the control On or Off When On the control will enhance the low frequency sounds 3Balance Press the or but tons to adjust the level of sound com ing from the left and right speakers 4...

Page 21: ...the TV Expand 4 3 Enlarges the picture to fill out the entire screen area eliminating the letter box effect 6When finished press the STA TUS EXIT button to remove the menu from the TV s screen Note Th...

Page 22: ...tains material that parents may find unsuitable for children under the age of 13 MOVIE RATINGS Continued R Restricted This is programming is specifi cally designed for adults Anyone under the age of 1...

Page 23: ...nels and get a better understanding of the rating terms for certain programming First let s start by learning how to set a per sonal access code 1Press the MENU button on the remote to show the on scr...

Page 24: ...ct the channels or the A V Inputs you want to block out or censor Once you ve entered your access code and the SmartLock features are displayed on the screen 1Press the CURSOR UP 5or DOWN buttons unti...

Page 25: ...ked chan nels All channels will be viewable If BLOCK ALL is selected press the CURSOR RIGHT 3 button to turn the control ON or OFF When ON is selected ALL available channels will be blocked from viewi...

Page 26: ...display the MOVIE RAT ING options G PG PG 13 R NC17 or X 3Press the CURSOR UP 5 or DOWN buttons to highlight any of the Movie Rating options When highlighted all these options can be turned ON which...

Page 27: ...sy violence S sexual situations L coarse language or D suggestive dialogue 4Press the CURSOR RIGHT 3 button on the remote to turn the TV Y or TV G rating ON or OFF Or press the CURSOR RIGHT 3 button t...

Page 28: ...on the Movie Ratings or Parental TV Guidelines can be blocked if this fea ture is set to ON and the BLOCKING feature is set to OFF NO RATING ALL programming with NO content advisory data can be blocke...

Page 29: ...Mute CC Off CC1 CC2 CC Off 1 2 3 POWER CH CH VOL VOL STATUS EXIT SLEEP MUTE SMART PICTURE SOUND SURF A CH 4 5 6 7 8 9 0 CC MENU MAGNAVOX 3 1 2 Your TV can be set to automatically turn itself off at a...

Page 30: ...picture options for watching sporting events WEAK SIGNAL Preset pic ture options for watching pro grams where the reception is not at its best MULTIMEDIA Preset picture options for use with video gami...

Page 31: ...the channel numbers once and flip between the two channels with the touch of only one button After entering the two channels numbers so that one is the last viewed channel and the other is the current...

Page 32: ...remote control If you re attempting to hook up auxiliary equipment check the audio jack connec tions located on the front of the TV Remote Does Not Work Check the batteries If necessary replace them w...

Page 33: ...n aging of the picture tube Stock market tickers presented at the bottom of the TV screen Shopping channel logos and pric ing displays bright and shown con stantly or repeatedly in the same loca tion...

Page 34: ...s pr s de chez vous NOTA Si Ud reside en una de nuestras zonas para sucursales Philips de servicio al de f bri ca ver directorio m s abajo Ud puede comunicarse con la sucursal de servicio m s cer cana...

Page 35: ...O EL PAIS PARA LA RECEPCION DE PRO DUCTOS NECESITADOS DE REPARACIONES COMUNICARSE CON EL CENTRO DE SERVICIO DE FABRICA MAS CERCANO PARA ESTOS LUGARES DENTRO DE UN RADIO DE 80 A 120 KM 50 A 75 MILLAS D...

Page 36: ...e the product the local Magnavox service organiza tion will attempt to provide service although there may be a delay if the appropriate spare parts and technical manual s are not readily available MAK...

Reviews: