background image

11

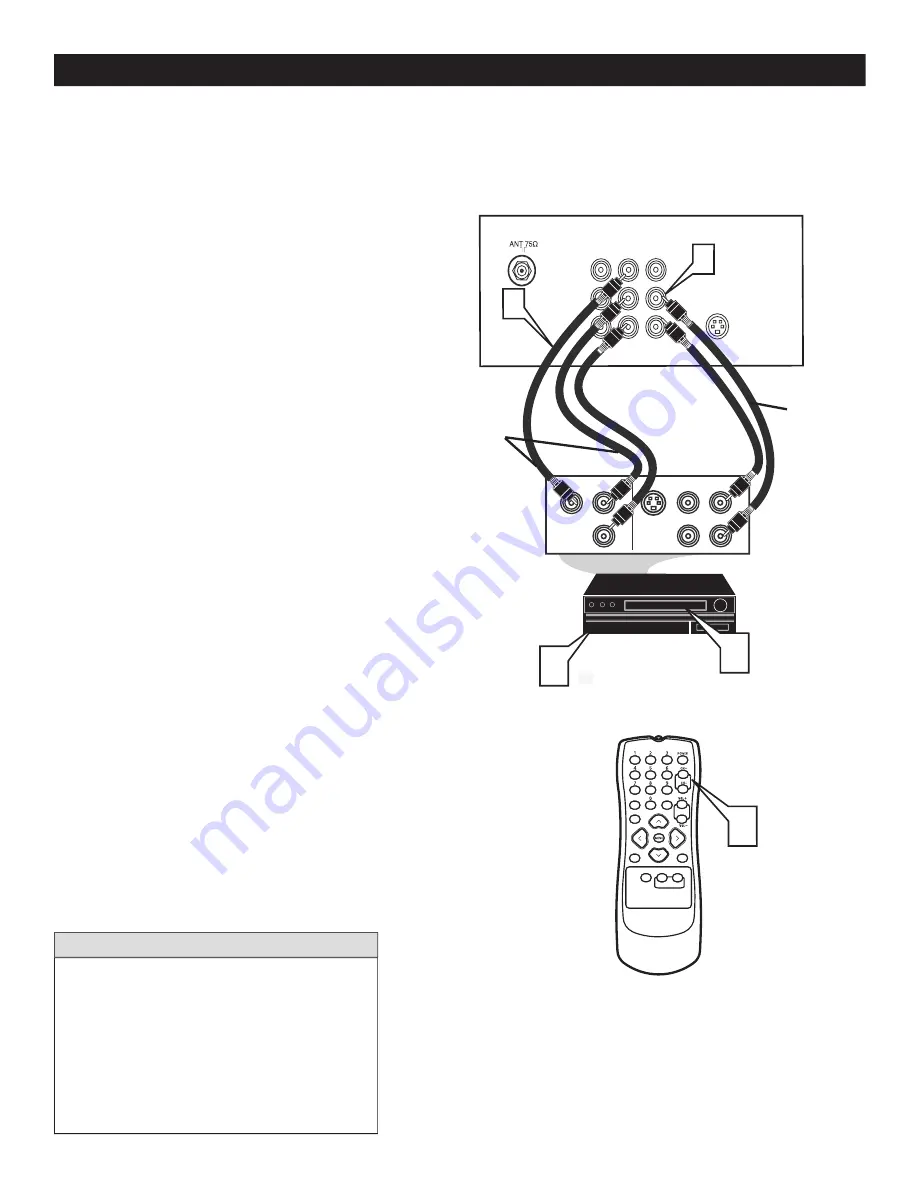
COMPONENT VIDEO (CVI) INPUT CONNECTIONS

C

omponent Video inputs provide for the highest possible color and picture resolution on the playback of digital signal 
source material, such as with DVD players. The colour difference signals (Pb, Pr) and the luminance(Y) signal are 

connected and received separately, which allows for improved color bandwidth information (not possible when using 
composite video or S-Video connections).

1


Connect the Component (Y, Pb, Pr) 
Video OUT 

jacks from the DVD player (or 

similar device) to the (Y, Pb, Pr) in(put) jack 
on the TV.  When using the Component Video 
Inputs, it is best not to connect a signal to the 
AV in Video Jack.

2


Connect the red and white AUDIO 
CABLES 

to the Audio (left and right) output 

jacks on the rear of the accessory device to the 
Audio (L and R) AV Input Jacks on the TV.

3


Turn the TV and the DVD (or digital 
accessory device) ON.

4


Press the AV button or the CH+ or CH- 
buttons 

on the remote control to scroll the 

channels until CVI appears in the upper left 
corner of the TV screen.

5


Insert a DVD disc into the DVD player and 
press the PLAY  

Æ

 button on the DVD Player.

The description for the component video 
connectors may differ depending on the DVD 
player or accessory digital source equipment 
used (for example, Y, Pb, Pr; Y, B-Y, R-Y; Y, Cr, 
Cb).  Although abbreviations and terms may vary, 
the letters b and r stand for blue and red color 
component signal. Refer to your DVD or digital  
accessory owen’s manual for definitions and 
connection details.

H

ELPFUL

 H

INTS

L

VIDEO

S-VIDEO

CVI

Y

Pb

Pr

AUDIO

AV In

R

S-VIDEO

OUT

OUT

OUT

L

R

AUDIO

VIDEO

COMP VIDEO

Y

Pb

Pr

3

5

4

1

2

Component

Video Cables

(Green, Blue,

Red)

Audio

Cables

(Red &

White)

Accessory Device

Equipped with

Component Video

Outputs

Back of TV

STATUS

EXIT

A/CH

SLEEP

MUTE

SMART

SOUND

PICTURE

SURF

CC

Summary of Contents for 20MT4405 - 20" Real Flat Stereo Tv

Page 1: ...20MT4405 3139 125 35882 English...

Page 2: ...dex 34 Smart Picture lets you select from five pre set picture settings Personal Movies Sports Multimedia or Weak signals with the push of one button Pg 18 Smart Sound lets you select from four pre se...

Page 3: ...required from you to obtain warranty service Product Safety Notification By registering your product you ll receive notification directly from the manufac turer in the rare case of a product recall o...

Page 4: ...e in performance or E The TV has been dropped or the enclosure damaged 17 Tilt Stability All televisions must comply with recommended international global safety standards for tilt and stability prope...

Page 5: ...Cable TV signal or Antenna signal is a round cable 75 ohm then you are ready to connect to the TV If your antenna has flat twin lead wire 300 ohm you first need to switch the antenna wires to the scre...

Page 6: ...Point the remote control toward the remote sensor window on the TV when operating the TV with the remote 1 Remove the battery compartment lid at the back of the remote 2 Place the batteries 2 AA in t...

Page 7: ...Audio Out L R jacks on the cable box Connect the other end to the AV In Audio L R Input jacks on the TV NOTE Use the AV button on the TV remote control to tune to the AV channel or the cable box sign...

Page 8: ...nd white cables to the AUDIO left and right AV In jacks on the rear of the TV 3 Connect the VIDEO yellow cable to the VIDEO OUT jack at the back of the VCR 4 Connect the AUDIO red and white cables to...

Page 9: ...the Audio In white jack on the SIDE or FRONT of the television For Mono Devices Connect one end of the audio cable from the Audio Out jack on the device to the Audio In white jack on the SIDE of the t...

Page 10: ...on the rear of the TV 2 Connect the other end of the S VIDEO CABLE to the S VHS S Video OUT jack on the back of the VCR Connect the other end of the AUDIO red and white CABLES to the AUDIO red and wh...

Page 11: ...t Jacks on the TV 3 Turn the TV and the DVD or digital accessory device ON 4 Press the AV button or the CH or CH buttons on the remote control to scroll the channels until CVI appears in the upper lef...

Page 12: ...V1 channel to view a pre recorded tape The following steps allow you to connect a second VCR to record the program while watching it 1 Connect on end of the yellow Video Cable to the AV Out Video plug...

Page 13: ...or enter values in the on screen menu For single channel entries press the numbered button for the channel you desire The TV will pause for a second or two before changing to the chosen channel SMART...

Page 14: ...screen menu to be show in English French or Spanish Fyou can set the TV s on screen menu to be show in English French or Spanish F 1 Press the MENU button on the remote control to show the on screen...

Page 15: ...INSTALL is highlighted 3 Press the CURSOR to display the INSTALL menu features 4 Press the CURSOR or to scroll through the Install features until the word TUNER MODE is highlighted 5 Press the CURSOR...

Page 16: ...s in the TV s memory then tune to the lowest available channel when done 6 When finished press the STATUS EXIT button on the remote control to remove the menu from the TV s screen You can auto install...

Page 17: ...annels that have not been skipped 7 Using CURSOR scroll the menu to highlight the word SKIPPED 8 Use CURSOR to toggle between ON or OFF If ON is selected the channel is skipped when scrolling channels...

Page 18: ...he picture quality The black portions of the picture become richer in darkness and the whites become brighter To adjust your TV picture controls select a channel and use the Picture Menu Controls list...

Page 19: ...r Mono settings Note If Stereo is not present on a selected show and the TV is in Stereo mode the sound coming from the TV will remain in the Mono mode To adjust your TV sound controls select a channe...

Page 20: ...re screen area elimating the letterbox effect 6 When finished press STATUS EXIT button on the remote control to remove the menu from the TV s screen NOTE The Expand 4 3 and can also be activated using...

Page 21: ...er an access code has been programmed you can block individual channels including the A V inputs Channel Block Clear All Lets you clear all channels being blocked from your viewing set with the Channe...

Page 22: ...code Enter the new code again XXXX will appear when you enter your new code and then display the SmartLock menu options Proceed to the next page to learn more Over the next few pages you ll learn how...

Page 23: ...d 6 When finished press the STATUS EXIT button on the remote control to remove the menu from the screen NOTE If you forget your code key 0 7 1 1 This is the factory default factory default factory def...

Page 24: ...If you forget your code key 0 7 1 1 This is the factory default factory default factory def Enter this code to create a new access code This is a continu This is a continu T ation of the previous page...

Page 25: ...viewing 4 Use CURSOR to turn the rating option ON or OFF NOTE If you forget your code key 0 7 1 1 This is the factory default factory default factory def Enter this code to create a new access code T...

Page 26: ...e TV Y or TV G rating ON or OFF Or press CURSOR to enter the sub menus for the TV Y7 TV PG TV 14 or TV MA ratings 5 If the TV Y7 TV PG TV 14 or TV MA sub menu is accessed press CURSOR or to select one...

Page 27: ...dvisory data can be locked if it is set to ON and the BLOCKING feature is set to ON 3 Press CURSOR or to highlight the desired feature 4 When highlighted each feature can be turned ON or OFF using CUR...

Page 28: ...select the amount of time 15 30 45 60 90 120 180 or 240 minutes before the TV automatically switches Off NOTE An onscreen countdown will appear during the last minute before the TV switches Off If any...

Page 29: ...cable signal coming from Cable TV Company to the TV Composit Video Input Connection An analog encoded video signal that includes vertical and horizontal synchronizing information Since both luminance...

Page 30: ...the cable or broadcast stations are in STEREO Try checking with several major network stations to be sure that the station you selected is in STEREO 2 When SAP is turned ON the sound mode is automati...

Page 31: ...he picture tube Stock market tickers presented at the bottom of the TV screen Shopping channel logos and pricing displays bright and shown constantly or repeatedly in the same location on the TV scree...

Page 32: ...tput RMS Sound Enhancement CONVENIENCE ON SCREEN DISPLAY LANGUAGES CONNECTIVITY Rear Side WEIGHT DIMENSIONS Weight incl Packaging Weight excl Packaging Visible diagonal screen size Auto Program Closed...

Page 33: ...ent because of improper installation connections to improper voltage supply abuse neglect misuse accident unauthorized repair or other cause not within the control of Magnavox A product that requires...

Page 34: ...emp 18 Constrast 18 Color Temperature Color Temp Control 18 Picture 18 Sharpness 18 Registration of TV Information 3 Remote Control button descriptions 13 Safety Precautions 4 S Video S VHS Input Conn...

Reviews: