background image

English

27

USB

Your TV is fitted with a USB connection that enables you to view 

photos or watch Motion JPEG files stored on a USB Memory Stick.

1

  Connect the USB Memory Stick to the USB terminal on the side of 

your TV.

2

  Press 

MENU

 and use ▲▼ to select 

USB

, then press 

OK

.

•  The highlighted text will move to the name of your USB 

Memory Stick, then press 

OK

 again.

\

Picture

Your USB

Sound

This menu allows you to enjoy

your pictures and videos via 

your USB device.

Setup
Features
Language

USB

3

  Use ▲▼ to select the 

Picture

 or 

Video

, then press 

OK

.

•  The files recorded under the following specifications are 

required.

Picture (JPEG)

Upper limit 24Mpixel

Video

(Motion JPEG)

Size

320 x 240 (QVGA)

Frame rate 30fps

Audio type LPCM

Sampling frequency

(32 kHz, 44.1 kHz or 48 kHz)

Quantization bit rate (16 bit)

Note


 Up to 2GB (FAT16) or 8GB (FAT32) capacity can be supported.


Up to 10,000 files or 1,000 folders with 19 hierarchies can be recognized.


Up to 255 English characters can be recognized.


This unit does not support MTP(Media Transfer Protocol).


This unit supports FAT16 and FAT32 file systems.


If the file is not supported, an error message appears.


When the USB Memory Stick is not recognized, try reconnecting it again.


We cannot be held responsible if your USB Memory Stick is not supported, nor will we 

accept any liability for damage or loss of stored data.


A file name exceeding 128 characters or contains a dot character is not supported on 

this TV.


Progressive JPEG files are not supported.


Only a Motion JPEG file with an “.avi” extension is supported. An extension “.mov” is 

not supported.


During Motion JPEG playback, “Pause”, “Forward” and “Reverse” do not work on this 

unit.

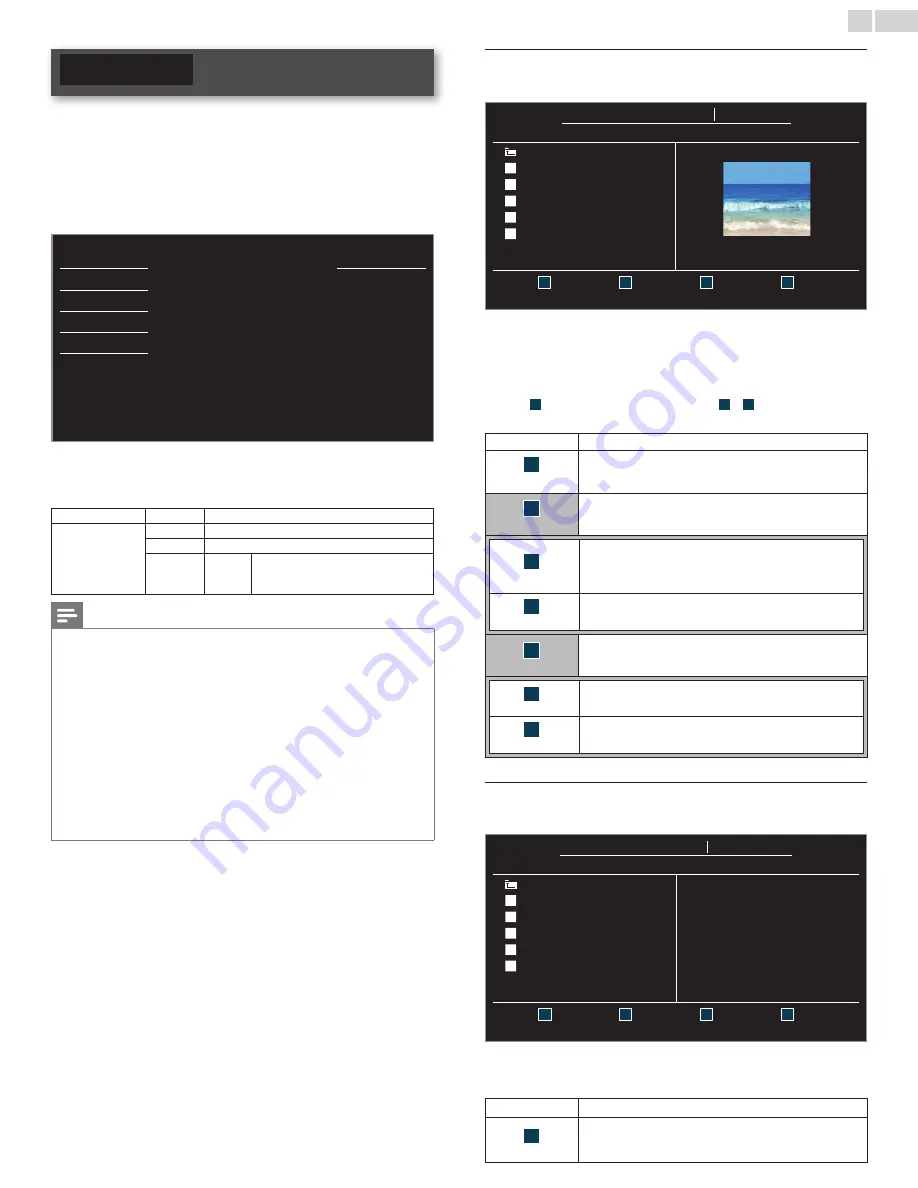
Picture (JPEG)

1

  Use ▲▼ to select the desired file, then press 

OK

.

Your USB

Picture Picture

Picture

Image1.jpg

..
Image1.jpg

Image2.jpg
Image3.jpg
Image4.jpg
Image5.jpg

Image1.jpg

1200:900

2009:04:02 17:42:06

1

2

Thumbnails

3

4

Press “OK” key to play/pause

•  To toggle between 

List

 and 

Thumbnails

 press 

the NUMBER 2 button

 each time.

•  The unit goes to the Slide show automatically.


   To pause / play the Slide show, press 

OK

.

•  Use 

the NUMBER buttons

 (

1

 through 

4

) to see the file detail   

1


) or change the following settings ( 

2


4


).


   See the description on the top of the next column.

Item

Detail

1

More Detail

Press 

1

 to display file details below.

Name

Album

Date

Size

 and 

Next

.

Press 

again to remove file details.

4

Start show

Press 

4

 or 

OK

 to start the Slide show.

While the Slide show is on, the following 2 settings will be 

displayed. 

2

Transitions

Press 

2

, then use 

▲▼

 to select the transition mode 

choosing from;

None

Dissolve

Wipe right

Wipe left

Wipe up

Wipe down

Box in

 and 

Box out

.

3

Slide time

Press 

3

, then use 

▲▼

 to change the display time 

choosing from; 

Short

Medium

 and 

Long

.

4

Stop show

Press 

4

 or 

OK

 to stop the Slide show.

While the Slide show is Off, the following 2 settings will be 

displayed. 

2

Rotate

Every press on 

2

 will turn the picture clockwise by 90 

degrees. 

3

Zoom

Press 

3

, then use 

▲▼

 to select the zoom factor (1x, 2x 

or 4x). Press 

OK

 to set the zoom factor.

Video (Motion JPEG)

1

  Use ▲▼ to select the desired file, then press 

OK

.

Your USB

Video Video

Video

MOVIE1.avi

..
MOVIE1.avi

MOVIE2.avi
MOVIE3.avi
MOVIE4.avi
MOVIE5.avi

Title:

MOVIE1.avi

Director:

Date:

2009/04/02

Duration:

00:06:37

1

2

3

4

Supported format: motion jpeg, 320 x 240, 30FPS

•  To stop playback and return to the file list, press 

BACK

OK

 or 

CH +

.

•  Press 

CH −

 to play back from the beginning.

Item

Detail

1

More Detail

Press 

1

 to display file details below.

Title

Director

Date

 and 

Duration

.

Press 

1

 again to remove file details.

Summary of Contents for 19ME402V

Page 1: ...www magnavox com support www magnavox com support Owner s Manual Manual del Propietario Manuel du Propri taire 1 866 341 3738 1 866 341 3738 1 866 341 3738 Necesita ayuda inmediata 39ME412V 32ME402V 2...

Page 2: ...n external device 14 Using auto mode 14 Sleep timer 14 Freeze mode 14 Switching audio mode 14 fun Link options 15 Changing picture format 15 TV screen information 16 5 Use more of your TV 17 Displayin...

Page 3: ...us large de la fiche dans la borne correspondante de la prise et pousser jusqu au fond CAUTION TO REDUCE THE RISK OF ELECTRIC SHOCK DO NOT REMOVE COVER OR BACK NO USER SERVICEABLE PARTS INSIDE REFER S...

Page 4: ...ing system of the building as close to the point of cable entry as practical Example of Antenna Grounding as per NEC National Electric Code ANTENNA DISCHARGE UNIT NEC SECTION 810 20 GROUNDING CONDUCTO...

Page 5: ...n the equipment and the receiver Connect the equipment into an outlet on a circuit different from that to which the receiver is connected Consult the dealer or an experienced radio or television techn...

Page 6: ...a space of 4 inches 10cm or more around this apparatus Press to turn the unit on and go into standby mode To completely turn Off the unit you must unplug the AC power cord Disconnect the AC plug to sh...

Page 7: ...HDMI link fun Link allows your other HDMI link devices to be controlled by the HDMI cable connected to yourTV HDMI Input HDMI DVI Input If your video device has DVI Output jack use an HDMI DVI conver...

Page 8: ...l not to drop the base when you remove it Mounting the unit on your furniture Screw this unit on your furniture tightly using wood screw not supplied in the hole at the back of the base as shown Recom...

Page 9: ...ess to turn the sound On and Off g BACK Press to return to the previous menu operation h OK Press to decide the command of setting when the main menu is displayed i NAVIGATION buttons Press to move le...

Page 10: ...CompositeVideo Input VIDEO jack is shared jack with ComponentVideo Input Y jack j Analog Audio L R Input jacks Connect Analog Audio signals from HDMI DVI Analog Audio L R jacks signal ComponentVideo...

Page 11: ...le to signals IN IN OUT OUT OUT OUT OUT IN IN IN OUT IN RF cable RF cable cable set top box Blu ray disc DVD recorder Audio L R Video cables Audio L R Video cables Note If you have any question about...

Page 12: ...fined setting for retail displays In this setting the power consumption may possibly exceed the limited requirement of the ENERGY STAR qualification Select Home the unit is set to maximize the energy...

Page 13: ...er the original sound Switching channels The above image is an example for 32 inch and larger screen sizeTVs It may differ depending on what product you purchased To select Channels by using CH or CH...

Page 14: ...ence Game Optimized for PCs and game consoles Eco EcoTV settings for low power consumption Music Optimized for music playback News Controls picture tone and set the anchor s voice at a comfortable vol...

Page 15: ...to switch theTV aspect ratio For 16 9 video signal Normal Movie expand 4 3 Wide Zoom Full can also be selected after Wide if an HDMI device is selected This picture format similarly displays like Nor...

Page 16: ...o a maximum of 4 lines c broadcast station Analog CableTV operation 11 480i 4 3 SD CC TV PG DLSV d f e g h SAP STEREO d channel number Switching channels p 13 e audio language DTV audio mode AnalogTV...

Page 17: ...0 30 30 0 2 Sound Setup Features Language USB Picture p 18 Adjusting the picture mode or customize the picture quality as your preference Sound p 19 Adjusting the sound mode equalizer and some other s...

Page 18: ...Noise reduction Black stretch Dynamic contrast and Gamma You can set a particular about picture quality in Advanced settings Picture Color alignment Noise reduction Black stretch Dynamic contrast Gam...

Page 19: ...25 TV speakers On to output sound from the unit s speakers Off not to output sound from the unit s speakers CEC Link to control Audio Output from your connected fun Link Compliant Devices with VOL by...

Page 20: ...elect the channel again using CH To reactivate a removed channel use and press OK The registered channels are highlighted When you remove a main channel its subchannels are removed as well Note The ch...

Page 21: ...age as the program s dialog up to 4 lines of script on theTV screen CC 3 and T 3 Rarely available and broadcasters use them only in special conditions such as when CC 1 and CC 3 or T 1 and T 3 are not...

Page 22: ...receives special effects playback signal e g Search Slow and Still from a VCR s video Output channel ch3 or ch4 the unit may not display the correct caption or text Child and ratings lock You can pre...

Page 23: ...or all children TV Y7 Appropriate for all children 7 and older G TV G General audience PG TV PG Parental guidance suggested PG 13 Unsuitable for children under 13 TV 14 Unsuitable for children under 1...

Page 24: ...s OK 4 Press the NUMBER buttons to enter the new 4 digit PIN code Enter PIN code again in Confirm PIN entry field Picture Enter PIN Confirm PIN Sound Setup Features Language USB PIN Code Back Note Mak...

Page 25: ...n Link deviceTurns Off automatically when the unit goes into Standby mode This unit willTurn On when the Power On signal is sent from your connected fun Link device AutoTV on Off This unit stays in St...

Page 26: ...e You must set Home Otherwise personalized picture and sound settings will not be memorized after the unit goes into Standby mode E sticker When you set Location to Retail store E sticker Electronic S...

Page 27: ...JPEG 1 Use to select the desired file then press OK Your USB Picture Picture Picture Image1 jpg Image1 jpg Image2 jpg Image3 jpg Image4 jpg Image5 jpg Image1 jpg 1200 900 2009 04 02 17 42 06 1 2 Thum...

Page 28: ...vox web site Warning When the software upgrade is running don t press any buttons Do not remove the USB Memory Stick during the software upgrade If an error occurs during the upgrade retry the procedu...

Page 29: ...Digital connection HDMI connection offers the highest picture quality HDMI High Definition Multimedia Interface transports high definition Digital video and multi channel Digital Audio through a singl...

Page 30: ...Audio L R Input jacks When the Audio is monaural then only connect to the Audio L Input jack OUT OUT IN IN DVD player Audio L R Video cables Note With this unit yellow cable must be connected toY gree...

Page 31: ...Unplug the AC power cord and use the built in battery of your PC Use an HDMI cable with the HDMI logo a certified HDMI cable High Speed HDMI cable is recommended for the better compatibility The unit...

Page 32: ...essing SOURCE or using CH Refer to Watching channels from an external device p 14 Check the antenna cable or other Input connection to the unit When using the ComponentVideo connection check that the...

Page 33: ...is not available watch Standard Definition programs instead Picture OK sound poor View otherTV channels The problem might be limited to the broadcasting station or weak signal strength Check if the au...

Page 34: ...VD recorder or Digital television over a single cable HDTV High Definition TV Ultimate Digital format that produces high resolution and high picture quality PIN code A stored 4 digit number that allow...

Page 35: ...Full Unscaled Refer to HDMI AV 16 9 Source above if PC has HDMI Output Photo Slide show JPEG files only Video playback Motion JPEG 320 x 240 30fps and file extension avi only Connectivity ComponentVi...

Page 36: ...y a to damage caused by accident abuse misuse neglect misapplication or non supplied product b to damage caused by service performed by anyone other than company approved Authorized Service Location c...

Page 37: ...A21F0UH A21A0UH A2170UT A21N0UT FUNAI CORPORATION Inc 19900Van Ness Avenue Torrance CA 90501...

Reviews: