background image

EN-15

ENGLISH

FRANÇAISE

ESP

AÑOL

Change 

6.3 

picture and sound settings

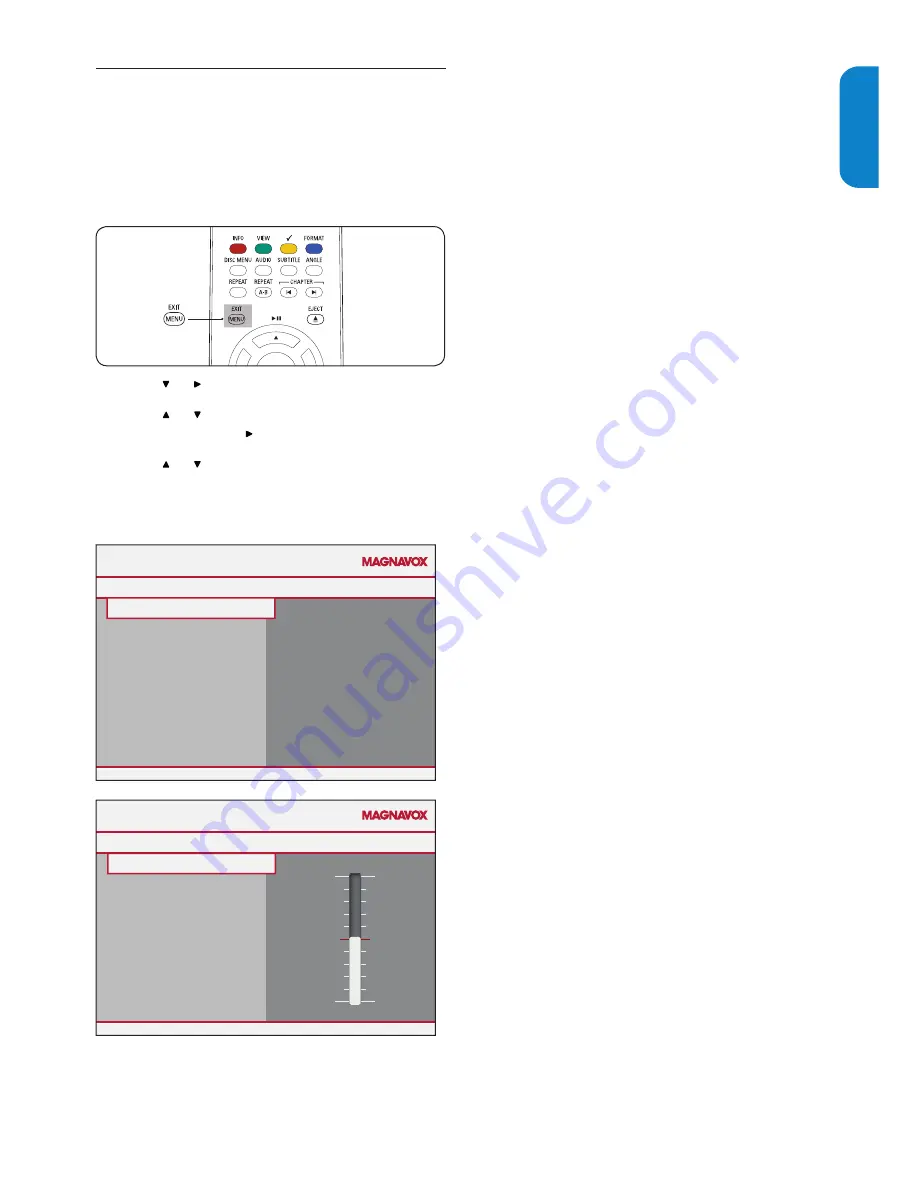
Change picture settings

This section describes how to adjust your picture 

settings.

Press 

1. 

MENU

 on the remote control.  

SMART

MODE

Press 

2. 

 or   to select the 

Picture

 menu.

Press 

3. 

 or   to select the one of the picture 

settings, and press   to enter the setting.
Press 

4. 

 or   to adjust the setting, and press 

OK


to confirm the change.
Press 

5. 

Menu

 to exit.

Picture

Contrast

Settings

Picture format

50

3

1

50

50

Contrast

Brightness

Color

Sharpness

Color temperature

Tint

Dynamic contrast

Settings

Picture

Sound

Features

Parental control

Installation

Picture format

Picture

Contrast

Brightness

Color

Sharpness

Color temperature

Tint

Dynamic contrast


Summary of picture settings

The following picture settings can be configured. 

Depending on the format of the picture source, some 

picture settings might not be available.

Contrast

• 

 - Sets the level of white in the picture.

Brightness 

• 

- Sets the brightness of the picture.

Color

• 

 - Sets the level of saturation.

• 

Tint

 - Adjusts the color balance between red 

and green.  

• 

Sharpness

 - Sets the sharpness of fine details.

Color temperature 

• 

- Sets the color 

temperature to normal, warm or cool.

• 

Dynamic contrast

 - Enhances contrast in the 

darker and the brighter picture areas as the 

image on the screen changes.

Picture format

• 

 - Changes the format of the 

picture.

Summary of Contents for 19MD358B - 19" LCD TV

Page 1: ...stomer support service in your country 1 800 705 2000 Enter below the Serial No located on the rear of the cabinet ES Para obtener más información llame al servicio de soporte al cliente de su país 1 800 705 2000 Escriba a continuación el Nº de serie el cual se encuentra en la parte posterior del gabinete Model Modelo Serial Serie ...

Page 2: ...gistering your product you ll receive notification directly from the manufacturer in the rare case of a product recall or safety defect Additional Benefits Registering your product guarantees that you ll receive all of the privileges to which you re entitled including special money saving offers Congratulations on your purchase and welcome to the family Dear MAGNAVOX product owner Thank you for yo...

Page 3: ...rate normally or exhibits a marked change in performance E The appliance has been dropped or the enclosure damaged Tilt Stability All televisions must comply with recommended international global safety standards for tilt and stability properties of its cabinet design Do not compromise these design standards by applying excessive pull force to the front or top of the cabinet which could ultimately...

Page 4: ...ence will not occur in a particular installation If this equipment does cause harmful interference to radio or television reception which can be determined by turning the equipment off and on the user is encouraged to try to correct the interference by one or more of the following measures Reorient or relocate the receiving 1 antenna Increase the separation between the 2 equipment and the receiver...

Page 5: ...rol overview DVD 14 6 3 Change picture and sound settings 15 6 4 Use Smart mode 17 6 5 Create favorite channels list 18 6 6 Set the clock 18 6 7 Set the sleeptimer 18 6 8 Use parental control and rating locks 19 6 9 Closed captions 22 6 10 Use your TV as a PC monitor 23 6 11 Select your TV in PC mode 23 7 Change your TV installation 24 7 1 Select your menu language 24 7 2 Autoprogramming 24 7 3 Re...

Page 6: ...the type plate at the rear of the TV 2 2 Screen care Turn off and unplug the AC power cord before cleaning the screen Clean the screen with a soft dry cloth Do not use substances such as household cleaning agents as these may damage the screen To avoid deformations or color fading wipe off water droplets as soon as possible Do not touch push rub or strike the screen with hard objects as this may d...

Page 7: ...4 Channel up down 5 Eject 6 Stop 7 Play and pause 8 Side connectors 3 5 4 75 Ω 75 Ω 2 1 7 6 8 Use the TV side connectors to connect to mobile devices such as a camera or game console You can also connect to the headphone Rear connectors Cable 75 Ω Use the TV rear connectors to connect to the antenna and permanent devices such as a high definition disc player or DVD player Note D D For more informa...

Page 8: ...l 3 2 SMART MODE 1 6 3 4 5 9 2 8 7 Standby ON 1 Format 2 Cursor buttons 3 OK button 4 Channel selection 5 Source selection 6 Volume 7 Menu button 8 INFO button 9 For more information about the remote control See Remote control overview on page 13 ...

Page 9: ...ereo sound if the broadcasting channel makes it available 4 Get started This section describes how to position and connect your TV and how to perform your first time installation Position theTV 4 1 WARNING B B Do not insert the power plug into the wall socket before all the connections are made Large screen TVs are heavy Two people are required to carry and handle the TV Wherever you decide to pos...

Page 10: ...ins a digital TV tuner for receiving off air digital television broadcasts Contact your local DBS provider for more information about the connections and the TV channels Connect to a cable receiver box satellite set top box CABLE SATELLITE Cable Receiver Box OR OR ANTENNA SATELLITE CABLE OR OR CABLE A cable receiver box or satellite set top box can be connected to the TV through the following conn...

Page 11: ...TV or press power the remote control The TV normally takes 10 15 seconds to start up and the following screen appears the first time you turn on the TV Thank you for your purchase TV Please proceed with the following steps to set up your TV For the BEST possible picture performance contact your local Cable Satellite signal provider for High Definition signal options available in your area Next Tha...

Page 12: ...the front of the TV to switch the TV off Press POWER again to switch the TV on Note D D The TV is never powered off completely unless it is physically unplugged WatchTV 5 2 Switch channels Press a number 1 to 999 or press CH on your remote control Press PREV CH to return to the previously viewed TV channel SMART MODE Note D D You can also switch channels by pressing CH on the top of the TV Adjust ...

Page 13: ...OURCE repeatedly to select the connected cable receiver box and wait a few seconds for the picture to appear SMART MODE Press 2 OK Use the remote control of your set top box to 3 select channels Watch a DVD 5 4 Insert a DVD disc in your player 1 Press 2 Play on the remote control of your player The picture from the player might appear automatically on your screen If the picture does not appear Pre...

Page 14: ...e Installation mode Antenna or Cable SMART MODE 6 Selects the among Personal Sports Standard Movie or Powers Saver settings CH 7 Switches to the next or previous channel NUMBER BUTTONS 8 Selects a channel page or setting DOT 9 Uses the dot for digital channels SOURCE 10 Selects connected devices SLEEP 11 Press to set the TV to turn itself off within a certain time FREEZE 12 No function CC Close Ca...

Page 15: ...he button once to start plyback Press the button second time to pause playback temporarily 6 2 Remote control overview DVD Press the SOURCE button repeatedly to select source DVD to activate DVD function Make sure the source DVD is selected 10 1 8 11 SMART MODE 12 9 13 DISC 1 MENU Enter the disc contents menu Switches on or off the playback control mode for VCD version 2 0 only AUDIO 2 Select the ...

Page 16: ...Features Parental control Installation Picture format Picture Contrast Brightness Color Sharpness Color temperature Tint Dynamic contrast Summary of picture settings The following picture settings can be configured Depending on the format of the picture source some picture settings might not be available Contrast Sets the level of white in the picture Brightness Sets the brightness of the picture ...

Page 17: ...e Super zoom Not for HD and PC Removes the black bars on the side of 4 3 broadcasts with minimal distortion 4 3 Not for HD Displays the classic 4 3 format Movie expand 14 9 Not for HD Scales the classic 4 3 format to 14 9 Movie expand 16 9 Not for HD Scales the classic 4 3 format to 16 9 16 9 subtitle Not for PC Display 4 3 pictures using the full surface of the screen leaving the subtitles visibl...

Page 18: ...ilable in analog channel Digital audio language This gives you the possibility to swap between main and alternative language when it is available in digital channel Automatic volume leveling Reduces sudden volume changes for example during commercials or when switching from one channel to another Select On or Off Tip E E There are only two options Sound setting and Virtual surround in PC and DVD m...

Page 19: ... how set the time Press 1 MENU on the remote control and select Installation Clock Installation Clock Settings Autoprogram Source Language AM Clock Current software info Reset AV settings Features Sleeptimer Settings Closed captions Caption service Digital caption service Digital caption options Preferred channels Sleeptimer 0 Press 2 to enter the list Press 3 or to set the time hour minute AM or ...

Page 20: ...gs lock US Movie ratings lock Change PIN Parental control US TV ratings lock US Movie ratings lock Settings Canada English ratings lock Canada French ratings lock Region ratings lock AV1 DVD Side AV HDMI PC Channel lock Channel lock Change PIN US TV ratings lock Settings I Parental control All None TV Y TV Y7 TV G TV PG TV 14 TV MA D Dialog L Language S Sex V Violence Parental control Change PIN P...

Page 21: ...dults and may be unsuitable for children under the age of 17 These programs may contain graphical violence explicit sexual activity and or crude or indecent language Language L Sex S Violence V Use the movie ratings lock This section describes how to control viewing of movies based on their Motion Picture Association of America MPAA rating Press 1 MENU on the remote control and select Parental con...

Page 22: ...an French movie ratings Movie rating Description G Appropriate for all ages with little or no violence and little to no sexual content 8 ans Appropriate for children 8 and up which may contain little violence some foul language and or little to no sexual content 13 ans Appropriate for children 13 and up with moderate violence language and some sexual situations Persons under 13 should be accompani...

Page 23: ...ion services are necessarily being used by a TV channel during the transmission of a closed caption program Select a caption service for digital channels 3 Press MENU on the remote control and select Features Digital caption service Press or to select one of the listed caption services and press OK to confirm your choice Press 4 MENU to exit Summary of caption services CC 1 CC 2 CC 3 and CC 4 Dial...

Page 24: ...ion to the center of the screen with the cursor buttons Select yourTV in 6 11 PC mode Press 1 MENU on the remote control and select Installation Source Installation Source Settings Autoprogram Clock Language TV DVD Source Current software info Reset AV settings Installation Language English Français Settings Autoprogram Source Clock Español Language Current software info Reset AV settings AV1 Side...

Page 25: ...sh Français Settings Autoprogram Source Clock Español Language Current software info Reset AV settings Autoprogram Settings I Installation Cable Antenna Start now Antenna AV1 Side AV HDMI PC Select 2 Cable or Antenna and press When Antenna is selected the TV detects antenna signals It searches for NTSC and ATSC channels available in your area When Cable is selected the TV detects signals supplied ...

Page 26: ... with Audio L R connectors for camcorder game console etc Select connection quality 8 2 This section describes how you can enhance your audio visual experience by connecting your devices with the best possible connectors HDMI Highest quality Comp red g HDMI HDMI produces the best audio visual quality possible Both audio and video signals are combined in one HDMI cable providing an uncompressed dig...

Page 27: ...nt video red gree blue Audio L R red white S video Composite audio video yellow red white Component video cable Red Green Blue Component video red gree blue Audio L R red white S video Composite audio video yellow red white Audio L R cable Red White Composite Basic quality Composite video provides basic analogue connectivity usually combining a yellow video cinch cable with red and white Audio L R...

Page 28: ... via HDMI Connect a DVD player recorder via HDMI DVI and DIGITAL AUDIO OUT connectors Connect a DVD recorder orVCR and a second A V device via composite connectors OUT OUT IN RF OUT SAT Cable receiver box RF IN RECORDER AV 2 L R VIDEO CABLE 3 1 2 4 SIDE AV L AUDIO R VIDEO IN L AUDIO R RF OUT RF OUT RF IN RF IN CABLE R L AV 2 L R VIDEO RECORDER L AUDIO R Connect a set top box and DVD player recorde...

Page 29: ...der via component video output connectors YPbPr and analog audio L AUDIO R DVD Cable receiver box L AUDIO R VGA TO PC Connect a digital home theatre amplifier Warning B B Due to legal requirements it is possible that with certain copy protected PCM audio qualities from a accessory device connected to the HDMI input the digital audio signal is muted me console a DVD player recorder via HDMI DVI and...

Page 30: ...nguage English Français Settings Español Language Source Clock Current software info Reset AV settings Tip Set the picture format to 4 3 or 16 9 in DVD E E mode Other settings For Picture Sound Parental control Installation settings you can take reference of page 13 24 Disc operations 9 1 IMPORTANT Depending on the DVD or VIDEO CD some operations may be different or restricted Do not put any objec...

Page 31: ...ifferent subtitle languages Playing discs 9 3 Press the SOURCE button to select source 1 DVD function Make sure the TV power is ON Insert a disc into integrated DVD player 2 Make sure the label side is facing up For double sided discs load the side you want to play facing down Playback will start automatically Exclude MP3 3 JPEG If the disc is locked by parental control you must enter your four di...

Page 32: ...T ALL to repeat playback of all the disc and all the programmed tracks REPEAT OFF to cancel the repeat mode Repeat A B DVD SVCD VCD CD Press REPEAT A B at your chosen starting point 1 Press REPEAT A B again at your chosen end 2 point The section A and B can be set only within the 3 same chapter track The section will now repeat continuously To exit the sequence press REPEAT A B 4 Forward Reverse s...

Page 33: ...1 The data disc menu appears on the TV screen Use 2 or use the numeric button 0 9 to select the folder and press OK to open the folder Press 3 or use the numeric button 0 9 to highlight an option Press OK to confirm The playback will start from the selected file to the end of the folder Press 4 DISC MENU to file browser Special for JPEG picture CD When pictures are in Slide show press STOP and the...

Page 34: ...tings Each rating has a box graphic in front of it to 5 indicate whether it is locked A box with X indicates that the rating is locked An empty box indicates that the rating is not locked Press 6 MENU to exit Disc rating Description Kid safe Kid safe G All ages PG Parental guidance PG 13 Parental guidance less than 13 years old PG R Under 17 years old parental guidance suggested R Under 17 years o...

Page 35: ...ed AC 3 or Digital 5 1 The channels consist of front left front right front center surround or rear left surround or rear right and a separate subwoofer Digital Tuner A digital tuner serves as the decoder required to receive and display digital broadcasts It can be included inside TV sets or via a cable receiver box HDTV The generally agreed upon definition of HDTV is approximately twice the verti...

Page 36: ...e power socket outlet wait 60 seconds and reconnect the AC power cord The picture is distorted It is stretched out has short fat black bars on the side or top Broadcast video format 1 Press the FORMAT button on the remote control to select the best picture format 2 For some accessory devices the picture format has to be set in the accessory device The picture is mostly red and green or the picture...

Page 37: ...ound 1 Adjust the volume of TV 2 Ensure to select stereo output on your disc except multichannel Disc can t be played 1 The DVD R CD R must be finalized 2 Ensure the disc label is facing up 3 Check if the disc is defective by trying another disc 4 Region code incorrect Picture freezes momentarily during playback Check the disc for fingerprints scratches and clean with a soft cloth wiping from cent...

Page 38: ...onal Sports Standard Movie Power saver Playback disc of Built in DVD player Plays DVD DVD R RW DVD R RW CD CD RW Picture CD MP3 CONNECTIONS Rear connectors AV1 Component video input with Audio L R support 480i p 720p 1080i HDMI Ver 1 3a HDMI support 480i p 720p 1080i SPDIF output Digital audio out support AC 3 PCM PC IN VGA PC Audio IN Side connectors Headphone x 1 Composite video input with audio...

Page 39: ...contrast 15 F Favorite list 18 H HDMI cable 25 I installation 8 L Language 24 M Manage cables 10 Model number 1 Movie expand 16 Movie ratings 20 Mute 13 O Overview Connection 25 Remote control DVD 14 Remote control TV 13 TV 6 P Parental control 19 PC mode 23 Picture 15 PIN code 19 Position the TV 8 R Rear connectors 25 Recycling 5 Registration Card 1 S Screen resolutions 23 Sharpness 15 Side conne...

Page 40: ...EN 39 ENGLISH FRANÇAISE ESPAÑOL T Technical specifications 37 Tint 15 Trouble shooting 35 V V chip 19 Volume 13 W Warranty 40 Y Y Pb Pr 28 ...

Page 41: ...rograms data or other information is not covered under this Limited Warranty This warranty does not apply a to damage caused by accident abuse misuse neglect misapplication or non supplied product b to damage caused by service performed by anyone other than company approved Authorized Service Location c to a product or a part that has been modified without written company per mission or d if any s...

Reviews: