background image

2

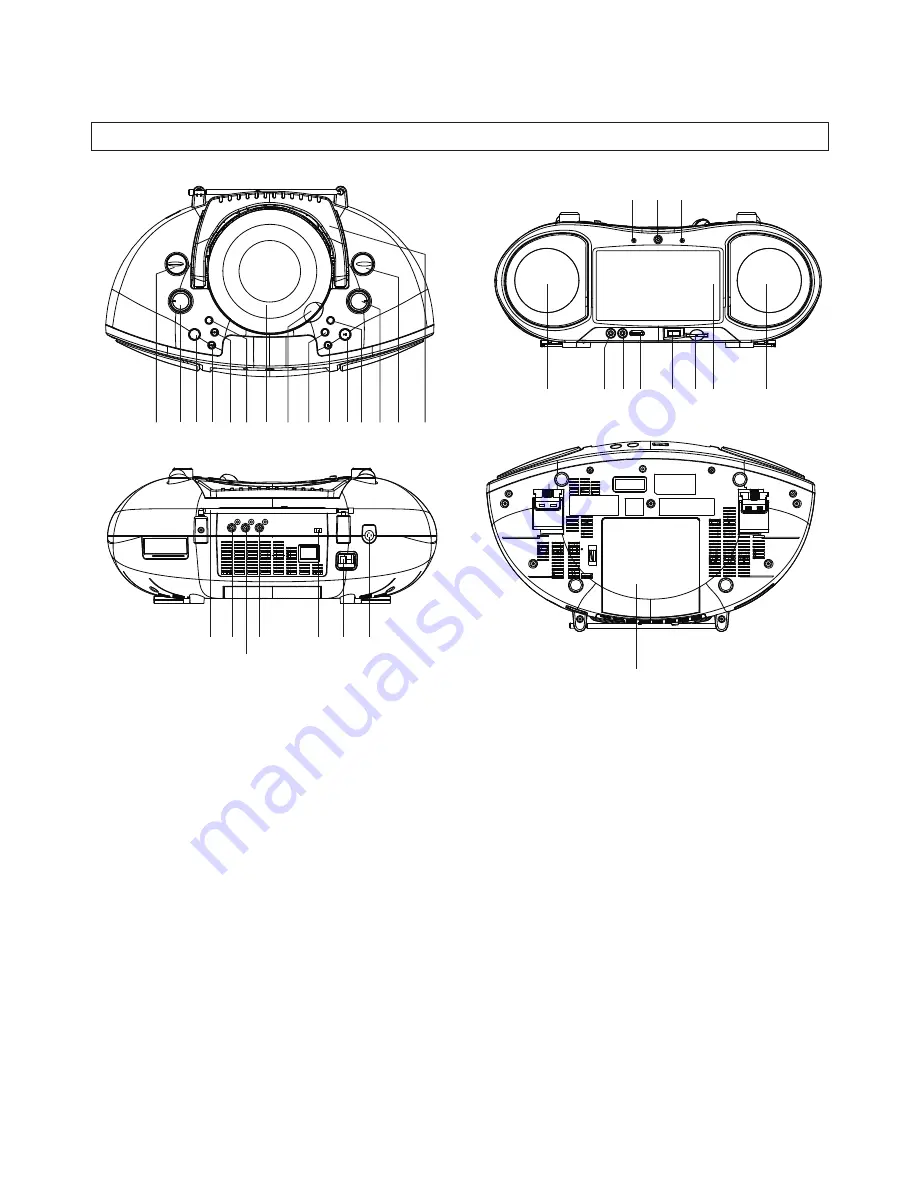
PRODUCT ILLUSTRATION

Main Unit

1. FUNCTION CONTROL

19. LCD DISPLAY

2. BAND CONTROL

20. CARRY HANDLE

3. VOLUME CONTROL

21. POWER INDICATOR

4. TUNING CONTROL

22. REMOTE SENSOR 

5. MODE BUTTON

23. FM ST. INDICATOR

6. FAST FORWARD BUTTON

24. FM TELESCOPIC ANTENNA

7. PREVIOUS/DOWN BUTTON  

25. VIDEO OUTPUT JACK 

8. PLAY/PAUSE BUTTON  

26. AUDIO OUT - RIGHT JACK 

9. NEXT/UP BUTTON   

27. AC SOCKET 

10. BASS BOOST BUTTON 

28. HEADPHONE JACK  

11. CD DOOR

29. BATTERY COMPARTMENT

12. CD DOOR OPEN AREA

30. DISPLAY ON/OFF SWITCH 

13. FAST BACKWARD BUTTON

31. AUDIO OUT - LEFT JACK 

14. STOP BUTTON

32. SD/MMC CARD SLOT 

15. SPEAKERS

33. AU

X

-IN JACK 

16. MIC INPUT
17. MIC LEVEL
18. USB PORT 

15

16 17

18

19

23

15

22

21

1

3 5 7 9 10 11 12 13 14 8 6 4

2

20

24 25

26

27

28

29


3

0

3

1

3

3

3

2

Summary of Contents for MDVD500

Page 1: ...le DVD Player and Boombox Instruction Manual Thank you for your purchase of this Magnasonic product Please read this Instruction Manual carefully before using product to ensure proper use Keep this manual in a safe place for future reference www magnasonic ca ...

Page 2: ...k 4 Picture CD JPEG CD Playback 4 PICTURE CD JPEG CD OPERATION 5 1 Play Modes 5 2 Skip to Next Previous Picture 5 3 Picture Rotation 5 4 Picture Flip 5 5 Picture Zoom In Out 5 6 Slide Show Transition Modes 5 Colour and Brightness Adjustment For the LCD Screen 5 External Memory Media Operation USB SD MMC Card 5 CUSTOM SETTINGS 5 Common Procedures for Custom Settings 5 1 System Setup 1 1 TV System 1...

Page 3: ...t the power adapter or any accessories in water or any other liquid 12 Unplug the power adaptor from the wall when the product is unused for a long period of time and during thunderstorms 13 Only use attachments accessories specified by the manufacturer 14 Unwind and straighten the power adaptor before use 15 Damage Requiring Service Unplug the power adaptor and refer servicing to qualified servic...

Page 4: ...WN BUTTON 25 VIDEO OUTPUT JACK 8 PLAY PAUSE BUTTON 26 AUDIO OUT RIGHT JACK 9 NEXT UP BUTTON 27 AC SOCKET 10 BASS BOOST BUTTON 28 HEADPHONE JACK 11 CD DOOR 29 BATTERY COMPARTMENT 12 CD DOOR OPEN AREA 30 DISPLAY ON OFF SWITCH 13 FAST BACKWARD BUTTON 31 AUDIO OUT LEFT JACK 14 STOP BUTTON 32 SD MMC CARD SLOT 15 SPEAKERS 33 AUX IN JACK 16 MIC INPUT 17 MIC LEVEL 18 USB PORT 15 16 17 18 19 23 15 22 21 1 ...

Page 5: ...tton 23 SLOW button 10 PAUSE STEP button 24 NEXT button 11 F BWD button 25 PREV button 12 F FWD button 26 SEARCH button 13 ANGLE button 27 PROGRAM button 14 ZOOM button Remote Control Unit To video input connector yellow To audio input connectors red white Audio Video cable R L CONNECTING A MICROPHONE AND HEADPHONES Connect one not included Microphone to the MIC Input Jack 1 Connect a Microphone 2...

Page 6: ...n to start playback Note A preview of the picture will be displayed while you scroll across the filenames SKIP AHEAD OR BACK Press the NEXT SKIP or PREV SKIP button once during playback to skip a chapter DVD or a track CD ahead or backwards RAPID ADVANCE REVERSE During playback press the F FWD button or the F BWD button several times to scan the disc forward or backward at X2 X4 X8 and X20 the nor...

Page 7: ...NESS ADJUSTMENT FOR THE LCD SCREEN Press the MODE button once on the main unit to select the function between USB CARD and DISC Press and hold the MODE button to select the colour intensity and brightness then use the NEXT PREVIOUS buttons to adjust EXTERNAL MEMORY MEDIA OPERATION USB SD MMC CARD Preparing the player for External Memory media operation Insert a USB disk drive into the USB port or ...

Page 8: ...ck has been provided on the front of the unit so that you may sing along to all of your favourite songs To use this jack plug in a microphone not included and adjust the MIC LEVEL control to a comfortable volume level AUX INPUT JACK An AUX Input jack has been provided on the front of the unit so that you may listen to your songs on your portable music device To use this jack plug in a portable mus...

Page 9: ...hat the A V cables are securely connected Check that the disc is a DVD region number 1 or all DVD RW AUDIO CD Do not use a disc that has scratches or dirt Check that the label side of the disc is facing up The pick up lens of the DVD player may be dirty Contact your service centre for lens cleaning Check that the TV channel is set to VIDEO or A V if viewing with a TV Power does not turn on or sudd...

Page 10: ...NIC product fail to operate during the warranty period warranty service may be obtained upon delivery of the MAGNASONIC product together with proof of purchase and a copy of this LIMITED WARRANTY statement to an Authorized MAGNASONIC Service Centre In home warranty service may be provided at SYNNEX Canada Limited s discretion on any MAGNASONIC television with the screen size of 27 or larger This w...

Reviews: