background image

M A G M A  

4

               Chapter 2     Hardware Installation 

Before you Begin  

The power supply is auto-switching. These means that it will 
automatically switch to match whatever source power you are using. 
Since all products ship with a US Standard 115V power cord, you will 
need to use a power cord adapter for non-US Standard 115V power 
sources. 


Attach PCI Expansion and Power Cable 

Carefully position the Magma expansion chassis so that the supplied 
PCI expansion cable will conveniently reach from the connector of the 
Host Card to the connector on the back of the chassis. See your Host 
Card Installation Guide for information on installing your Host Card. 

Attach one end of the PCI expansion cable to the Host Card and secure 
it using the captive thumbscrews on the cable. 

See the Host Card 

Installation Guide for more information on connecting the cable to 
the card. 


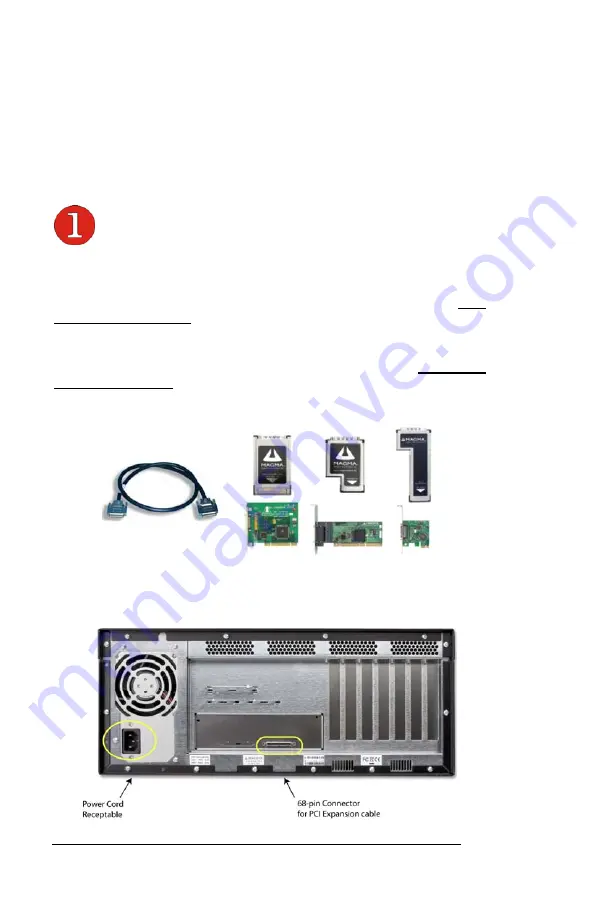
Carefully route the cable to the rear side of the expansion chassis and 
attach it to the 68-pin connector, as shown below:  


Summary of Contents for P7R4

Page 1: ...PCI Expansion Chassis User s Guide 7 Slot PCI Expansion Model P7R4 P7RR Model P7R464 P7RR64...

Page 2: ...lectro magnetic mechanical optical or otherwise in whole or in part without prior written consent from Magma Limitation of Liability Information presented by Magma in this guide is believed to be accu...

Page 3: ...Installation 5 Applying Power Correctly 6 Starting Up 6 Shutting Down 6 CHAPTER 3 VERIFY INSTALLATION 7 Windows 7 Mac OS X 8 CHAPTER 4 INSTALL 3 RD PARTY PCI CARDS 10 Remove PCI Expansion Chassis Cov...

Page 4: ...erchandise to Magma 31 APPENDIX A BUS HIERARCHY 32 Bus Hierarchy 32 Bus Hierarchy 32 APPENDIX B NEED MORE SLOTS 34 Multiple PCI Expansion System Configurations 34 Fan Out 35 Verify your configuration...

Page 5: ...ur Magma host card This manual is divided into the following parts Chapter 1 Provides General Specifications and Parts List Chapter 2 Briefly explains Expansion Chassis installation Chapter 3 Explains...

Page 6: ...the following step from causing injury DANGER or STOP Used to indicate and prevent the following step from causing serious injury or significant data loss Disclaimer We have attempted to identify most...

Page 7: ...allation to produce emissions that could interfere with other electronic equipment in the area of your system WhenWorkingInsideaComputer Before taking covers off a computer perform the following steps...

Page 8: ...per ESD procedure to reduce the risk of damage to components Magma strongly encourages you to follow proper ESD procedure which can include wrist straps and smocks when servicing equipment You can als...

Page 9: ...ipment is not compromised Mechanical Loading Mounting of the equipment in the rack should be such that a hazardous condition is not achieved due to uneven mechanical loading Circuit Overloading Consid...

Page 10: ......

Page 11: ...dant Standard Cable 1 meter MTBF 53 000 hours PCI Bus 32 bit 33Mhz or 64 bit 33MHz PCI Local Bus Specification Revision 2 2 PCI Bridge Architecture Spec Revision 1 2 Interconnect Bandwidth 132 MB sec...

Page 12: ...Power supply cord 1 or 2 Host Card PCI is standard 1 Software CD ROM 1 User s Manual 1 The Magma PCI expansion cable uses a 68 pin connector however it is NOT an off the shelf SCSI cable The Magma PCI...

Page 13: ...over Turning the system power off at the power on off switch does not remove power to components High voltage is still present CAUTION Before touching anything inside the enclosure move to an ESD stat...

Page 14: ...agma expansion chassis so that the supplied PCI expansion cable will conveniently reach from the connector of the Host Card to the connector on the back of the chassis See your Host Card Installation...

Page 15: ...ly to the connectors at both ends Before connecting the power cord check that the expansion chassis On Off switch is set to the OFF position This switch is located on the left side of the chassis NOTE...

Page 16: ...the configuration code to recognize the PCI bus hierarchy and any attached devices There is an On Off switch on the front panel as well as an LED indicator to indicate power status Verify that the gr...

Page 17: ...Installation Guide for information on how to connect your Host Card Always power up your Expansion System by turning on the power to the Expansion Chassis first followed by your host computer Windows...

Page 18: ...n your system host computer first then the expansion chassis and reconnect the cables and reseat the PCI Host Card to ensure that you have a solid connection Then restart the Magma expansion chassis f...

Page 19: ...PCI as shown below Any PCI Cards you install in the expansion chassis will appear behind the pci bridge device If any of these devices are not displayed as shown above you should shut down your system...

Page 20: ...Magma expansion chassis functions exactly as a standard desktop computer chassis Always follow the manufacturer s instructions for installing their card on a desktop computer IMPORTANT We will provide...

Page 21: ...sis it should make no difference which PCI slot you place your cards in unless specified by the card manufacturer If you have PCI cards that need priority assignments slot ordering in your PCI Expansi...

Page 22: ...Specification compliance from your card and system vendors Cards and systems should be at least PCI Specification Revision 2 0 compliant or better Compliance in your system motherboard PCI cards and c...

Page 23: ...hard drive cages Instructions for removing the 5V Load Resistor are included with the hard drive cage DANGER The Load Resistor is and must NOT BE TOUCHED unless the system has been shut off for at le...

Page 24: ...s into an equipment rack has never been easier Simply attach one of Magma s optional Rack mount slide kits PN RSLIDES XX to allow you to mount the chassis in a computer rack and then simply slide the...

Page 25: ...ng problems try these simple troubleshooting steps My Computer Can t Find the PCI Expansion System When Nothing Works My PCI Card Doesn t Work The PCI to PCI Expansion System is correctly displayed as...

Page 26: ...onal troubleshooting steps Double check the PCI host card to ensure it is inserted correctly in a PCI slot Try moving the PCI host card to a different PCI slot Check for a bad cable or connection Try...

Page 27: ...gma expansion system and that you have correctly installed your 3 rd Party PCI card s and their associated drivers as required If it powers up OK but nothing works check the computer s Device Manager...

Page 28: ...ut the Magma expansion system attached call Magma Technical Support ii If it still hangs the problem is in the computer and not with the Magma expansion system or the 3 rd Party PCI cards b If it boot...

Page 29: ...fail to resolve your problem 1 Shut down the computer followed by the Magma expansion chassis 2 Remove the PCI card displaying a problem 3 Replace the problem card with a simple PCI card such as an E...

Page 30: ...d if the PCIe to PCI Bridge Connections and the 3rd Party PCI card s are now correctly visible Support for 3rd Party PCI Cards Magma will provide reasonable technical support to with 3 rd Party PCI ca...

Page 31: ...e indicates that there is a problem with the 3 rd Party PCI Card driver If necessary contact the PCI Card s manufacturer for updated PNP compatible drivers If all else fails contact Magma Technical Su...

Page 32: ...s are not working correctly Reinstall the PCI host card into the computer s PCI slot and recheck all cable connections If the error code remains try another PCI slot If you still have the error call M...

Page 33: ...ld remove the chassis cover and check for loose cards and remove any dust build up Always to remember to power down your computer and then the expansion system BEFORE you attempt to perform any mainte...

Page 34: ...3 rd Party cards and wipe the PCI X slots with a soft bristle brush like a toothbrush dipped in the isopropyl alcohol to gently clean each slot When finished blow the slots with compressed air from a...

Page 35: ...e module using the power switch at the bottom of the module The power load will again be shared between these two modules In order to ensure the safety and efficiency of your expansion system it is re...

Page 36: ...and remove the foam filter located behind the faceplate and clean it with a solution of warm water and mild dish soap Finally replace the filter and faceplate Secure faceplate with four Phillips scre...

Page 37: ...uter Make 9 Computer Model 10 Operating System and Version 11 Make Model of PCI cards in expansion chassis 12 Detailed description of the problem You can also visit our web site at www magma com suppo...

Page 38: ...tting a request at www magma com support 1 Locate a file called dbgview exe on the Magma CDROM 2 Double click on the file dbgview exe 3 While the dbgview screen is open locate and double click on a fi...

Page 39: ...can purchase an inexpensive license from APSoft for use beyond the evaluation period PCIScope has proven to be extremely useful when verifying and debugging configurations involving the Magma PCI Expa...

Page 40: ...ore Help You should save this data as a file on your computer Please include your name and date as part of the file name with an extension of bpd Then email this file to support magma com if you are e...

Page 41: ...ep the packaging from the original shipment of your Magma product However if you return a product to Magma for warranty repair replacement or take advantage of the 30 day money back guarantee you will...

Page 42: ...ally conveys the overall PCI bus topology of the system 7 Slot Topology In general we do not know what the actual Bus numbers are We only know how they increment starting from the host card The key po...

Page 43: ...33 NOTE All PCI cards installed in the PCI Expansion chassis will appear on the Third PCI Bus behind the PCI Bus that the host card is installed on If you need to know the actual Bus number right clic...

Page 44: ...tion the bios finds the Magma host card in a PCI slot The bios configures it and then looks beyond it to find any PCI cards installed in the expansion chassis The bios then configures the cards and al...

Page 45: ...us should be viewed as a Resource Toll road that runs from the computer CPU resource home through the Toll Booths the PCI bridges to the Resource Users PCI Cards As in the case of a real Toll Road the...

Page 46: ...he total number of PCI buses that the data must pass through COULD make a difference See Chapter 5 Troubleshooting for more information if you suspect this could be an issue with one of your specialty...

Page 47: ...ficance of the performance variance between the Fan Out and Daisy Chaining configurations the primary reason for using this one would be limitations on physical space This could be the number of avail...

Page 48: ...xpansion System Notice that each Daisy Chained unit appears in the Device Manager in the reverse order of its place in the configuration Combination Configurations Depending on your business requireme...

Page 49: ...urations When trying to troubleshoot problems with PCI cards in a multiple expansion system configuration it is vital to correctly determine the nature of the problem Therefore the first task is to id...

Page 50: ...e information contained in the Location field Look for the Error Code in the box in the center of the Properties Window and then go to the Windows Error Code section for information on how to resolve...

Page 51: ...Rules Operation is subject to the following two conditions 1 this device may not cause harmful interference and 2 this device must accept any interference received including interference that may caus...

Page 52: ...Manual P N 09 09910 01 Rev C Magma 9918 Via Pasar San Diego CA 92126 USA Phone 858 530 2511 Fax 858 530 2733 www magma com...

Reviews: