Page 6 of 18
508196-01
Issue 2120
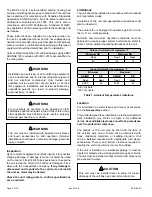
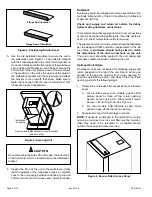
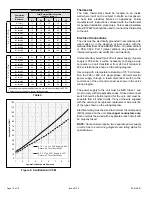
Figure 4. Positioning Divider Panel
Flange Up Orientation
Flange Down Orientation
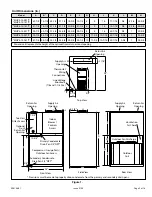
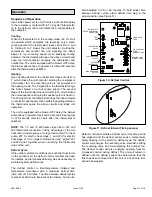
5. Use the two installation brackets to secure the unit to
the wall sleeve (see Figure 5). The units are shipped
with the brackets placed in the return air compartment.
Hook each bracket into the front edge of the wall sleeve
side. Position the bracket so it can be bent around the
front corner of the unit. Remove one of the two screws
in that position on the unit. Line up one of the holes in
the installation bracket with the screw hole and attach
the bracket to the unit with that screw. Make sure to
fasten tight enough that the seal is maintained. Trim
off excess bracket if applicable.
Figure 5. Securing Unit
Installation
Brackets
Remove and replace screw to secure bracket
(one each side)
Do not screw into the side of the drain pan, the indoor coil
or the heat strip, which is located above the installation
bracket.
CAUTION
6.
Inspect the fit up of the unit to the wall sleeve. Verify
that the gaskets of the wall sleeve make a complete
seal to the unit paying particular attention to top and
bottom corners of unit to sleeve seal. Caulk if needed.
Ductwork
Ductwork should be designed and sized according to the
methods in Manual Q of the Air Conditioning Contractors
of America (ACCA).
Check unit supply and return air outlets for debris
before making ductwork connections.
It is recommended that supply and return duct connections
at the unit be made with flexible joints. If flexible ducts are
used, a 6” sheet metal starter collar is required.
The supply and return air duct systems should be fabricated
per the designed CFM and static requirements of the job
Ductwork should not be sized to match
the dimensions of the duct connections on the unit.
The return duct should be sealed to the unit casing and
terminate outside the space containing the unit.
Optional Front Return
As shipped, units are configured for attaching supply and
return ductwork to the top of the unit. Return air may be
brought in through the optional front return opening. To
open the optional front return and close off the top return
opening, perform the following steps.
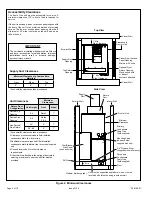
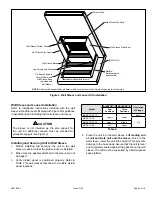
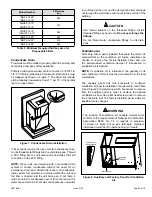
1.
Rotate knob to release filter access panel and remove
panel.
a.
For all units except 3-ton models, position filter
access panel to close off top return opening.
Secure at rear using two sheet metal screws.
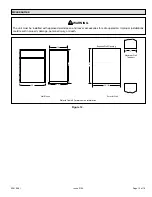
Secure in front using knob. See Figure 6.
b.
For 3-ton models, field fabricate a sheet metal
panel to close off the top return opening.
2. Seal panel to top of unit with tape or mastic.
NOTE:
If ductwork is attached to the optional front return
opening, provisions to service unit filter must be provided.
Filter may need to be relocated to a suitable location
outside the cabinet for ease of service.
Figure 6. Secure Filter Access Panel


