background image

6

CARE AND MAINTENANCE 

Cleaning Your Appliance


U

pon installation of your new appliance, it is recommended that it be cleaned thoroughly. 

  Turn off the appliance first and then unplug the unit from the wall outlet.

Remove all contents.

  Wash the inside with a damp warm cloth soaked in lukewarm water and baking soda solution. 

     The solution should be about 2 tablespoons of baking soda to a quart of water.

  Be sure to keep the door gasket (seal) clean to keep the unit running efficiently. 

  The outside of the appliance should be cleaned with mild detergent and warm water.

Dry the interior and exterior with a soft cloth. 

Vacation Time

  Turn off the appliance first and then unplug the unit from the wall outlet.

Remove all the contents.

Clean the appliance.


L

eave the lid open slightly to avoid possible formation of condensation, mold, or odors.


U

se extreme caution in the case of children.  The unit should not be accessible to child’s play.   

Short vacations:

Leave the appliance operating during vacations of less than three weeks.

Long vacations: 

If the appliance will not be used for several months, remove all contents and unplug 

the power cord. Clean and dry the interior thoroughly. To prevent odor and mold growth, leave the door

open slightly: blocking it open if necessary or have the door removed.

Moving Your Appliance

  Turn off the appliance first and then unplug the unit from the wall outlet.

Remove all the contents.

Securely tape down all loose items inside your appliance.

  Tape the doors shut. 

  Be sure the appliance stays in the upright position during transportation.

Energy Saving Tips

  The appliance should be located in the coolest area of the room, away from heat producing

appliances or heating ducts, and out of the direct sunlight. 


Let hot contents cool to room temperature before placing in the appliance. Overloading the appliance

     forces the compressor to run longer.

  Be sure to wrap contents properly, and wipe containers dry before placing them in the appliance. This

     cuts down on frost build-up inside the appliance.

  Organize and label contents to reduce door openings and extended searches. Remove as many items 

     as needed at one time, and close the door as soon as possible.


Before removing the inner light, turn off the appliance first and then unplug the unit from the wall outlet. 

Failure to do so could result in electrical shock or personal injury.

Using a screwdriver, remove the two screws from the clear plastic cover.

Tilt the panel towards the front of the appliance and unscrew the LED board from the black plastic spacer.

Gently unclip the power cable from the red socket insert on the LED board.

Insert the power cable into the red socket insert on the replacement LED board. 

Position within the black plastic spacer. 

Reassemble the LED board, spacer and cover together using the two screws. 

Reposition the panel and carefully enclose the cord within the LED housing. 

Reattach the clear plastic panel using two screws.

Important: The replacement of LED lamp can only be performed by an authorized technician.

Changing the Inner Light

Summary of Contents for MCB34CHW

Page 1: ...LLY BEFORE USING YOUR APPLIANCE AND KEEP IT FOR FUTURE REFERENCE MCB34CHW MCB34CHB MCB34CHR MCB34CHM Specifications are subject to change without prior notice for purpose of product improvement 3 4 Cu Ft Beverage Cooler User s Manual ...

Page 2: ...tering your product include the following 1 Registering your product will allow us to contact you regarding a safety notification or product update 2 Registering your product will allow for more efficient warranty service processing when warranty service is required 3 Registering your product could act as your proof of purchase in the event of insurance loss Once again thank you for purchasing a M...

Page 3: ... not play with the appliance Cleaning and maintenance should not be made by children without supervision If the component part is damaged it must be replaced by the manufacturer its service agent or similar qualified persons in order to avoid a hazard Please abandon the appliance according to local regulations as the unit contains flam mable blowing gas and refrigerant Follow local regulations regar...

Page 4: ...TRUCTION BEFORE USING YOUR APPLIANCE 4 INSTALLING YOUR APPLIANCE 4 OPERATING YOUR APPLIANCE 5 TEMPERATURE CONTROL 5 LEVELING LEGS 5 ELECTRICAL CONNECTION CLEANING YOUR APPLIANCE 6 VACATION TIME 6 MOVING YOUR APPLIANCE 6 ENERGY SAVING TIPS 6 4 1 SPECIFICATIONS 3 TABLE OF CONTENTS CHANGING THE INNER LIGHT 6 ...

Page 5: ...2 4 Adjustable Leveling Legs 2 Adjustable Electronic Thermostat with Digital Display 3 Door Hinge 1 Wire Shelf 5 Door Gasket 6 Tinted Double Pane Glass Door NAMES OF THE PARTS ...

Page 6: ...igerant Tubing CAUTION Risk Of Fire Or Explosion Flammable Refrigerant Used Consult Repair Manual Owner s Guide Before Attempting To Service This Product All Safety Precautions Must be Followed CAUTION Risk Of Fire Or Explosion Dispose Of Property In Accordance With Federal Or Local Regulations Flammable Refrigerant Used CAUTION Risk Of Fire Or Explosion Due To Puncture Of Refrigerant Tubing Follo...

Page 7: ...ed electrician or an authorized service center This unit is not designed to be installed in an RV or used with an inverter After plugging the appliance into a wall outlet turn the unit on and allow the unit to cool down for 2 3 hours under before placing beverages in the appliance Do not use an extension cord with this appliance If the power cord is too short have a qualified electrician or servic...

Page 8: ... will show the temperature that you set You can manually turn off or turn on the light by pressing the LIGHTICON Short press tap only Your appliance has two leveling legs which are located in the front bottom corners of your appliance After properly placing your appliance in its final position you can level your appliance Leveling legs can be adjusted by turning them clockwise to raise your applia...

Page 9: ... tape down all loose items inside your appliance Tape the doors shut Be sure the appliance stays in the upright position during transportation Energy Saving Tips The appliance should be located in the coolest area of the room away from heat producing appliances or heating ducts and out of the direct sunlight Let hot contents cool to room temperature before placing in the appliance Overloading the ...

Page 10: ...mpletely Temperature inside the appliance is too cold Temperature control is set too cold Turn the control to a warmer setting and allow several hours for the temperature to stabilize Temperature of external appliance surface is warm The exterior appliance walls can be as much as 30ο F warmer than room temperature This is normal while the compressor works to transfer heat from inside the appliance...

Page 11: ...posal costs for any failed unit not returned to our factory Any delivery installation costs incurred as the result of a unit that fails to perform as specified Expenses for travel and transportation for product service if your appliance is located in a remote area where service by an authorized service technician is not available The removal and reinstallation of your appliance if it is installed ...

Page 12: ...CNA International Inc d b a MC Appliance Corporation All rights reserved Magic Chef logo is a registered trademark of CNA International Inc www mcappliance com Printed in China ...

Page 13: ...ILIZAR SU REFRIGERADOR Y GUÁRDELO PARA FUTURA REFERENCIA MCB34CHW MCB34CHB MCB34CHR MCB34CHM Las especificaciones están sujetas a cambios sin previo aviso para mejorar el producto Manual del usuario Enfriador de bebidas 3 4 pies3 ...

Page 14: ...o siguiente 1 Al registrar su producto nos permite contactarle para notificarle de un cambio deseguridad o actualización del producto 2 Si llegara a necesitar servicio bajo garantía registrando su producto nos permite ser más eficiente en procesar el servicio 3 En el evento que usted tenga una perdida que esta cubierto por un seguro registrando su producto puede servir como prueba de su compra Una...

Page 15: ...gar con el aparato Los niños no deben realizar la limpieza o el mantenimiento sin supervisión Si el componente está dañado debe ser reemplazado por el fabricante su agente de servicio técnico o persona similar calificada para evitar cualquier peligro Deseche el refrigerador de acuerdo con las normas locales ya que la unidad contiene refriger ante y gas inflamable Siga las normas locales con respec...

Page 16: ... EQUIPOS 4 5 CONTROL DE TEMPERATURA 5 5 CONEXIÓN ELÉCTRICA 6 4 ESPECIFICACIONES 3 INDICE DE MATERIAS NOMBRE DE LAS PIEZAS CÓMO OPERAR EL APARATO TIEMPO DE VACACIONES 6 MUDANZA DEL APARATO 6 CONSEJOS ÚTILES SOBRE AHORRO DE ENERGÍA 6 CAMBIO DE LA ILUMINACIÓN INTERIOR 6 PATAS DE NIVELACIÓN CUIDADO Y MANTENIMIENTO LIMPIEZA DEL APARATO 1 ...

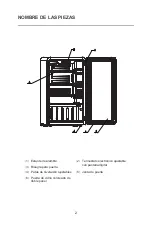
Page 17: ...DE LAS PIEZAS 4 Patas de nivelación ajustables 2 Termostato electrónico ajustable con pantalla digital 3 Bisagra para puerta 1 Estante de alambre 5 Junta de puerta 6 Puerta de vidrio coloreado de doble panel 2 ...

Page 18: ...Riesgo de incendios o explosiones Se utiliza un refrigerante inflamable Consulte el manual de reparaciones o la guía del propietario antes de intentar darle servicio a este producto Deben seguirse todas las precauciones de seguridad PRECAUCIÓN Riesgo de incendios o explosiones Deshágase del producto adecuadamente de acuerdo con las regulaciones federales o locales Se utiliza un refrigerante inflam...

Page 19: ...e conectarlo a la fuente de alimentación Esto reducirá la probabilidad de fallo del sistema de refrigeración debido a un funcionamiento inadecuado durante el transporte Limpie la superficie interna con un paño suave y agua caliente página 7 instrucciones de limpieza Conexión eléctrica Para su seguridad este dispositivo debe estar conectado a tierra correctamente El cable de alimentación d el dispo...

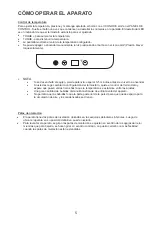
Page 20: ...ere que pasen varias horas hasta que la temperatura se estabilice entre los ajustes Una gran cantidad de bebidas disminuirá la eficacia de enfriamiento del aparato No permita que las bebidas toque la parte posterior de la pared para que quede espacio para la circulación de aire y los condensados se drenen Patas de nivelación 5 TOQUE para aumentar la temperatura TOQUE para disminuir la temperatura ...

Page 21: ...oméstico Cierre las puertas con cinta adhesiva Asegúrese de que el electrodoméstico se mantenga en posición vertical durante su transporte Consejos útiles sobre ahorro de energía El electrodoméstico debería ubicarse en el lugar más fresco del ambiente alejado de artefactos generadores de calor o conductos de calefacción y fuera de la luz solar directa Deje que se enfríen los contenidos calientes h...

Page 22: ...ol de temperatura está demasiado bajo Gire el control a un ajuste más caliente y espere unas horas para estabilizar la temperatura La temperatura de la superficie exterior del aparato es mayor La temperatura de la pared exterior del equipo puede ser 30 F superior a la temperatura ambiente Esto es normal cuando el compresor transmite calor desde el interior del armario eléctrico El compresor estall...

Page 23: ...stra fábrica Todos los gastos de entrega instalación incurridos como resultado de una unidad que no cumple con lo especificado Gastos de viajes y el transporte de los productos principales de servicio si su aparato está situado en una zona remota donde el servicio por un técnico de servicio no está disponible La remoción y reinstalación de sugran aparato si está instaladoen un lugar inaccesible o ...

Page 24: ...ternational Inc realiza negocios bajo el nombre de MC Appliance Corporation Derechos reservados El logotipo Magic Chef es una marca registrada de CNA International Inc www mcappliance com Impreso en China V1 ...

Reviews: