


Paradox Magellan Systems
9
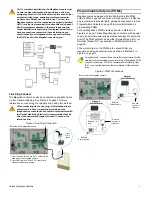
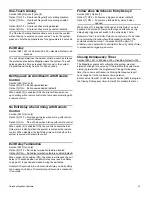
X10 Transmitter Connection
Magellan supports the X10 communication protocol. X10 is a
communication protocol for remote control of electrical devices
such as lamps and appliances. Communication is accomplished
through standard household electrical wiring using X10
transmitters and receivers. Configure Magellan, with the use of
an X10 transmitter, to automate a home. Connect the X10
transmitter as shown in Figure 9 on page 9.
Refer to the
Magellan X10 Instructions
on our website,
www.paradox.ca, for information on using and
configuring Magellan’s X10 feature.
Figure 9: Connecting the X10 Transmitter
Connecting a Paradox Memory Key (PMC-3)
When using a Paradox Memory Key with a Magellan console,
remove power (both AC and battery power), connect the memory
key to the 5-pin connector on the back of the Magellan console
as shown in Figure 10 on page 9. Once connected, re-apply
power to the console. For more information, see Programming
Using a Paradox Memory Key on page 11.
Figure 10: Connecting a Paradox Memory Key (PMC-3)
Location and Mounting
Location
The locations of Magellan and its wireless transmitters affect the
overall performance of the wireless system. To ensure the best
signal reception, the following list of location criteria should be
respected whenever possible:
•
Select an installation site that is free of obstacles that reflect
and absorb radio frequency (RF) signals, as well as
interference that may distort signals. Avoid installation near
or in the path of strong RF fields (i.e. neon lights,
computers), and on or near metal objects, circuit breakers
boxes, air conditioners and heater ducts since they may
cause interference and reduce the console’s sensitivity.
•
Select a site that is not susceptible to drastic temperature
changes.
•
Mount the Magellan console as central as possible to the
proposed placement of the wireless transmitters.
•
Mount the Magellan console as high as possible.
•
Avoid installing Magellan in the basement as the range of
the console is reduced when installed below ground level.
However, if it is absolutely necessary to install the console in
the basement, install the console as high as possible.
•
Install the Magellan console on a wall allowing at least 5cm
(2”) around the console to permit adequate ventilation and
heat dissipation.
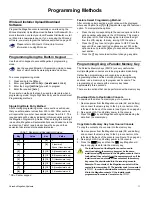
The Wall Plate
Magellan uses a plastic wall plate to stay mounted on a wall. The
wall plate is also used for tabletop mounting to cover the back of
the console as well as keep any wires within their respective wire
slots. After choosing an appropriate location (see Location on
page 9), mount the wall plate onto the Magellan console with two
screws as described in Mounting Magellan on the Wall on page
10 or Tabletop Mounting on page 10.
Figure 11: Wall Plate
4-pin
RJ11
cable
X10 transmitter
1. Connect one end of the 4-
pin RJ11 cable into the
X
10
plug of the console.
2. Connect the other end of
the 4-pin RJ11 cable into
the X10 transmitter.
3. Plug the X10 transmitter
into a standard wall outlet.
1
2
3
Back view of the Magellan console.
Jumper ON:
Read from and/or write to memory key
Jumper OFF:
Write protected (read from memory key only)
A
A
B
C
C
Summary of Contents for MG-6060
Page 1: ...All In One Wireless Security System V1 0 Model MG 6060 Reference and Installation Manual...
Page 2: ......
Page 44: ...42 Reference Installation Manual...
Page 46: ......
Page 47: ......


