background image

10

Viewing the 

Navigation Screens

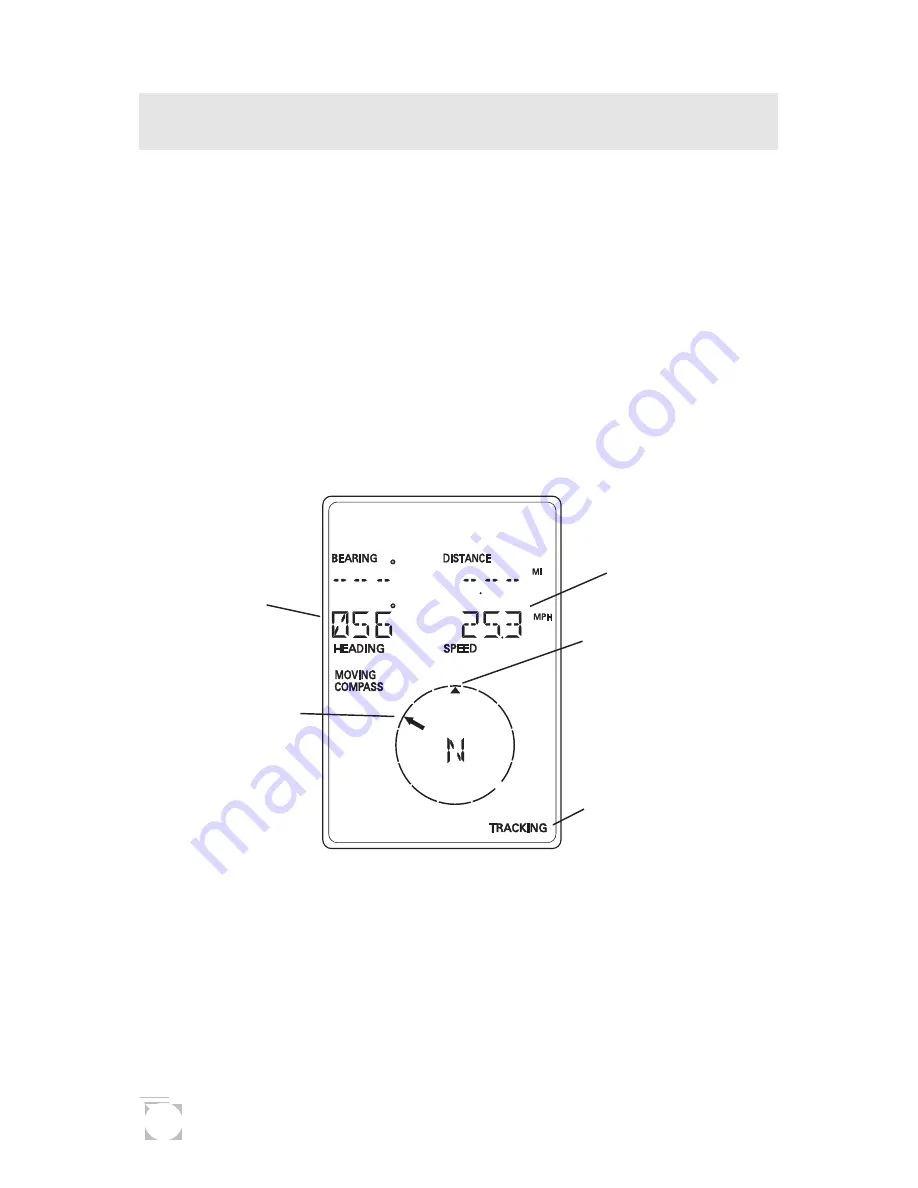
Without an Active Route.  Without an active route the
navigation screen displays your heading and the speed at
which you are traveling.  The lower portion of the screen
displays a moving compass.  The triangle at the top of the
compass points in the direction you are traveling and the
arrow points to north.

Navigation Screen without an Active Route

(Moving Compass)

Tracking Indicator

Appears when enough

satellites have provided

information to compute

position fixes.

Current

Heading

Current

Speed

Direction of

Travel

North

Indicator

The navigation screens display your speed of travel. In order
for the North Indicator to be valid and the speed to be
displayed, you must be moving at a speed greater than 2 miles
per hour.

Summary of Contents for Blazer12

Page 1: ...GPS lazer12 User Manual User Manual...

Page 2: ...em GPS is operated by the U S Government which is solely responsible for the accuracy and the maintenance of GPS Certain conditions can make the system less accurate No part of this User Guide may be...

Page 3: ...tteries 3 Getting Signals from Satellites 3 Initializing the Receiver EZStart 4 Computing a Position 5 Basic Operation 7 Saving a Position Fix 7 Creating a Landmark 8 Viewing the POSITION Screen 9 Vie...

Page 4: ...Reversing a Route 24 Additional Features 25 Viewing the Time and Date 25 Viewing Elevation 25 Viewing Battery Life 25 Changing Coordinate Systems 26 Changing Map Datums 27 Changing Distance Units 28 C...

Page 5: ...ast through the chapter on Basic Operation Before you begin make sure that your package includes the items listed on the GPS Blazer12 box If any items are missing or damaged contact your Magellan deal...

Page 6: ...T key turns the light on and off The ARROW pad is used to enter landmark names and scroll through the series of screens and menu selections The MENU key is used to access the route landmark and setup...

Page 7: ...es and replace the battery cover Replace the screw and turn the ring clockwise until the battery door is held in place securely You should avoid overtightening the battery door screw Getting Signals f...

Page 8: ...rmation it requires when you turn it on for the first time You do not need to initialize your receiver each time you use it Follow these steps to initialize the GPS Blazer12 if this is the first time...

Page 9: ...atellites that it knows are in this area for the date and time you entered The display shown here may differ from yours depending upon the information you selected in steps 2 and 3 As the GPS Blazer12...

Page 10: ...the GPS receiver has received positioning data from at least three satellites approximately 2 3 minutes it will begin computing a position fix based upon the information it is receiving As soon as a p...

Page 11: ...this landmark To accept the receiver generated name LM01 LM99 press ENTER To quickly save a position fix press MARK MARK User Created Name To create a name up to four charac ters use the UP DOWN arrow...

Page 12: ...name or accept the receiver generated name for this landmark When the desired name is displayed at the top of the screen press ENTER Use the ARROW pad to change the latitude and press ENTER to accept...

Page 13: ...ed by the satellite pointer Number of satellites being used Tracking Indicator Satellite Icons Appears when the receiver has acquired enough information from the satellites to compute a position fix N...

Page 14: ...the direction you are traveling and the arrow points to north Navigation Screen without an Active Route Moving Compass Tracking Indicator Appears when enough satellites have provided information to co...

Page 15: ...g of 56 while your destination bearing is 34 This would indicate that you need to turn left 22 to be on a straight line to your destination The circle and arrow display the same informa tion but in a...

Page 16: ...reens and the position screen are connected to one another in a circular loop Pressing the NAV key or using the ARROW pad while viewing one of the position or navigation screens moves you to the next...

Page 17: ...to create a GOTO route is that you have saved a landmark indicating the location of your destination To create activate a GOTO Route From any screen press GOTO The GOTO screen appears To select a diff...

Page 18: ...Take a position fix of the location and save it to memory giving it a name that you will later associate with this location Then travel a few miles away with your receiver stop and take another positi...

Page 19: ...E screen for the first landmark in the receiver s memory is displayed with the bearing and distance from the last computed position fix to that landmark To select a different landmark use the LEFT RIG...

Page 20: ...landmark you are editing is used in a route the route will be modified to reflect the changes you made to the landmark Deleting a Landmark Following the instructions under Viewing a Landmark use the L...

Page 21: ...at directs you to the destination of each leg sequentially Creating a Route A route can contain up to 10 legs using any of the landmarks stored in memory If there is a route already in memory you must...

Page 22: ...red landmark is displayed and flashing press ENTER Note that as you scroll through the list of landmarks the display updates showing you the bearing and distance from the start of this leg to the disp...

Page 23: ...to press the ARROW pad until END ROUTE is displayed again A route may contain no more than ten legs and the GPS Blazer12 automatically saves the route and returns to the Route Menu as soon as Leg 10...

Page 24: ...g the LEFT RIGHT ARROWs to step through the other legs in the route eventually returning to the ROUTE SUMMARY screen Activating Deactivating a Route With a route in memory press MENU until ROUTE appea...

Page 25: ...gs to a Route With a route in memory press MENU until ROUTE appears at the top of the display Press ENTER While still viewing the Route Summary screen press the UP ARROW until the display indicates PR...

Page 26: ...til the leg you wish to activate is displayed Press the UP ARROW If the leg is not active the display indicates ENT TO ACTI VATE Press ENTER The leg has become activated the NAV screen is displayed an...

Page 27: ...yed with the FROM landmark flashing Use the LEFT RIGHT ARROWs to select a new FROM landmark and press ENTER The TO landmark begins flashing alerting you that the GPS Blazer12 is ready for you to selec...

Page 28: ...ARROW to select flashing YES to delete or NO to cancel If you attempt to delete a leg that causes the route to contain a leg that is under the 0 1 mile leg distance limitation the receiver will displ...

Page 29: ...the screen Viewing Elevation You can view the last computed elevation for your GPS Blazer12 by repeatedly pressing the MENU key until ELEVATION is displayed at the top of the screen Viewing Battery L...

Page 30: ...want your GPS Blazer12 to be displaying the coordinates in the same mode that your map or chart uses The following example shows the same position in three different modes LAT LON DEGMIN LAT LON DEGMI...

Page 31: ...U key until SETUP is displayed at the top of the screen and press ENTER Use the RIGHT ARROW until SETUP MAP DATUM is displayed Press ENTER again the currently used map datum begins to flash Use the RI...

Page 32: ...nit of measure is displayed Changing Time Display and Time To change the way that time is displayed 12 HOUR default 24 HOUR or UT repeatedly press MENU until SETUP is displayed at the top of the scree...

Page 33: ...e begins to flash Use the RIGHT LEFT ARROWs to scroll between MAGNETIC and TRUE and press ENTER to select Initializing the Receiver EZSTART If you desire to re initialize the receiver for example you...

Page 34: ...date Press ENTER Note The prompts to enter time and date will not appear if your receiver has already collected this information from the satellites Activating the Demo Mode To turn on the Demo Mode...

Page 35: ...LEFT RIGHT ARROW keys to change the contrast to the desired level and press ENTER Using the Trip Odometer Press MENU until the ODOMETER is displayed The odometer will keep track of the distance you h...

Page 36: ...antenna is pointing up and that it is a reasonable distance from your body 3 Check that the time is correct If not reset the time following the instructions for Changing Time Display and Time on page...

Page 37: ...m as your map The map datum is generally shown in the map legend See Map Datum under Setup for instructions on selecting the map datum in your receiver 2 Check your LAT LON format Make sure that the f...

Page 38: ...h the use of NiCad batteries Can I attach my GPS Blazer12 to external power Yes However this requires the optional external power cable available from your dealer or Magellan Systems Will I lose all m...

Page 39: ...e receiver will operate for about an additional hour before automatically turning off The Magellan GPS Blazer12 will retain its memory route landmarks last fixes etc for 30 minutes with the batteries...

Page 40: ...first Ship the unit to Magellan Systems by Parcel Post or UPS and include a description of the problem your name and address and a copy of your sales receipt If your return shipping address is differ...

Page 41: ...her surface allowing you hands free operation of your GPS Blazer12 Allows the use of the External Power Cable while the receiver is resting in the bracket putting your GPS Blazer12 where you want it a...

Page 42: ...e lanyard for your GPS Blazer12 can be easily attached by inserting the small loop of the lanyard through the ring provided on the battery door locking screw and then looping the other end of the lany...

Page 43: ...to get your first fix after shipment Also prior to shipping you should loosen the battery door screw if you feel that your GPS Blazer12 may be placed in an unpressurized area of an aircraft Loosening...

Page 44: ...ich to chart their maps so position coordinates will differ from one datum to another The datum for the map you are using can be found in the legend of the map If you are unsure as to which datum to u...

Page 45: ...Leg Route A segment of a route that has a starting FROM landmark and a destination TO landmark A route may consist of 1 or more legs A route that is from landmark A to landmark B to landmark C to land...

Page 46: ...from an observer s position The north direction on any geographi cal meridian UT Universal Time formerly referred to as Greenwich Mean Time GMT UTM Universal Transverse Mercator UTM is the metric gri...

Page 47: ...31 Cross Track Error XTE 12 Customer Service 36 D Date see Time and Date Datums see Map Datums Demo mode activating 30 Distance units 28 E Elevation viewing 25 F Function keys 2 G GOTO creating a rou...

Page 48: ...osition computing a position 5 6 screen 9 saving 7 troubleshooting 32 Position fixes saving 7 troubleshooting 32 see also Landmark R Route create 17 19 viewing 19 20 deactivating activating 20 deletin...

Page 49: ...ers RMS without Selective Availability Velocity 0 12 mph RMS steady state without Selective Availability Physical Weight 6 8 ounces Housing Waterproof Battery compartment is splashproof Temperature 0...

Page 50: ...960 Overland Court San Dimas CA 91773 630288 B This product has been certified by Mission HOME the official educational campaign of the U S space community...

Reviews: