background image

L

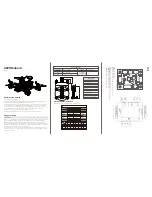
MAD-S Manual - Release 1.0

1x

2x

8x

8x

1x

1x

2x

Female

Standoff

Button Head

Screw

Button Head

Screw

Button Head

Screw

Button Head

Screw

M

T

1

0

2

-1

M

T

1

0

2

-2

M

T

1

0

2

-3

M

T

1

0

2

-4

M

T

1

0

2

-6

.X

M

T

1

0

2

-7

M

3

x

6

 B

lu

e

7

0

7

5

-T

6

M

3

x

8

 B

la

c

k

7

0

7

5

-T

6

M

3

x

1

8

 B

lu

e

7

0

7

5

-T

6

M

3

x

2

0

 B

la

ck

7

0

7

5

-T

6

M

3

x

1

0

 R

e

d

6

0

6

1

-T

6

M

T

1

0

2

-1

1

Parts included in MAD-S frame kit

Scale 2:1

Scale 1:2

Center Plate

Top/Bottom Plate

Arm

Motor plate

Camera mount

Antenna bracket

Battery strap

1x

25x

1x

10x

10x

Summary of Contents for MAD-S

Page 1: ...MAD S ...

Page 2: ... Head Screw MT102 1 MT102 2 MT102 3 MT102 4 MT102 6 X MT102 7 M3x6 Blue 7075 T6 M3x8 Black 7075 T6 M3x18 Blue 7075 T6 M3x20 Black 7075 T6 M3x10 Red 6061 T6 MT102 11 Parts included in MAD S frame kit Scale 2 1 Scale 1 2 Center Plate Top Bottom Plate Arm Motor plate Camera mount Antenna bracket Battery strap 1x 25x 1x 10x 10x ...

Page 3: ...best for you depends on your motors hole pattern If you follow this instruction the motor cables will be aligned with the arm going to the top level where the ESC is recommended to be mounted Using motors with 16x16 hole pattern let you build according to Mode A OR Mode B depending on what gives you best access to the flight controller USB connector 6 Step by step assembly instructions ...

Page 4: ...4 MAD S Manual Release 1 0 Mode A Top view of correct mounted motorplate for Mode A M3x20 M3x8 M3x18 M3x18 M3x6 ...

Page 5: ...5 MAD S Manual Release 1 0 Mode B Top view of correct mounted motorplate for Mode B M3x8 M3x20 M3x18 M3x6 M3x18 ...

Page 6: ... included in MAD S frame kit An animated version of this example can be found at madkwads com 1x Holybro Kakute F4 V2 1x Holybro Tekko 32 1x Runcan Micro Eagle 4x Brother Hobby R5 1x Lumenier AXII 5 8GHz Antenna 1x TBS Unify Pro HV 1x FrSky R XSR 1x XT60 Battery cable 2x 2 5mm wide ziptie M3 Nut 4x 3x4 Spacer 4x M3x12 Screw 4x 1x Battery cable clips OPTIONAL 2x 5 1 CCW Propeller 1x R line 1050mah ...

Page 7: ...e 1 0 1 2 Mount FC with so little distance to center plate as possible M3x12 4x 3x4 4x M3x6 2x M3x10 2x Temporarly pre mount standoffs to bottom plate these will be removed in step 13 Mount FC and ESC to center plate M3 4x ...

Page 8: ...8 MAD S Manual Release 1 0 3 4 M3x18 3x M3x10 standoff 3x Temporarily mount bottom plate it will be removed in step 13 Double check that USB cable can be connected to FC Micro USB cable ...

Page 9: ...9 MAD S Manual Release 1 0 Top view of correct mounted motorplate for Mode A 5 6 Repeat step 5 for each motor M3x18 4x Mount motor ...

Page 10: ...10 MAD S Manual Release 1 0 7 8 Solder motor and battery cables If battery clips are used pull it over cable before soldering Pre mount standoffs to top plate M3x6 3x M3x10 3x ...

Page 11: ...11 MAD S Manual Release 1 0 9 10 Mount battery straps to top plate BEFORE mounting plate Metal catch facing forward Mount top plate M3x18 1x M3x6 2x ...

Page 12: ...12 MAD S Manual Release 1 0 11 12 Mount camera bracket using screws with odd length and color M3x20 1x M3x8 1x Mount camera using M2 screws supplied with camera ...

Page 13: ...13 MAD S Manual Release 1 0 13 14 Unmount bottom plate Install and connect RX and connect camera Holes for zip ties when using 2 4Ghz RX zip tie antenna to motor plate when using 900Mhz RX ...

Page 14: ...14 MAD S Manual Release 1 0 15 16 M3x6 2x M3x10 2x Pre mount standoffs to bottom plate Install and connect VTX and antenna M3x6 2x ...

Page 15: ...15 MAD S Manual Release 1 0 17 18 Mount bottom plate M3x18 5x M3x6 2x M3x18 2x Mount screws in top plate ...

Page 16: ...16 MAD S Manual Release 1 0 19 20 Check motor rotation direction and configure FC Information about how to configure and tune MAD S can be found at madkwads com Install propellers and fly ...

Reviews: