


35
IT
EN
FR
ES
Madas Technical Manual
- 2|2.2b - REV. 0 of 10
th
May 2018
M16/RM N.C. EEX
9
30
9
30
31
31
31
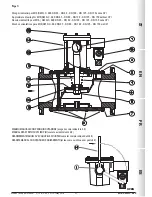
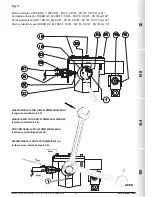
fig. 5
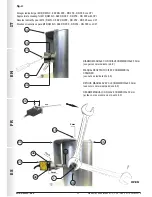
fig. 6
DN 65 - DN 80 - DN 100
IT
fig. 5: vista dall’alto senza coperchio
Posizionare l’organo filtrante (
9
) controllando
che sia sistemato tra le apposite guide (
30
).
EN
fig. 5: view from above without cover
Position the filter element (
9
), making sure it is
between the relative guides (
30
).
FR
fig. 5: vue du haut sans couvercle
Positionnez l’organe filtrant (
9
) en vérifiant qu’il
est placé entre les guides appropriés (
30
).
ES
fig. 5: vista superior sin tapa
Inserte el cartucho filtrante (
9
) controlando que esté
colocado entre las guías correspondientes (
30
).
DN 125 - DN 150
IT
fig. 6: vista dall’alto senza
coperchio
Posizionare l’organo filtrante (
9
) controllando
che sia sistemato tra le apposite guide (
30
)
e verificando che le alette (
31
) risultino ben
aderenti al corpo valvola.
EN
fig. 6: view from above without
cover
Position the filter element (
9
), making sure it
is inserted between the relative guides (
30
)
and check that the fins (
31
) are secured well
to the valve body.
FR
fig. 6: vue du haut sans couvercle
Positionner l’organe filtrant (
9
) en vérifiant
qu’il est placé entre les guides appropriés
(
30
) et en vérifiant que les ailettes (
31
)
adhèrent bien au corps de la vanne.
ES
fig. 6: vista superior sin tapa
Inserte el cartucho filtrante (
9
) controlando
que esté colocado entre las guías
correspondientes (
30
) y comprobando que
las aletas (
31
) se adhieran correctamente al
cuerpo de la válvula.


