


Configuring Breeze Live
If you install Macromedia Breeze Live on the same computer as the Breeze Presentation platform, no
additional configuration of Breeze Live is necessary. If you install Breeze Live on a separate computer from
the Breeze Presentation, you need to perform the configuration steps described in this chapter.
Note:
If you are using the Breeze Live stand-alone configuration, all references to the Breeze Presentation platform in
this chapter also apply to the Breeze application server.
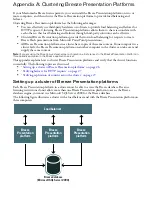
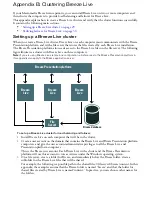
Breeze Live creates files that need to be shared with the Breeze Presentation platform. If Breeze Live is not
on the same computer as the Breeze Presentation platform, you need to set up the shared access to these
files and copy the custom.ini configuration file used by the Breeze Presentation platform to the Breeze Live
host computer.
To configure Breeze Live on a separate computer from the Breeze Presentation platform:
1
Create a user account on the domain that contains the Breeze Live and Breeze Presentation platform
host computers, and give the account administrative privileges to both computers.
This is the Breeze user account. Breeze Live and the Breeze Presentation platform will use this
account to run as Windows services.
2
Immediately under the Breeze Live installation folder, create a folder called “content” for the files
that Breeze Live and the Breeze Presentation platform need to share.
3
Share the Breeze Live installation folder so that Breeze Live and the Breeze Presentation platform
have access to it.
4
Set permissions on the Breeze Live installation folder. Give the Breeze user you created in step 1 full
control of the folder.
Because Breeze Live and the Breeze Presentation platform run as the Breeze user you created, this
privilege lets them write files to the folder and its subfolders.
5
Set the
FCS_CONTENT_PATH
property in the Breeze Presentation platform custom.ini configuration
file to the location of the content folder you created in step 2.
For example, if the Breeze Live host computer is named ZLIVE, you set
FCS_CONTENT_PATH
as
shown in the following example:
FCS_CONTENT_PATH=\\ZLIVE\
breeze_live_install_folder
\content
For more information about the
FCS_CONTENT_PATH
configuration property, see the table of
configuration properties in
“Configuring the Breeze Presentation Platform” on page 17
.
The custom.ini configuration file on the Breeze Presentation platform host computer resides in the
Breeze Presentation platform installation folder.
6
If your Breeze server will serve presentations for Internet clients, add the following entries at the end
of the configuration file. In the example below,
breeze.yourhostname.com
represents the fully
qualified domain name of your Internet accessible Breeze server as it appears in the Domain Name
Service (DNS) and in your
ADMIN_HOST
entry.
USE_HOST_MAPPINGS=yes
host.breeze=breeze.yourhostname.com
7
Copy the custom.ini file to the Breeze Live installation folder on the Breeze Live host computer.
8
On the Breeze Presentation platform host computer, set the login properties for the Macromedia
Breeze Application Service so that the Breeze user account can start the service.
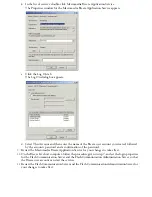
To set login properties for the Macromedia Breeze Application Service:
a
Depending on your operating system, do one of the following:
In Windows 2000, select Start > Settings > Control Panel > Administrative Tools > Services.
In Windows XP, select Start > Control Panel > Performance and Maintenance > Administrative
Tools > Services.
In Windows 2003, select Start > Administrative Tools > Services
Summary of Contents for BREEZE
Page 1: ...Installation Guide...
Page 32: ......