background image


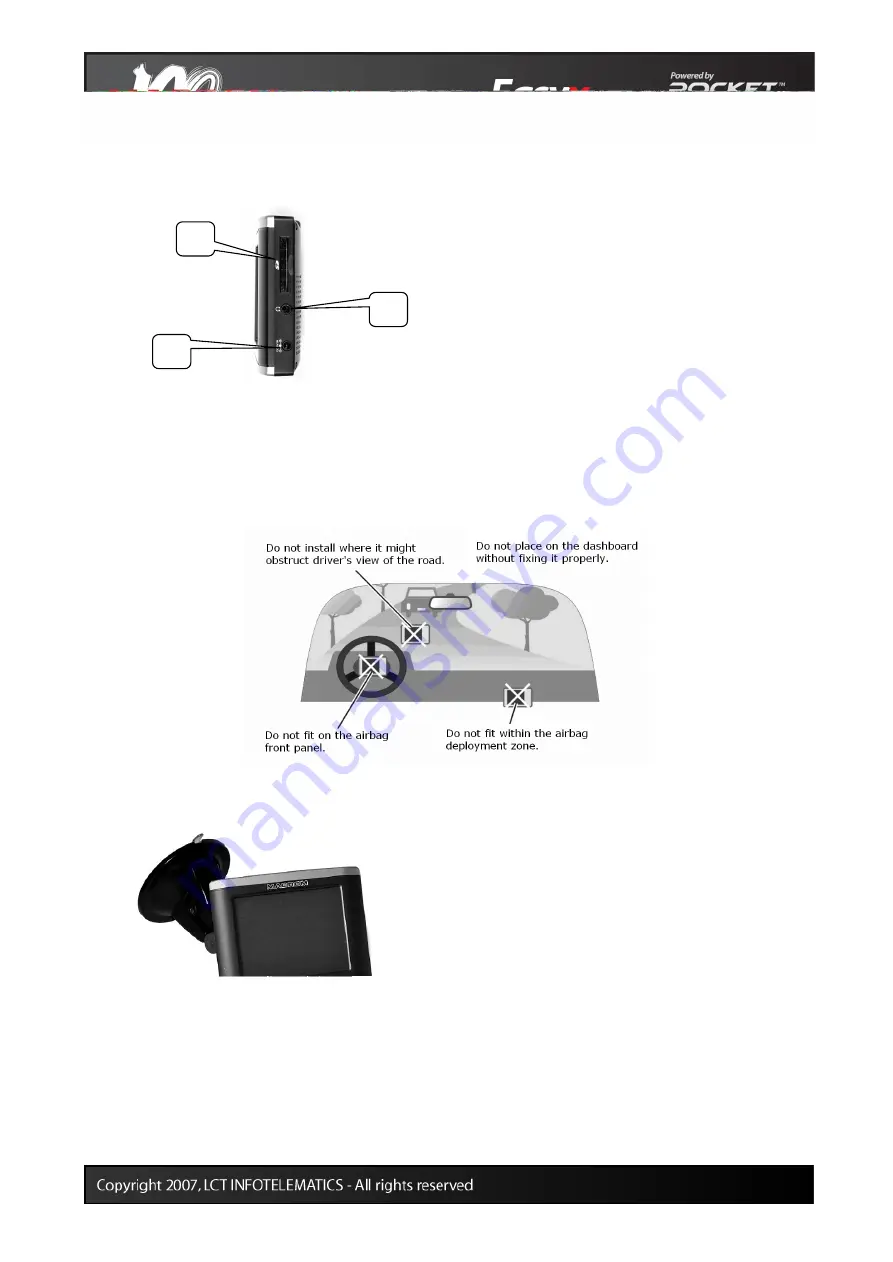
RIGHT PANEL 


(1) Slot for SD memory cards:

 socket for 

SD (Secure Digital) memory cards.


(2) Audio connector:

 to connect stereo 

headphones. 

(3) Power connector:

 to connect the 

supplied AC mains (AC adapter) or car charger. 


USE OF THE NAVIGATOR 

A suction support and car charger are included with your navigator. Fix the navigator on the 
windscreen, choosing the position carefully so as not to obstruct road visibility and cause 
danger.  See the figure below. 


To fix the suction support, place the sucker on the 
windscreen and press the lever, making sure that 
the seal is secure. 
 
Then insert the navigator into the support. 

Summary of Contents for Portable GPS Navigator

Page 1: ...REV 1 1...

Page 2: ...NS AND INSTRUCTIONS 3 REGISTERED TRADEMARKS 4 BEFORE STARTING 5 NAVIGATOR CONTROLS 5 USE OF THE NAVIGATOR 6 GETTING STARTED 8 MAIN FUNCTIONS 11 TROUBLESHOOTING AND MAINTENANCE 14 TROUBLESHOOTING 14 MA...

Page 3: ...driver of the vehicle from observing road signs or the highway code The GPS Global Positioning System is a system operated by the government of the United States which has sole responsibility for its...

Page 4: ...hts of third parties Windows is a trademark of the Microsoft Corporation Note LCT Infotelematics pursues a policy of continuous improvement in its product development data and information found in the...

Page 5: ...on to restore the navigator s functions if there is a fault 2 Aerial connector connector for an external GPS aerial 3 Loudspeaker 4 Guide to fix the navigator to the suction support TOP PANEL 1 ON OFF...

Page 6: ...ger USE OF THE NAVIGATOR A suction support and car charger are included with your navigator Fix the navigator on the windscreen choosing the position carefully so as not to obstruct road visibility an...

Page 7: ...car s cigar lighter socket Note While in use the car charger functions as a supply for the navigator and as a battery charger Recharging is quicker when the navigator is turned off CAUTION to protect...

Page 8: ...ry charge level The Main Menu icons represent the different functions available the Navigator the image viewer the MP3 player the Smart Blocks game the calculator and the configuration functions To op...

Page 9: ...e necessary changes press OK to confirm Press the Volume button Adjust the volume to the desired level by tapping the and keys Press OK to confirm and return to the Setup Menu Press the Language key t...

Page 10: ...lect the button Calibration and then OK to confirm Touch the cross wire with the pen and keep it pressed lightly on the screen Repeat the operation following the indications and touch the screen again...

Page 11: ...r software to be found on the CD DVD The latest version of the Manual can be found and downloaded from www macromgps com Start the image viewer by pressing the Photo button The programme shows the fol...

Page 12: ...wise Close the application Start the MP3 player by pressing the MP3 button The upper part of the window contains the forward bar the button to display information relating to the application and the b...

Page 13: ...o Delete the playlist Add a track Delete a track from the playlist Pressing the Smart Blocks button starts the game Press the X button on the top right to exit the application Start the calculator by...

Page 14: ...too low Plug the charger into the navigator The navigator is on but the screen is blank Plug the charger into the navigator If the screen remains blank press the reset button The system responds very...

Page 15: ...and reduce the risk of damage and malfunctioning we recommend you follow the advice below Remember that the navigator is not waterproof Do not expose the navigator to humidity or high temperatures Avo...

Page 16: ...fire or burning do not dismantle break pierce or put into fire or water The battery could explode and release poisonous chemicals Advice to people carrying out maintenance Replacing the battery with o...

Reviews: