background image

- 2 - 

1.  Never disassemble or adjust the unit without any professional guidance.

  For details, please consult any professional car shop / dealer for inquiry.

2.   If the front panel or TFT monitor is dirty, please use a clean silicone cloth and neutral detergent 

to wipe off the spot. Using a rough cloth and non-neutral detergent such as alcohol for cleaning 

may result in  scratching or decoloration to the monitor.

3.   If any abnormal behavior of the unit is found, please refer to trouble shooting guide of this 

manual. If no relevant information is found, please press the [RESET] key on the front panel to 

resume factory default.

4.   If you have parked the car in hot or cold weather for a long time, please wait until the 

temperature in the car becomes normal before operating the unit.

5.   Using the car heater in low temperature environment may result in moisture inside the unit, DO 

NOT use the unit in this situation. Eject the disc and wipe off the moisture on the disc. If the unit 

still doesn't work after a few hours, please contact the service center.

6.   Do not impact the LCD monitor which could cause damage.

7.  To prevent damage to the screen, avoid touching it with sharp objects.

8.   To provide a clear demonstration and an alternative for easy understanding to the operation of 

this unit, graphic illustrations are used.

   However, some illustrations are different from the actual images displayed on the screen.

9.   Operate the unit correctly according to this manual to prevent unnecessary problem. The 

guarantee won't be valid if the problem is caused by inappropriate operation.

Safety Precautions

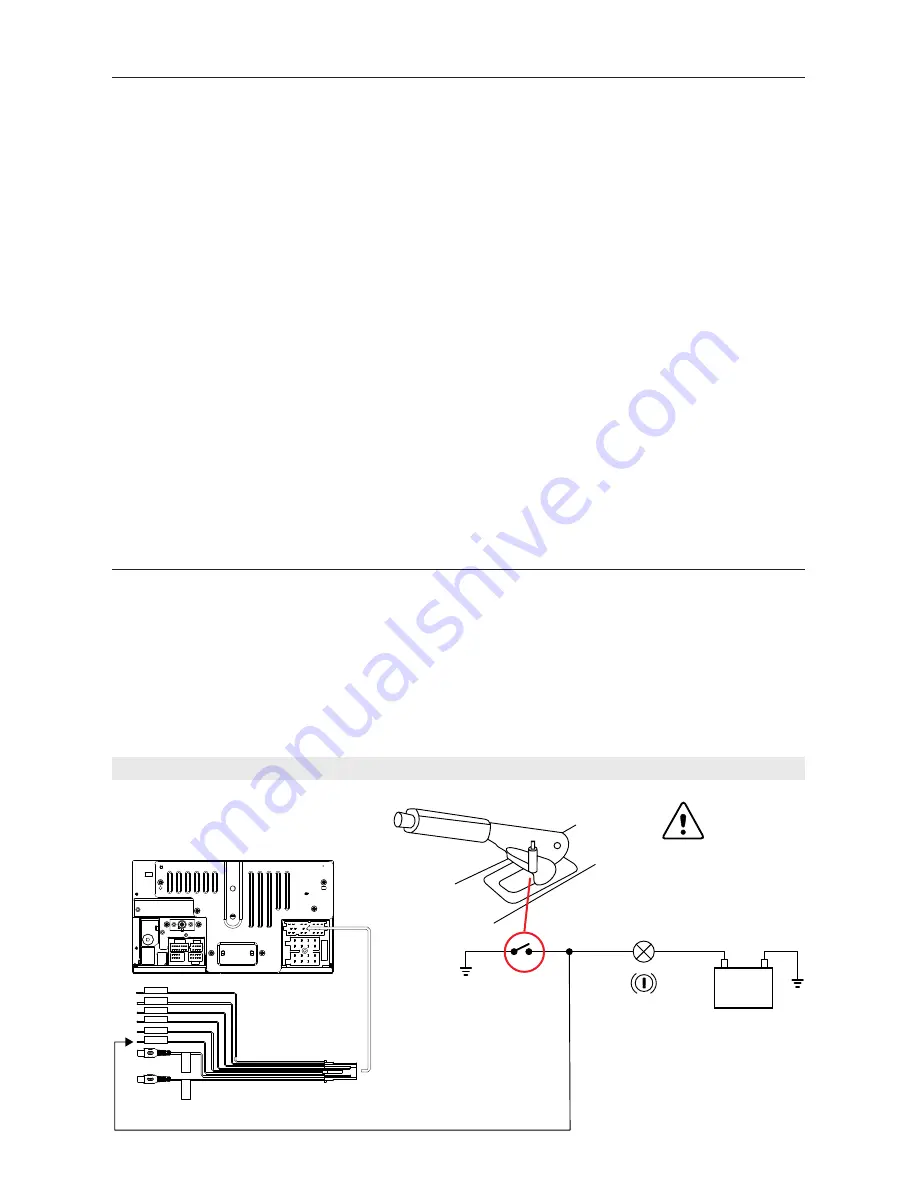
Detect parking brake

•  In order to be able to install the android application, the handbrake connection must be 

connected. Engage the parking brake for APP installation.

•  Connect the cable "BRAKE" to the parking brake switch to view video files on the TFT monitor.  

Engage the parking brake for viewing videos.

•   When the parking brake is not engaged, the monitor displays "Warning!!!, Video playback is 

disabled for your safety. Engage parking brake to watch video.", preventing the driver to watch 

content while driving. The rear screens are not interested in this inhibition.

Importante note:

This connection is indispensable for the proper operation.

Warning

Brake light

Battery

Pink 

Green with White

Black

Orange with white

Brown with white

Blue

SWC &

CAMERA IN

Camera IN

Video Out

PARKING

REVERSE 

SWC GND

SWC2

SWC1

P.CONT 

Video Out

Yellow

Yellow

To connect to 

the Parking cable

Summary of Contents for M-DL7000

Page 1: ...USER MANUAL M DL7000...

Page 2: ......

Page 3: ...Call out receive Call 9 Map 9 Message 9 Siri 9 iPod 10 Play with iPod 10 Android Auto 10 Installation procedure 10 11 12 Play with Android 13 Map 13 Call out receive Call 13 BAck to Android Auto 13 Pl...

Page 4: ...negative grounding MUTE OK MUTE OK Never install this unit where the operation condition for safe driving is impaired Never use the video display function in the front when driving to prevent the viol...

Page 5: ...he screen avoid touching it with sharp objects 8 To provide a clear demonstration and an alternative for easy understanding to the operation of this unit graphic illustrations are used However some il...

Page 6: ...ll up main menu 4 button Show the volume bar 5 Reset Button Press to reset system settings to factory default except password and parental lock settings 6 USB Connector Connect a USB device for playba...

Page 7: ...he front panel to display the playing source menu The playing mode is displayed on the screen 1 Date display 2 Time display 3 Function icons Basic Operations 1 2 3 Setting Date Time 1 Touch Settings 2...

Page 8: ...our interest 1 Enter the EQ setup mode Touch the icon in the user interface and the EQ setup interface will display on the screen 2 Adjust subwoofer volume Touch or drag to adjust subwoofer volume fro...

Page 9: ...ep Method 2 1 Touch the numeric keypad icon Numeric keyboard is displayed touch number to input frequency 2 Touch to delete the input number step by step 3 Touch OK to enter FM AM Radio mode 1 Touch t...

Page 10: ...title RDS service availability varies with areas Adjust RDS Settings 1 In Radio menu touch The option menu is displayed 2 Touch on the selected option to change the setting RDS To turn on or off RDS...

Page 11: ...dates the AF list of preset stations including the one that currently tuned into TA Function The TA Traffic Announcement function lets the unit receive traffic announcements automatically The TA funct...

Page 12: ...ceive Call Touch the Phone of CarPlay mode for Calling Map Touch the Map of CarPlay mode to let the iPhone show you the way Message Touch the Messages of CarPlay mode for sending message or check unre...

Page 13: ...n phones and the product at the same time Required Android OS 5 0 Android Auto App must be installed on the phone before connecting Installation procedur The following procedure illustrated for the in...

Page 14: ...tinue with the installation you must agree to the terms provided by Google Next step are to allow Android Auto to easily work with navigation music calls messages and other voice commands If you want...

Page 15: ...12 Android Auto Next step are to allow Android Auto to show your notifications on top of your other apps Next step Get started to Android Auto...

Page 16: ...e phone show you the way Call Out Receive Call Touch the icon on Android Auto for Calling Back to Android Auto Touch the icon of Android Auto to back on main menu Play Music Touch the icon of Android...

Page 17: ...nnect a USB Device 1 Open the USB door 2 Insert the USB socket then connect the other end of the cable to your USB device Remove a USB Device 1 Select other source on the main menu 2 Remove the USB de...

Page 18: ...ouch the file again to start play Repeat 1 Touch anywhere except the upper left corner to display menu on the screen 2 Touch repeatedly Repeat off Cancel repeat play Repeat folder Play all in the curr...

Page 19: ...hed the device is displayed in the menu Press the button if you want to delete the Bluetooth device from the list Connecting Bluetooth devices If you want to connect a device to the audio system fothe...

Page 20: ...via Bluetooth streaming A2DP is short for Advanced Audio Distribution Profile The mobile phones supporting this function can transmit stereo audio whereas the ones not supporting this function can tr...

Page 21: ...Video 2 Touch an option repeatedly to select Video settings Options Description Parking On Disable video Off Enable video Day Night Mode Day Night Auto Brightness 0 10 Adjust the display Brightness V...

Page 22: ...tool Replace a Fuse If there is no power the fuse may be damaged and need to be replaced 1 Remove the unit from the dashboard 2 Check all electrical connections 3 Buy a fuse that matches the amperage...

Page 23: ...Hz 50dB Frequency range 522 1620KHz BT Frequency 2 402 2 480GHz EIRP power 5 44dbm LCD Screen size 6 75 inches 16 9 Display resolution 800X480dots Contrast ratio 400 Brightness 280cd m2 Power output F...

Page 24: ...g signal cable Radio Noisy Cannot search the station Ensure there is no metal products around the machine Driving the vehicle to the place where the radio signal is good and search the station If the...

Page 25: ...Rear right Purple with black stripe Front right Gray Front right Gray with black stripe Front left White Front left White with black stripe ACC Red Rear left Green Ground Black Battery 12V Yellow Rear...

Page 26: ...23...

Page 27: ...ting symbol for waste electrical and electronic equipment WEEE This means that this product must be handled to the local collecting points or given back to retailer when you buy a new product in a rat...

Page 28: ...w w w m a c r o m i t The MACROM brand is a registered trade mark of ALDINET S p A...

Reviews: