


© 2015 MacroAir Technologies Toll Free: 866 668 3247 Fax: 909 890 2313 www.macroairfans.com 34
Rev. Date 090415
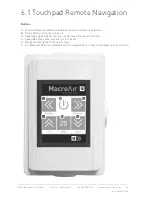
3.3 Touchpad Remote Mounting
3.3B Flush Mounting (Not Provided)
3.3.1B:
Install the single gang
electrical box (not provided).
3.3.2B:
Run the provided shielded
CAT5e cable from the fan into the
single gang electrical box.
3.3.3B:
Plug the remote cable into the
pre-wired shielded CAT5e cable from
the screen using the provided RJ45
coupler.
3.3.4B:
Secure the touch screen to the
enclosure using the 2 provided screws.
3.3.5B:
Lock the provided bezel into
place via the plastic tabs.
3.3A Wall Mounting (Provided)
3.3.1A:
Mount the base plate of the enclosure to the
wall using the 4 provided wall anchors and screws.
3.3.2A:
Snap the front of the enclosure to the base
plate.
3.3.3A:
Plug in the pre-wired shielded CAT5e cable
from the screen into the RJ45 coupler inside the
enclosure.
3.3.4A:
Secure the touch screen to the enclosure
using the 4 provided screws.
3.3.5A:
Lock the provided bezel into place via the
plastic tabs.
3.3.6A:
Plug the provided shielded CAT5e cable from
the fan into the RJ45 on the outside of the enclosure.
Note:
The Touchpad Remote will automatically turn off after 30 seconds of inactivity. To turn the
screen back on, simply touch anywhere on the screen.
Note:
100 feet of shielded CAT5e cable is provided standard. Up to 400 feet of cable can be
ordered and 400 feet is the maximum distance allowed.
Refer to the next page for dimensions.
Components:
A - Base Plate
B - Front of Enclosure
C - Touch Screen
D - Bezel
E - Single Gang Electrical Box (not provided)
A
B
C
C
D
D
E


