background image

   Taurus LAN                                                                                                    User Guide 

Peer to Peer 

If you connect the Taurus LAN directly to your computer (PC or Mac) via Ethernet cable, 
you can access it using its default IP 192.168.1.1. Open the web browser and enter 
192.168.1.1 to access the web configuration interface. 
 

Note: This only works when the Bonjour service is disabled! 


Login on a Mac 

When the Bonjour service is disabled, the only way to access the login page is by using its 
IP address. First, you will have to find out the IP address of your Taurus LAN and then use 
the web browser to access the web configuration interface. 
 

1.  Turn on your Taurus LAN and make sure it is connected to the same network as 

your computer. 

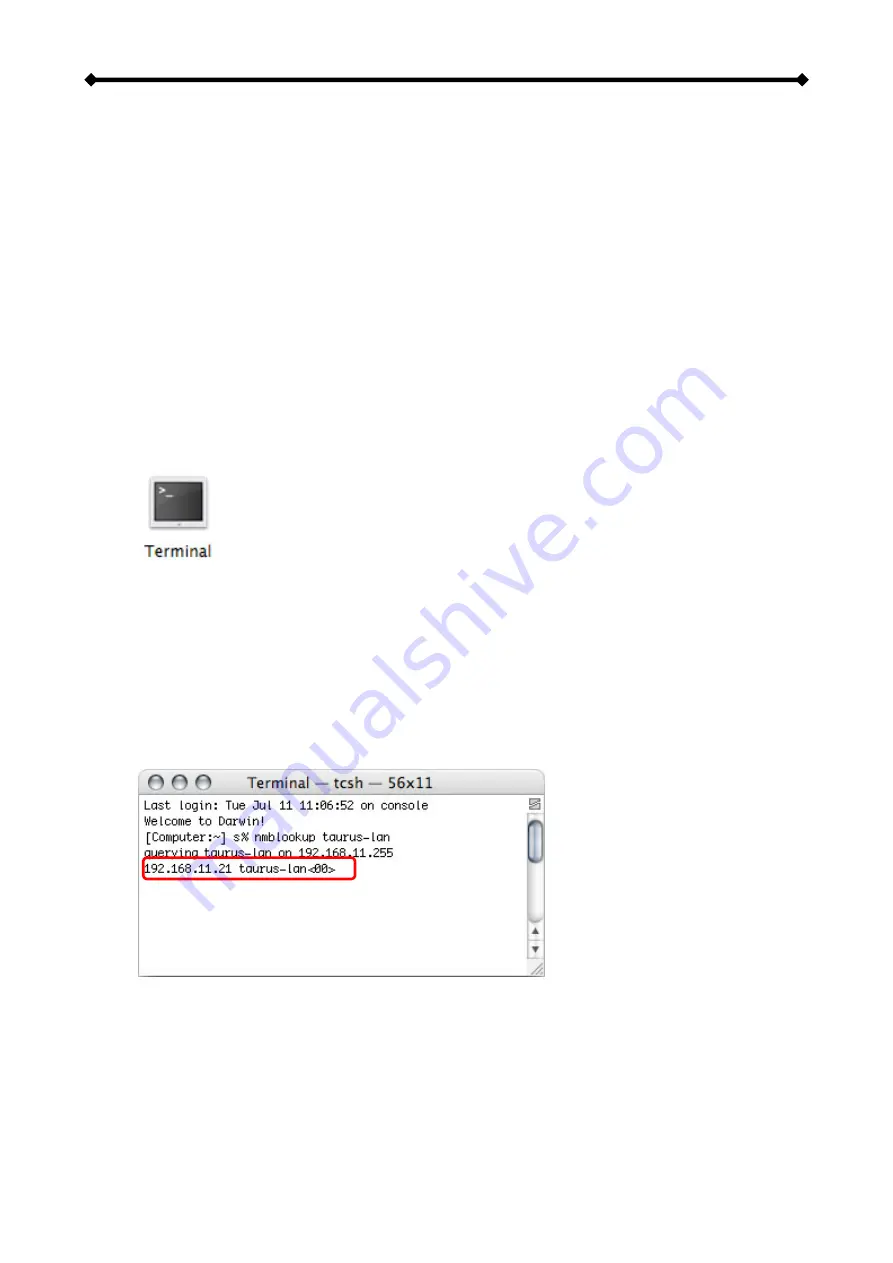
2.  Start the Terminal utility, which is usually located in your Applications folder under 

Utilities. 


3.  Type nmblookup taurus-lan. This is the default name of your Taurus LAN, so if that 

has previously been changed and you don’t know the correct name, reset the 
device first.  
 
The command looks like this: 
nmblookup taurus-lan 
 

4.  After entering the previous command and hitting the Enter key, it should return an 

IP address, followed by the name you just entered. 


5.  Open your web browser and enter the IP address from the previous step to access 

the web configuration interface. 

6.  The default username and password is admin. 


Note: When the Bonjour service is disabled, you could also use the “Peer to Peer” method 
to login and set up your network drive. 

Page 9  /  Chapter 2 - System Setup 

Summary of Contents for Taurus LAN PDD-LNU2SS

Page 1: ...tech Technology Co Ltd Date June 11 2008 v1 2 Firmware v2 6 3 20080529 PCB MP LNU23SL v1 2 Model PDD LNU2SS The diagrams and images contained in this manual may not fully represent the product that you are using and are there for illustration purposes only ...

Page 2: ...erver 17 Share Management 18 Printer Server 19 SYSTEM 19 LAN Settings 19 Time Settings 20 Turn Off Server 20 Information 21 Disk Usage 21 NETWORK SERVICE 22 DHCP Server 22 Bonjour 22 BTorrent 23 MAINTENANCE 24 Disk Utility 24 RAID Setting 25 Firmware Upgrade 28 Restore Configuration 29 Factory Reset 29 Log File 30 Account Information 30 CHAPTER 4 NETWORK STORAGE 31 FILE ACCESS ON A PC 31 FTP 31 Wi...

Page 3: ...l Note Package contents may vary depending on vendor version System Requirements Computer with internet browser and network access for setup Switch or Router with one free Ethernet port for the Taurus LAN One or two 3 5 SATA I or SATA II Hard Drives 1 5Gb s 20GB 1TB per HDD maximum of 2TB in total For RAID 0 1 two hard drives of identical capacity are recommended Supported Operating Systems PC run...

Page 4: ...ing Data access Rear View 1 Slot for security lock 2 Smart fan for ventilation 3 Gigabit Ethernet port 4 Restart button 5 Reset button 6 USB port upstream 7 Power receptacle Restart Button Press and release this button for a hardware reset The device will restart after you release the button Reset Button Press and release this button for a software reset or when the Taurus LAN is powered up and re...

Page 5: ... first the other functions of the Taurus LAN will not be available Power ON OFF Procedure Always connect the power adapter to your device before you plug it into the wall socket To turn on the power press the ON OFF switch The blue backlight LED will turn on and the unit will start to boot up It will take about one minute for the device to go online and be ready During boot up the OS LED will be b...

Page 6: ...the inner enclosure out and remove the outer chassis 3 Install the first hard drive by placing it in the enclosure and connecting the SATA plus power cables 4 Mount the drive with two screws on each side 5 Attach the thermal probe with the tape provided to the first hard drive Choose a location in between the two drives but without damaging the thermal probe when installing the second drive 6 Inst...

Page 7: ...les are connected firmly Fan Speed Settings The jumper at J4 J5 can be used to set the mode for the fan speed You can set it to AUTO and the fan speed will automatically be adjusted according to the temperature thermal sensor needs to be connected or you can manually set it to use low or high speed Following are the settings you can use Jumper on J4 AUTO Jumper on J5 Manual High Speed No jumper at...

Page 8: ...lity at a later point to map the network drive after you setup your shares 1 Turn on your Taurus LAN and make sure it is connected to the same network as your computer 2 Start the NetTool utility by double clicking on the EXE file and then pressing the Setup button 3 Your Taurus LAN will automatically show up in the device list but if not make sure the NetTool has access to the network and search ...

Page 9: ...nfiguration We recommend using the Automatically obtain an IP address DHCP When set press Next to continue 1 2 3 7 In step 3 you can set up the date and time Select your time zone from the drop down menu set the date the time and then press Next to continue 1 2 3 4 Page 7 Chapter 2 System Setup ...

Page 10: ... will remind you that the previous settings will now be updated with the new configuration Press OK to finish the setup wizard Note Alternatively you could also write down the IP address in the first step of the setup wizard or use the product name taurus lan input either in the URL field of our web browser and then access the web configuration interface of your Taurus LAN Page 8 Chapter 2 System ...

Page 11: ...is connected to the same network as your computer 2 Start the Terminal utility which is usually located in your Applications folder under Utilities 3 Type nmblookup taurus lan This is the default name of your Taurus LAN so if that has previously been changed and you don t know the correct name reset the device first The command looks like this nmblookup taurus lan 4 After entering the previous com...

Page 12: ...and select the Taurus LAN 1 Turn on your Taurus LAN and make sure it is connected to the same network as your computer 2 Start your web browser Safari If not already displayed click on the bookmarks icon to show all bookmarks 3 Select Bonjour and browse for the Taurus LAN Click on it to open the login page 4 The default login for the Taurus LAN is admin for both username and password ...

Page 13: ...or someone first using this device For a more advanced set up see Control Panel Control Panel This menu includes all the settings and information the Taurus LAN offers Sorted into individual categories the user can access only particular settings or adjust and modify everything manually Personal Info This menu is for the system administrator account It includes the option to set the password and s...

Page 14: ...ur preferred language for the web interface from the drop down list Step 2 Set a new password for the web configuration interface Not required but strongly recommended Step 3 If you prefer a different hostname for your Taurus LAN you can change the name here otherwise simply use the default name Step 4 We recommend setting both IP Address and DNS Server to obtain the IP automatically but if requir...

Page 15: ... they can be added to the user account management Step 3 In the last step you can configure the permissions to the shared folder and add or remove other users Add Group Use this setup wizard to quickly add a new group Step 1 Enter the group name Step 2 Configure which members will be included in this group by adding and removing the members from the list Step 3 Configure the share permissions by a...

Page 16: ...onfigure the Windows FTP access permissions by adding read only or writable and removing the members or group from the list Step 3 Configure the NFS access permissions by adding unique IP addresses or a subnet Note For a more detailed explanation to each of the settings refer to Users and Group Management or File and Print Page 14 Chapter 3 Web Configuration ...

Page 17: ...the Clear Form button then fill out a user name and password The description is optional but will help you to manage multiple users so we recommend filling out a short description If required you can create a private folder for that user and set a limit for the capacity Once done press the Save button to create the new user If you would like to add this user to an existing group select the user fr...

Page 18: ...he form by pressing the Clear Form button then enter a new group name Once done press the Save button to create the new group If you would like to add some members to this group select the group from the existing groups list and press the Members button for further settings Modifying Groups Select the group from the existing groups list and modify the members by pressing the Members button for fur...

Page 19: ...change the workgroup that the Taurus LAN belongs to and modify its description The IP for the WINS Server Windows Internet Name Server can be left blank unless this is required for your network FTP Server This service can be enabled or disabled When enabled the default FTP port number will be set to 21 but you can change that if required NFS Server This service can either be enabled or disabled de...

Page 20: ...iles click on Windows FTP Access or NFS Access and add the users or groups that will have access to this share You can allow access for all users or define each user and group separately The names with an for the first letter are groups Modifying Shares Select the share from the existing shares list and modify the access rights by pressing the Windows FTP Access or NFS Access button for further se...

Page 21: ...for your Taurus LAN and set up the IP configuration We recommend using the Obtain IP DNS address automatically When selecting a hostname make sure to use a unique name and not one that has already been used on the local network If required you can also set the individual addresses yourself If you need assistance in manually filling out these fields please contact your network administrator for hel...

Page 22: ... list If the default address at time windows com does not work find a new one and then try again or turn off the NTP server and set the time manually Turn Off Server In this section you can restart the server or turn off the Taurus LAN via the web browser Make sure that nobody is accessing the device when you restart or turn it off Press the Restart button to restart the server The system will res...

Page 23: ...ou can find the product name the current firmware and the current IP address Disk Usage In this section you can find a summary of the hard disk status and disk usage Press the Refresh button to update the information Page 21 Chapter 3 Web Configuration ...

Page 24: ...t everything up press the Save button to start the DHCP server and save the settings Bonjour In this section you can enable or disable the Bonjour service For Mac users turn it on to offer easy access to the login page via the Safari web browser In addition to that you can also enable the iTunes service so that music files can be accessed directly from iTunes When the iTunes option is enabled you ...

Page 25: ...lic btdownload folder The BitTorrent client on the Taurus LAN can download 5 files at the time with a maximum of 40 files in the queue Remember to start the download again if the Taurus LAN has been turned off or rebooted before the file has been downloaded completely For more details see BTorrent under Additional Features in chapter 5 Note If there is no hard drive installed or the HDD is not yet...

Page 26: ...lity Scandisk Press the Scan button to check the disk integrity If possible any errors found will automatically be fixed This will take a while to finish depending on the capacity of the drive and also the disk can not be used in that time Umount This function is only available for external USB drives that are attached to the Taurus LAN Press the Umount button to eject the USB drive before you dis...

Page 27: ...tical drives to implement A RAID 1 creates an exact copy or mirror of a set of data on the second drive This is useful when reliability and backup are more important than data capacity The available capacity to the user will only be as large as a single drive but when one of the hard drives fails it can be replaced and the data rebuilt JBOD Used to combine two hard drives of different capacity and...

Page 28: ... replaced 2 Turn off the power remove the power supply from the wall socket and replace the defective HDD with a new one 3 Turn on the power and go to the RAID Setting menu Press the Add disk button to start rebuilding your RAID array Note On the bridge board of your Taurus LAN the connector at P1 indicates the drive at hdb whereas P2 indicates the drive at hda With firmware v2 6 3 or later P1 ind...

Page 29: ...the HDD LED will turn off and the disk status will show that the system is ready Note Rebuilding the RAID system will take a while depending on HDD capacity Do not turn off the power or interrupt the system in any other way during this process Note Pressing the Remove system data or Remove raid system button will erase all data Only use this if you need to set up a different RAID system Page 27 Ch...

Page 30: ...about 10 20 minutes Note Never turn off your unit during the firmware upgrade procedure This may damage your device If for any reasons e g power supply failure during firmware update the procedure fails you may not be able to operate your device any more Save Configuration For backup and before every firmware upgrade you can use this function to save your current configuration Press the Save butto...

Page 31: ... button we recommend saving your current configuration in case you want to restore it again later Note When the Factory Reset button is pressed all users groups and other configurations will be lost The files inside the shared folders will not be erased but only the administrator will have access to them via SMB unless the same share name is set up again and access is granted for new users To comp...

Page 32: ...ogs for the SAMBA FTP and DHCP server as well as system and administration logs Note To delete the old log files press the Clean button beneath the log Account Information In this menu you can change your admin password and the menu language for the configuration interface There is also an overview of disk usage and share list available ...

Page 33: ...ser group and share management File Access on a PC FTP Use your Windows Explorer and type ftp followed by the IP address of your Taurus LAN It will list the available folders and you can download or upload new files As an example your URL might look something like this ftp 192 168 11 21 Note For FTP transfers we recommend installing and using a dedicated FTP application which can either be a free ...

Page 34: ... copy files to the network storage as if it were a folder on your local drive Depending on the bandwidth you can also directly play and open the files although we recommend transferring the data to your local drive first Mapping a Network Drive For easy access we recommend mapping the storage as network drive 1 Double click on My Computer go to the Tools menu and select Map Network Drive Page 32 C...

Page 35: ...tton and locating the folder that way 3 Once the drive has been mapped you are able to find and access it under My Computer This link will still be there even after rebooting your Operating System Note For quick and temporary access you can also simply go to My Network Places view the workgroup computers and select your Taurus LAN Page 33 Chapter 4 Network Storage ...

Page 36: ...e and click on it to access the folder Alternatively you can use the Connect to Server command 1 Click on Go and choose Connect to Server 2 Type smb followed by the IP address of your Taurus LAN or click on the Browse button to locate the folder on your network Click on the Connect button once the server address has been filled out Page 34 Chapter 4 Network Storage ...

Page 37: ...ou can not upload new data to the drive To do that you will need to install a dedicated FTP application which can either be a free utility or professional shareware program 1 Click on Go and choose Connect to Server 2 Type ftp followed by the IP address of your Taurus LAN Click on the Connect button once the server address has been filled out 3 You will be asked to choose a folder and after enteri...

Page 38: ...You can select it and access the configuration page Note There is no need to configure anything this function is turned ON by default and other devices will be able to recognise it automatically Bonjour iTunes For easy access to the web configuration interface on the Mac a shortcut to the Taurus LAN will be available in the bookmarks collection under Bonjour Page 36 Chapter 5 Additional Features ...

Page 39: ... MP3 files in the music folder of the Taurus LAN and play them over the network 1 Make sure the support for iTunes in the Bonjour menu is enabled 2 Store your MP3 files in the music folder of your Taurus LAN The folder has already been created in public music 3 Start iTunes and the Taurus LAN will appear as shared device Page 37 Chapter 5 Additional Features ...

Page 40: ... based on date and time will be created in the public directory All files will be copied to that folder During the backup process the yellow LED will blink When finished the LED will stop blinking and it will automatically eject the drive so that you can remove the USB drive Note For external USB devices we recommend using self powered USB drives Only drives formatted using FAT32 are supported If ...

Page 41: ...s on 2 Login to make sure the printer server is enabled and the printer is recognised Installation on a PC Printing via the shared network printer will be slower than when the printer is connected directly to the USB port on the computer After you press the Print button please wait for the printer to receive the data 1 On your PC go to Start and select Printers and Faxes 2 Go to File and select Ad...

Page 42: ...Taurus LAN User Guide 4 Select Connect to this printer and hit Next 5 Browse for the Taurus LAN and select the lp printer then hit Next Page 40 Chapter 5 Additional Features ...

Page 43: ...rd and you are done Your printer is now set up and you can print the first page Installation on a Mac Printing via the shared network printer will be slower than when the printer is connected directly to the USB port on the computer After you press the Print button please wait for the printer to receive the data 1 Start the Printer Setup Utility in the Utilities folder Page 41 Chapter 5 Additional...

Page 44: ...N User Guide 2 Select More Printers 3 Select Windows Printing and the workgroup your computer and Taurus LAN belong to Browse for the Taurus LAN select it and hit Choose 1 2 Page 42 Chapter 5 Additional Features ...

Page 45: ... login or the login of a user account 5 Select the lp printer from the list browse for the corresponding printer model to install the correct printer driver and hit Add 1 2 3 6 Done your printer has been set up and you can now print the first page Page 43 Chapter 5 Additional Features ...

Page 46: ... about other things 1 Browse the internet for the media files you would like to download and store the torrent files on your local drive 2 Login to the web interface and go to BTorrent in the Network Service menu 3 Press the Browse button and locate your previously downloaded torrent file Once selected press the Add button to add the file to the download queue 1 2 4 To start the download process p...

Page 47: ...s using the TCP protocol and the ports 6881 6889 Make sure those ports are not blocked by your router or its firewall and if necessary set up port forwarding so that the traffic for those ports is forwarded to your Taurus LAN Note The BitTorrent client on the Taurus LAN can download 5 files at the time with a maximum of 40 files in the queue Note Before turning off the Taurus LAN we recommend firs...

Page 48: ...designed to distribute large amounts of data widely without incurring the corresponding consumption in costly server and bandwidth resources For more details please refer to www bittorrent com Torrent A torrent can mean either a torrent metadata file or all files described by it depending on context The torrent file contains metadata about all the files it makes downloadable including their names ...

Page 49: ...d drive to be installed Make sure you have at least one HDD installed and that it is formatted using EXT2 or EXT3 Q I lost my password what do I do A Press the reset button and hold it for 5 seconds to reset the device to its default settings The default login is admin admin Be aware that resetting the device will erase all user and group accounts plus some other settings Q I can not access the we...

Page 50: ...le to create shares on the second hard drive It is however possible to access the second drive via network SMB or FTP but all files stored on that HDD will be similar to the public folder All users have access to it and can modify the files About this Manual This manual was written using the Taurus LAN model PDD LNU2SS and the v2 6 3 firmware revision Images and descriptions may therefore slightly...

Reviews: