background image

User’s

Guide

47

DSP screen continued

In addition to the high-pass and low-pass fi ltering, each channel has its own 4-band EQ, Compressor/
Limiter, and Gate/Expander DSP module. Any adjustments you make to the settings of these three 
modules will affect your recording.

Each module has a graphical display in which you can click and drag the nodes to change the param-
eters, or you can click and drag on the individual controls to fi ne tune the settings. Holding the Ctrl 
(Control) key when you click on a control slider, or control node in the graphic display, returns the 
associated parameters to their default values.

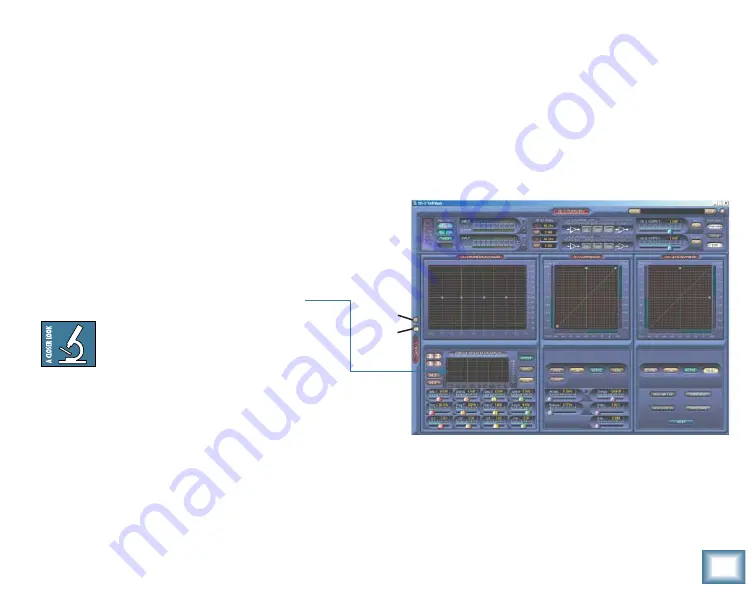
Zoom (Z) button 

Use this to switch between a single-chan-
nel or two-channel view. The single channel 
view has larger graphs and meters and also 
shows the lovely HP/LP fi lter display.

Note:

 even though the HP/LP 

graph is displayed here, it is not 
part of the EQ module. All HP/LP 
fi ltering is performed before the 
signals reach the DSP modules.

Switch (S) button

Once the single-channel view is open, the 
SWITCH button appears just above the 
ZOOM button. Use this to switch between the channel 1 and channel 2 displays.

DSP Single Channel View (showing Channel 1)

Zoom

Switch

Summary of Contents for Spike

Page 1: ......

Page 2: ...ended to alert the user to the presence of uninsulated dangerous voltage within the product s enclosure that may be of sufficient magnitude to consti tute a risk of electric shock to persons Le symbol...

Page 3: ...on NOTE This equipment has been tested and found to comply with the limits for Class B digital devices pursuant to Part 15 of the FCC Rules These limits are designed to provide reasonable protection a...

Page 4: ...make one copy of the Software in machine readable form for backup purposes only You must reproduce on such copy LOUD Technologies copyright notice and any other proprietary legend on the original copy...

Page 5: ...vernment other than DOD the Government s rights in the Software and its documentation will be defined in Clause 52 227 19 c 2 of the FAR or in the case of NASA in clause 18 52 227 86 d of the NASA sup...

Page 6: ...E A WARRANTY OR IN ANY WAY INCREASE THE SCOPE OF THIS WAR RANTY SHOULD THE SOFTWARE PROVE DEFECTIVE YOU AND NOT LOUD TECHNOLOGIES OR ANY LOUD TECHNOLOGIES AUTHORIZED REPRESENTATIVE ASSUME THE ENTIRE C...

Page 7: ...xtent permissible so as to effect the intent of the parties and the remainder of the License shall continue in full force and effect 11 Complete Agreement This License constitutes the entire agreement...

Page 8: ...he help documentation included within the soft ware itself or included on the Spike software installer CD ROM Mackie Spike and the Running Man figure are trademarks or registered trademarks of LOUD Te...

Page 9: ...pport 33 The XD 2 Software screens 35 Basic Controls 36 Overview Screen 38 Setup Screen 43 DSP Screen 46 Parametric Equalizer Module 51 Compressor Module 53 Gate Expander Module 56 Using Spike 59 Appe...

Page 10: ...annel adjusts to become a line level input or an instrument level input if the INSTRUMENT guitar icon button is pressed in An onboard SHARC processor provides full EQ and dynamics processing including...

Page 11: ...ll Tracktion is an easy to use multitrack audio recording and MIDI sequencing software application capable of unlimited track count VST support automation and much more Warmer Phaser is a VST plug in...

Page 12: ...authorization in order to run Tracktion authorizes the first time it detects the XD 2 hardware attached to your computer Mackie Final Mix authorizes with the Tracktion PC version Other software bundle...

Page 13: ...scan for these folders as well Tracktion will default to scan both the C Program files Tracktion plugins and C Program files Steinberg VSTplugins folders To install the software on a Macintosh 1 Turn...

Page 14: ...ing your guitar or in strument directly to the XD 2 without using a preamplifier or direct box Connect a pair of powered monitor speakers or an amplifier connected to speakers to the XD 2 rear panel M...

Page 15: ...IDI Power Supply Mackie Control or other MIDI device MIDI OUT MIDI IN USB Connection Laptop Guitar Microphone Mackie HR624 or other Active Studio Monitors Headphones plug into front panel SPDIF IN DAT...

Page 16: ...s the 48V button if your microphone needs phantom power Press the INSTRUMENT button on Channel 1 if you are not using a guitar preamp or direct box 3 On your computer open the XD 2 software and click...

Page 17: ...o bring up the DSP graphic interface Fool around with the channel EQ Compressor Limiter and Gate Expander as you see fit For more details of the mysteri ous DSP workings see page 46 Note The XD 2 has...

Page 18: ...t Mackie XD 2 for Mac USB Audio Device for PC under the Settings MIDI devices menu For more details of the Tracktion software press F12 on your keyboard or click the HELP button in the lower left of t...

Page 19: ...e by Tracktion Note Do not create project folders inside the Tracktion main folder or any software main folder Otherwise if you un install re install software your project folders will disappear mine...

Page 20: ...ou get going Tracks can also be renamed by selecting them and typing the new name in the Properties area The audio icon represents Tracktion s stereo audio input from your XD 2 The MIDI icon repre sen...

Page 21: ...port Area Treat as stereo channel pair off Ch 1 Icon 15 As we have a microphone and a guitar connected in this example we want two independent chan nels instead of a stereo pair Click the audio icon a...

Page 22: ...e left and the arrow will disappear In the Properties area set the Bit Depth to 16 bit or 24 bit as needed We will begin by recording the guitar so go ahead and arm track 1 Leave the icon highlighted...

Page 23: ...on the XD 2 To play back your guitar recording and hear the direct input from your microphone turn the MIX knob to the 12 o clock position Adjust the CH 2 GAIN knob so your vocals do not light the OL...

Page 24: ...ppear and you can choose the MDA DX10 or other synths Synths have a little keyboard icon The properties area shows various options for the MDA DX10 in cluding loading presets 25 Depending on the setti...

Page 25: ...three LEDs which indicate the digital signal strength as follows They also flash briefly hypnotically during power up Green 30 lights when a signal is present These show that your input sources are p...

Page 26: ...2 and 3 of both XLR inputs simultaneously It has no effect on the 1 4 inputs Note There are just a few microphones mostly ribbons that can be damaged by phantom power Consult your mic s manual to see...

Page 27: ...down each time you turn on your sys tem and then increase it to a safe listening volume 8 PHONES knob and 9 HEADPHONE jack Note Make sure the PHONES knob is turned fully down before plug ging in your...

Page 28: ...DAT or CD recorders with a S PDIF input or to active speakers if they have a S PDIF input The signal at the S PDIF OUT is always active The signal is affected by turning the MIX knob but not by the MO...

Page 29: ...UT 1 and 2 Each combo input connector accepts either an XLR a 1 4 TS or TRS plug Use these inputs to connect microphones guitars other instru ments or line level signals from mixers or preamps For a m...

Page 30: ...ternal power supply is plugged into AC power it is powered up and ready to go 16 USB This is the main connection between the XD 2 and the host computer Use the USB cable provided to connect this port...

Page 31: ...S Connectors The combo inputs on the XD 2 also accept balanced 1 4 TRS male phone plugs typical for line level outputs such as from a keyboard or mixer TRS stands for Tip Ring Sleeve the three connect...

Page 32: ...PDIF connectors on the XD 2 are RCA connectors which are commonly used in home stereo equipment to interconnect audio signals However S PDIF connections carry digital signals which contain much higher...

Page 33: ...The XD 2 uses the Universal Serial Bus specification Rev 1 1 as the main audio and communication link between the XD 2 and your computer This supports up to two input channels and two output channels...

Page 34: ...orporation OS X Core Audio Audio Class USB device Apple Computer Core MIDI HAL9000 Connections to the HAL9000 computer have shown a tendency towards shutting down all support functions defrosting the...

Page 35: ...ters input and output metering DSP enable and block order ing output level controls and master linking Setup see page 43 This screen provides access to a num ber of setup parameters and indicators suc...

Page 36: ...to recall a previously saved file The name of the currently opened file appears in the window between the OPEN and SAVE buttons We supply some neat and exciting ex amples just click on OPEN and select...

Page 37: ...ck X the XD 2 software application closes but the software continues to run the XD 2 in the background This prevents accidental disconnection of signals to and from recording ap plications as well as...

Page 38: ...hese input signals You can monitor both the direct and USB playback by adjusting the front panel MIX knob accordingly When the USB button is on lit the XD 2 operates in USB processing mode The DSP get...

Page 39: ...t HiZ indicator is channel 1 the right is channel 2 S PDIF button Click this button to enable the S PDIF input and disable the analog inputs The stereo S PDIF input enters the signal flow after the GA...

Page 40: ...ch corresponds to the XD 2 front panel 30 and OL LEDs Note The OL indicator will light when the signal reaches 3 dBFS or when your oil pres sure is low Turn down the XD 2 front panel GAIN knobs or the...

Page 41: ...ed and the lower frequency range is attenuated The LP filters can be enabled or disabled by clicking the LP buttons in the Overview screen LP filters are useful for reducing high frequency effects lik...

Page 42: ...faders The faders control the output level of the DSP which is effectively the input level going into Tracktion Ctrl click to re turn to the default level Link All and Link Faders When the LINK ALL bu...

Page 43: ...Save Settings to Template The template contains the settings loaded into the XD 2 when the software boots up The default template is the same as the reset settings After you have adjusted and tweaked...

Page 44: ...e the Internal sample clock the default as the master reference Always select S PDIF when recording from a connected S PDIF device Clock Lock Detection This shows when the XD 2 is locked to either XD...

Page 45: ...96 kHz IN if you are recording and 96 kHz OUT if you are playing back At these faster sample rates the XD 2 can record or play back high res olution audio but it cannot record and playback at the same...

Page 46: ...User s Guide 46 DSP Screen When the DSP button is selected the DSP screen appears as if by magic Zoom Zoom Parametric EQ Module Compressor Module Gate Expander Module Ch 1 Ch 2 DSP Two Channel View...

Page 47: ...click on a control slider or control node in the graphic display returns the associated parameters to their default values Zoom Z button Use this to switch between a single chan nel or two channel vi...

Page 48: ...ted normally it shows the controls DSP screen continued Active buttons Each DSP module is active when its ACTIVE button is lit A second click will de activate and bypass that particular module The mod...

Page 49: ...module with the settings being recalled SAVE CHAN AS This button works the same in all three modules It saves all the settings for all three DSP modules in the CHAN folder on the hard drive for later...

Page 50: ...ntical This is useful when recording or mastering a stereo source in which identical adjustments are normally made to both left and right channels at once It doesn t matter which channel s controls yo...

Page 51: ...play there are four small node circles labeled 1 to 4 You can either use these grab points to adjust the bands or use the sliders below Left click on a node and drag your mouse to adjust the frequency...

Page 52: ...band has a frequency range from 20 Hz to 20 kHz Q sliders These sliders control the Q quality factor for each band with a range from 0 1 to 16 The larger the number the narrower the band of frequencie...

Page 53: ...r also has a soft knee and a limit feature with controls to adjust attack release threshold ratio and gain Nodes T R and G Threshold Ratio and Gain can be adjusted by grab bing the nodes with your wee...

Page 54: ...e level at which the compressor begins to act on the incoming signal It ranges from 60 dB to 0 dB Ratio slider This determines the change in output level as a func tion of the change in input level on...

Page 55: ...as the signal nears the threshold and minimizes softens the audi bility of the compressor with program material that crosses the threshold Knee slider This control is visible only when the SOFT button...

Page 56: ...s allowed to pass When the gate closes the gate acts on the signal by at tenuating the signal level by the desired amount Nodes T and R Threshold and Range or Ratio if EXPAND is on can be adjusted by...

Page 57: ...as fallen below and remains below the threshold It ranges from 0 0 ms to 10 0 sec The release time is in addition to the hold time Threshold slider The threshold is the level at which the gate acts on...

Page 58: ...old The Ratio control ranges from 1 1 to 20 1 Initiate Inter Planetary Launch Sequence After a hard day s work there s nothing better than unwinding with a trip to the outer planets of the solar syste...

Page 59: ...yback from Tracktion USB The signal from Tracktion via USB is sent directly to your monitors headphones and S PDIF output If you have the MIX knob set all the way to USB you will only hear the Trackti...

Page 60: ...ngs the direct new performance the previously recorded tracks and the new performance after it has passed through Tracktion In general you only want to monitor your new performance from one source the...

Page 61: ...recording with to show the properties area Make sure the enable end to end button is checked and also the global e to e button in the transport area Turn the MIX knob to USB Load the new plug in using...

Page 62: ...back onto any two tracks or a single stereo track Arm a track by dragging the Spike audio input icon over to the track Make sure the treat as stereo channel pair button is checked and disable the mast...

Page 63: ...you may not be able to move it all in five minutes This is similar to how your computer deals with the audio buffer If you choose too small a buffer the computer needs to work very hard to quickly tra...

Page 64: ...puter with 128 MB of physical RAM The original early PowerBook G3 upgrade cards are not sup ported by OSX Hard Drive notes To record a one minute 24 bit 44 1 kHz Mono track requires approximately 8 MB...

Page 65: ...c in to Monitor Out Gain at Min 101 0 dBr Mic in to Monitor Out Gain at nominal 4 dBu XLR input 100 0 dBr Mic in to Monitor Out Gain at nominal 4 dBu 1 4 input Mic Preamp EIN 130 5 A weighted 150 sour...

Page 66: ...level input reaches 6 dBu OL Red LED lights when Digital signal reaches 3 dBFS which is approximately when Line level input reaches 20 dBu Mic level input reaches 14 dBu DSP Speci cations Parametric E...

Page 67: ...Combo 8 85 in 225 mm 1 60 in 42 mm 2 38 in 60 mm 5 60 in 142 mm 8 02 in 204 mm 8 70 in 221 mm XD 2 XD 2 Disclaimers Since we are always boldly striving in our un ending quest to make our products bett...

Page 68: ...TAL SIGNAL ANALOG SIGNAL COMP LIMIT OUTPUT LEVEL CH 1 CH 2 1 2 2 1 SPIKE XD 2 BLOCK DIAGRAM REV 1 HEADPHONE OUTPUT MONITOR PHONES MIX KNOB MONO STEREO USB OUTPUT TO COMPUTER S PDIF OUTPUT DAC DIGITAL...

Page 69: ...ec Play Mode Make sure the USB connection established light is on in the XD 2 Setup panel see page 43 Restart your computer if it is off Make sure you have selected the right driver Mackie XD 2 in you...

Page 70: ...ments If it plays fine then you may be pushing your computer above it s lim its Try increasing your latency settings as described above Large latency delay from input signal to Monitor output or headp...

Page 71: ...nto your XD 2 engage the SPDIF button in the XD 2 Overview Panel see page 39 Set the Clock Source Select in the Setup Panel to SPDIF and the XD 2 will receive its clock reference from your external de...

Page 72: ...ead the firmware version This menu is also used to load new firmware if you have downloaded it previously On a Mac click control on the XD 2 icon in the Dock then select the About menu Compare your fi...

Page 73: ...If you think your XD 2 hardware has a problem please do everything you can to confirm it before calling for service If the problem is related to set ting up and using the XD 2 with the third party so...

Page 74: ...em This is the sad part where we say goodbye but remember we are only a phone call or an e mail away We hope that Spike will help you have a great deal of fun If music be the food of love then it must...

Page 75: ...ranty you must have a copy of your sales receipt from the authorized Mackie dealer where you pur chased the product It is necessary to establish the purchase date and determine whether your Mackie pro...

Page 76: ...e centers H This warranty is extended to the original purchaser and to anyone who may subsequently purchase this product within the applicable warranty period I This is your sole warranty LOUD Technol...

Page 77: ...16220 WOOD RED ROAD NE WOODINVILLE WA 98072 USA US AND CANADA 800 898 3211 EUROPE ASIA CENTRAL AND SOUTH AMERICA 425 487 4333 MIDDLE EAST AND AFRICA 31 20 654 4000 FAX 425 487 4337 WWW MACKIE COM E M...

Reviews: