


Fr
eePlay GO • F
reePlay HOME
8
FreePlay GO • FreePlay HOME
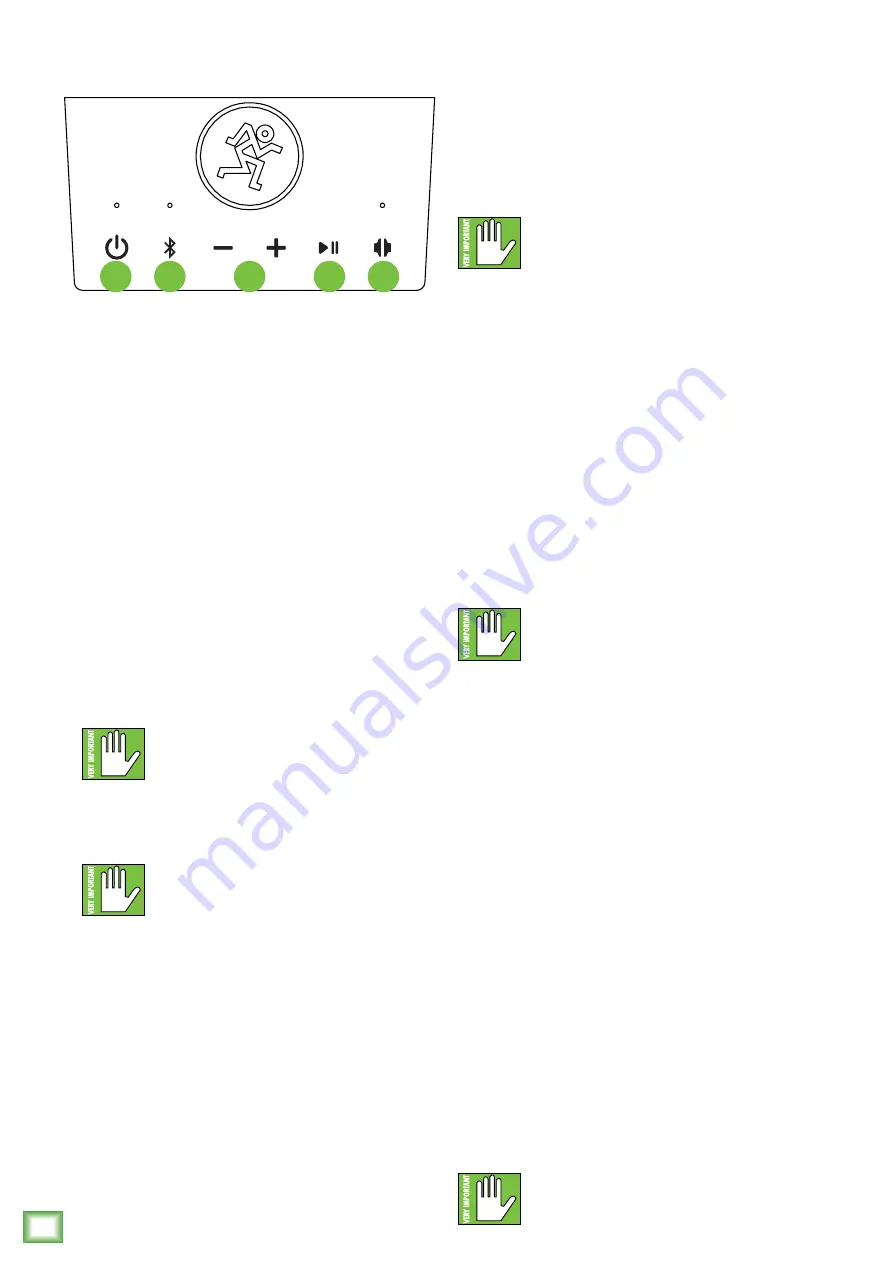
FreePlay GO and FreePlay HOME: Top Panel Features
6
7
8
9
10
5. Passive Radiator
The function of the passive radiator is to increase
bass response. You can see it dancing with your
music. There’s another one behind the grille,
so this is technically a dance duo.
6. Power Button
Press the power button to turn the FreePlay on.
A cheerful startup sound will commence when turned
on. Additionally, the LED located above the button will
illuminate solid white after it goes through the internal
setup. This should only take a few seconds.
Press and hold the power button to turn the FreePlay
off. The hold is to prevent an unwanted shutdown.
We have pesky kids who don’t like our music, too!
A descending shutdown sound will occur when turned
off. As you might expect, the LED located above the
button will also turn off.
When the battery life reaches three
percent (3%), all LEDs will flash slowly
until the FreePlay is either plugged in
or loses all battery power. The shutdown sound will
occur to indicate a dead battery. Plug the FreePlay in
again to charge the battery and keep the music going!
There IS a way to check the battery level
via FreePlay Connect. Please review the
FreePlay Connect Reference Guide for
directions.
7. Bluetooth Button
On initial startup, the LED located above the
Bluetooth button will be slowly flashing white.
Press and hold the Bluetooth button to select it.
The LED will continue flashing white – but at a
faster rate – when selected. This is to indicate
that the FreePlay is in pairing mode.
While FreePlay is in pairing mode, simultaneously
scan for Bluetooth devices on the smart phone
or tablet. You should see FreePlay appear in the
“available devices” list. From there, the device should
indicate that it is successfully connected. Once paired,
the LED will illuminate solid white. If it does not, start
the pairing process again, and make sure that FreePlay
and device are both in pairing mode at the same time.
The Bluetooth may disconnect when
affected by Electrostatic Discharge [ESD].
Manually reconnect the Bluetooth
connection.
8. Level [+ and –] Buttons
Push the + button repeatedly to add extra meat
and veggies to your hoagie. Conversely, pushing
the – button repeatedly will lower the amount
of meat and veggies added to the grinder.
And now that lunch is over, a moment of truth.
The + and – buttons actually adjust the overall
output level of the FreePlay from off to max.
9. Play / Pause Button
Press this transport button to play or pause the
Bluetooth stream.
This is only for the Bluetooth stream.
If signal is routed via the 1/8" input,
it will continue to play until paused
on the device.
10. Speaker Link Button
A really neat feature of the FreePlay is the ability
to link it to an additional FreePlay. This way, you can
either have a “stereo pair” in the same location or place
one elsewhere to please guests in another room or
outside (aka “zone mode”). It may link with any Mackie
FreePlay model. Let’s check out how to link them...
First, make sure that a device is connected to one
of the two FreePlays.
Next, press and hold this button until the LED
above the button starts flashing. This initiates speaker
linking with the other FreePlay. A sound will confirm
your command.
Now press and hold the speaker link button on
the second FreePlay until the LED illuminates solid
white. You will hear two sounds; one confirming
your command and a second confirming success!
Simply press and hold the speaker link button
on either FreePlay to disconnect.
The signal might cut out when linking.
This is normal, as it allows the hardware
to complete the linking process.
Summary of Contents for FreePlay HOME
Page 1: ...OWNER S MANUAL...


