background image

Owner’

s Manual

11

Owner’s Manual

DLM12S Subwoofer: Rear Panel Features continued...

9. OLED Display

The OLED Display is one of the most vital features  

of the DLM12S subwoofer. It displays subwoofer  
information including (but not limited to) volume, 
selected crossover, delay settings and other parameters.

When a DLM12S subwoofer is powered up, the last 

state it was in will load up and the OLED Display will 
present the volume screen and settings.

DLM12S subwoofers will display a running Running 

Man screensaver if parameters haven’t been changed in 
awhile. Simply touch one of the DLP buttons to “wake 
up” the OLED Display.
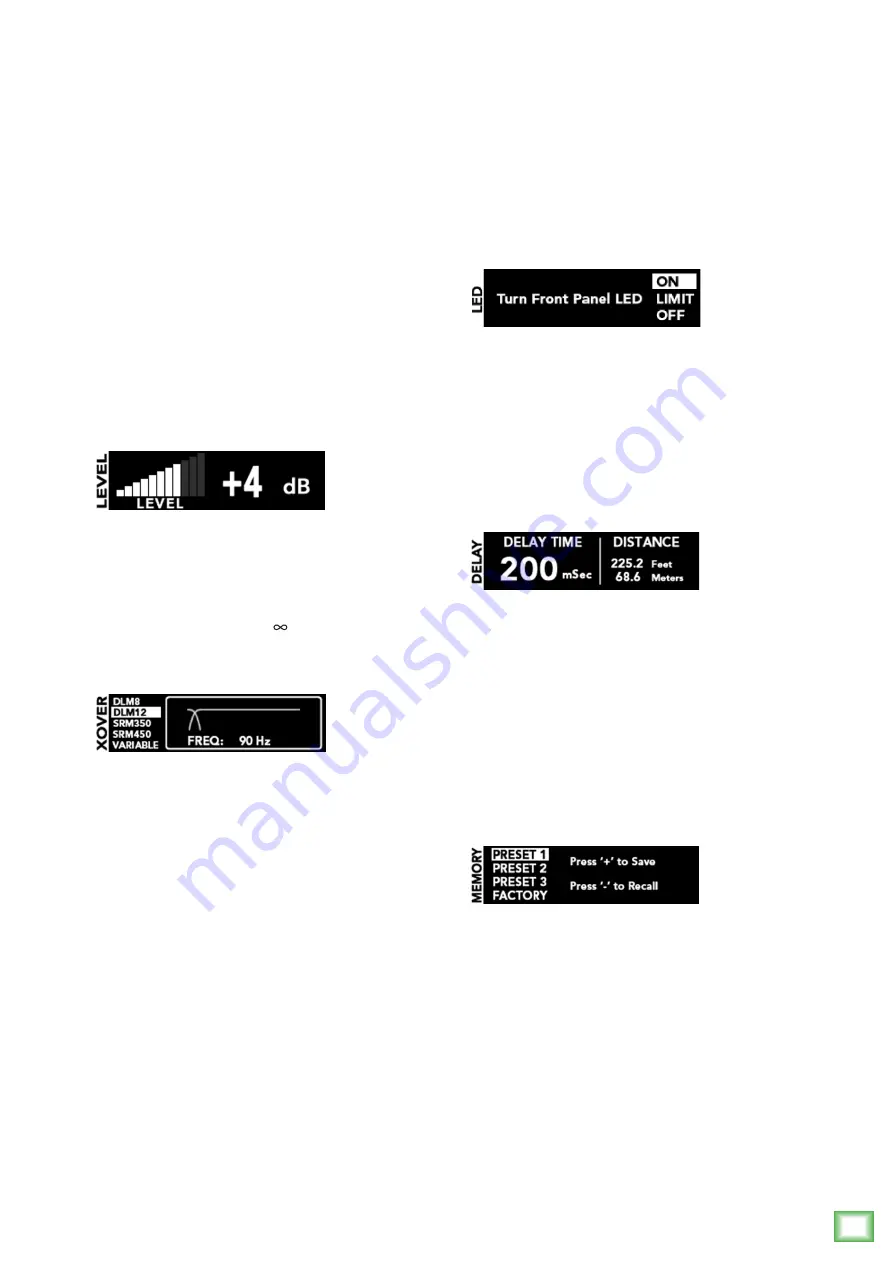
10. VOL Button

Volume [VOL] adjusts the overall signal level at the 

inputs to the built-in amplifiers. Press the VOL button


to access and update the subwoofer’s volume and 
change the volume by pressing the + or – button [16] 
repeatedly until you have reached the desired volume. 
The volume ranges from off (–  dB) to +10 dB.

11. XVR Button

The DLM12S crossover [XVR] allows you to choose 

from a list of preset crossover frequencies for Mackie 
loudspeakers, as noted below. This optimizes the 


subwoofer and loudspeakers connected to the 


DLM12S high pass outputs. If not using DLM or SRM 
loudspeakers, a variable mode allows you to select   
the best crossover frequency suited for your PA system 
from 60 Hz to 120 Hz. 

Frequencies below the selected crossover frequency 

are sent to the subwoofer while frequencies above the 
selected crossover frequency are sent to the high pass 
outputs [6]. The crossover frequency should be set 
to the lowest frequency response rating of the main  
loudspeakers. Press the XVR button repeatedly until 


the desired crossover setting is highlighted.

•   DLM8 : 110 Hz
•   DLM12 : 90 Hz
•   SRM350 : 100 Hz
•   SRM450 : 95 Hz
•   Variable : 60 Hz – 120 Hz

The last one listed – variable – may be set to taste. 

Simply press the + or – button [16] repeatedly until  
you have achieved the crossover point you  desire.    
It ranges from 60 Hz to 120 Hz.

12. Front LED On / Limit / Off

Pressing the VOL [10] and XVR [11] buttons  


simultaneously gives you the option to turn the front 
LED on, off or limit. Press the + or – button [16] to 
make a choice, followed by any other button to exit the 
screen. Choosing limit means the LED is on full-time. 
However, it will flicker when the limiter is active    
[3 dB of attenuation, averaged].

13. DLY Button

Delay “delays” the audio signal for a set period of 

time. With the DLM12S subwoofer, it’s used for aligning 
delay stacks, balcony fills, etc, not as an effect.

Press the DLY button to access and update the  

subwoofer’s delay. Change the delay by pressing 


the + or – button [16] repeatedly until you have 
reached the desired delay. Delay times range from   
0 ms [0.0 feet / 0.0 meters]to 300 ms [337.8 feet /  
102.9 meters].

14. MEM Button

Settings for DLM subwoofers may be saved to memory 

and recalled at a later time by utilizing the memory 
[MEM] button.

Press this button repeatedly until the preset spot  

you want to save settings to (or recall settings from) is 
highlighted. There are three user presets and a fourth 
to recall the factory default settings. 

Once the preset you want to save to (or recall from)  

is highlighted, press the “+” button [16] to save the  
current settings or press the “–” button to recall a  
preset that was previously saved.

Summary of Contents for DLM12S

Page 1: ...OWNER S MANUAL 2000W Powered Subwoofer with DLP Digital Processor DLM12S...

Page 2: ...cted Consult the dealer or an experienced radio TV technician for help CAUTION Changes or modifications to this device not expressly approved by LOUD Technologies Inc could void the user s authority t...

Page 3: ...t output compact subwoofer on the market Fit an entire DLM system in nearly any car Stack them up for storage Pole mount a DLM8 or DLM12 Extremely durable 15mm poplar cabinet Rugged powder coated 20 g...

Page 4: ...tial connections with the power switches OFF on all equipment Make sure the master volume level or gain controls are all the way down 2 Connect the line level outputs from the mixing console or other...

Page 5: ...L R L UNBALANCED R 0dB 0dBu MAIN METERS R L OL 4 6 3 10 15 7 10 20 30 0 2 BREAK MUTES ALL CHANNELS PHANTOM POWER POWER STEREO GRAPHIC EQ FX SEND MID 2 5kHz MID 2 5kHz MID 2 5kHz MID 2 5kHz MID 2 5kHz...

Page 6: ...AVIS RISQUE DE CHOC ELECTRIQUE NE PAS OUVRIR TOREDUCETHERISKOFFIREORELECTRIC SHOCK DO NOT EXPOSE THIS EQUIPMENT TO RAIN OR MOISTURE DONOTREMOVECOVER NOUSERSERVICEABLE PARTSINSIDE REFERSERVICINGTOQUAL...

Page 7: ...there is no additional loading to the inputs when daisy chaining In other words you could conceivably daisy chain DLM subwoofers indefinitely INPUTS FULL RANGE HIGH PASS A B A B STEREO MONO NORMAL INV...

Page 8: ...T EXPOSE THIS EQUIPMENT TO RAIN OR MOISTURE DO NOT REMOVE COVER NO USER SERVICEABLE PARTS INSIDE REFER SERVICING TO QUALIFIED PERSONNEL 1 THRU 2 TRS TRS Line XLR RISK OF ELECTRIC SHOCK DO NOT OPEN AVI...

Page 9: ...DA OPERATION IS SUBJECT TO THE FOLLOWING TWO CONDITIONS 1 THIS DEVICE MAY NOT CAUSE HARMFUL INTERFERENCE AND 2 THIS DEVICE MUST ACCEPT ANY INTERFERENCE RECEIVED INCLUDING INTERFERENCE THAT MAY CAUSE U...

Page 10: ...r The frequency range above 20 Hz 200 Hz is sent to these line level output jacks The frequency range depends on where the crossover XVR 11 is set 7 Full Range Outputs Connect the full range outputs t...

Page 11: ...cy should be set to the lowest frequency response rating of the main loudspeakers Press the XVR button repeatedly until the desired crossover setting is highlighted DLM8 110 Hz DLM12 90 Hz SRM350 100...

Page 12: ...tance 13 and use these buttons to save and recall presets 14 17 2000W 2W Switch 1 At Mackie we are always striving to push the envelope dreaming up new awesome products to design in order to expand th...

Page 13: ...ating a built in thermal switch will activate muting the signal and ramping the fan up to top speed An error message will also appear on the OLED Display When the amplifier has cooled down to a safe o...

Page 14: ...e changes that we perceive as sound When the normal invert polarity switch 5 is engaged the original waveform is simply reversed 180 see Figure 2 Again the subwoofer cone follows the waveform However...

Page 15: ...u think your Mackie product has a problem please check out the following troubleshooting tips and do your best to confirm the problem Visit the Support section of our website www mackie com support wh...

Page 16: ...www mackie com click Support and select Locate a Service Center Service for Mackie products living outside the United States can be obtained through local dealers or distributors If you do not have a...

Page 17: ...GE Simply plug the signal source i e mixer output into the input jack s and patch that subwoofer s full range jack to the next subwoofers s input jack and so on daisy chaining multiple DLM12S subwoofe...

Page 18: ...nector 3 pin IEC 250 VAC Safety Features Input Protection Peak and RMS limiting power supply and amplifier thermal protection Display LEDs Defeatable front power ON Front load power limiter Status Inf...

Page 19: ...SSubwooferDimensions WEIGHT 48 lb 21 7kg 16 4 in 417 mm 20 8 in 529 mm 17 9 in 455 mm DLM12SSubwooferFrequencyResponse Frequency Response Hz 20 80 90 100 50 100 200 500 dB SPL Legend DLM8 DLM12 SRM350...

Page 20: ...rocessing DAC DAC Comp Lim High Pass Outputs XOver B A B XOver ADC Fader XOver A B Full Range Outputs ANALOG BUS A B ADC HARDWIRE BUS A B DIGITAL BUS A B Limit Limit Mono Stereo DISPLAY USER CONTROLS...

Page 21: ...the noncompliance within the Warranty Period to the Company at www mackie com support or by calling LOUD technical support at 1 800 898 3211 toll free in the U S and Canada during normal business hou...

Page 22: ...DLM12S Powered Subwoofer 22 DLM12S Powered Subwoofer 16220 Wood Red Road NE Woodinville WA 98072 USA Phone 425 487 4333 Toll free 800 898 3211 Fax 425 487 4337 www mackie com...

Reviews: