12 Getting Started with FeverWarn l Models FW100, FW120, FW130, FW200 and FW230
Setting up Cloud Storage and Retrieval
of Scan Information (FW200 and FW230)
(continued)
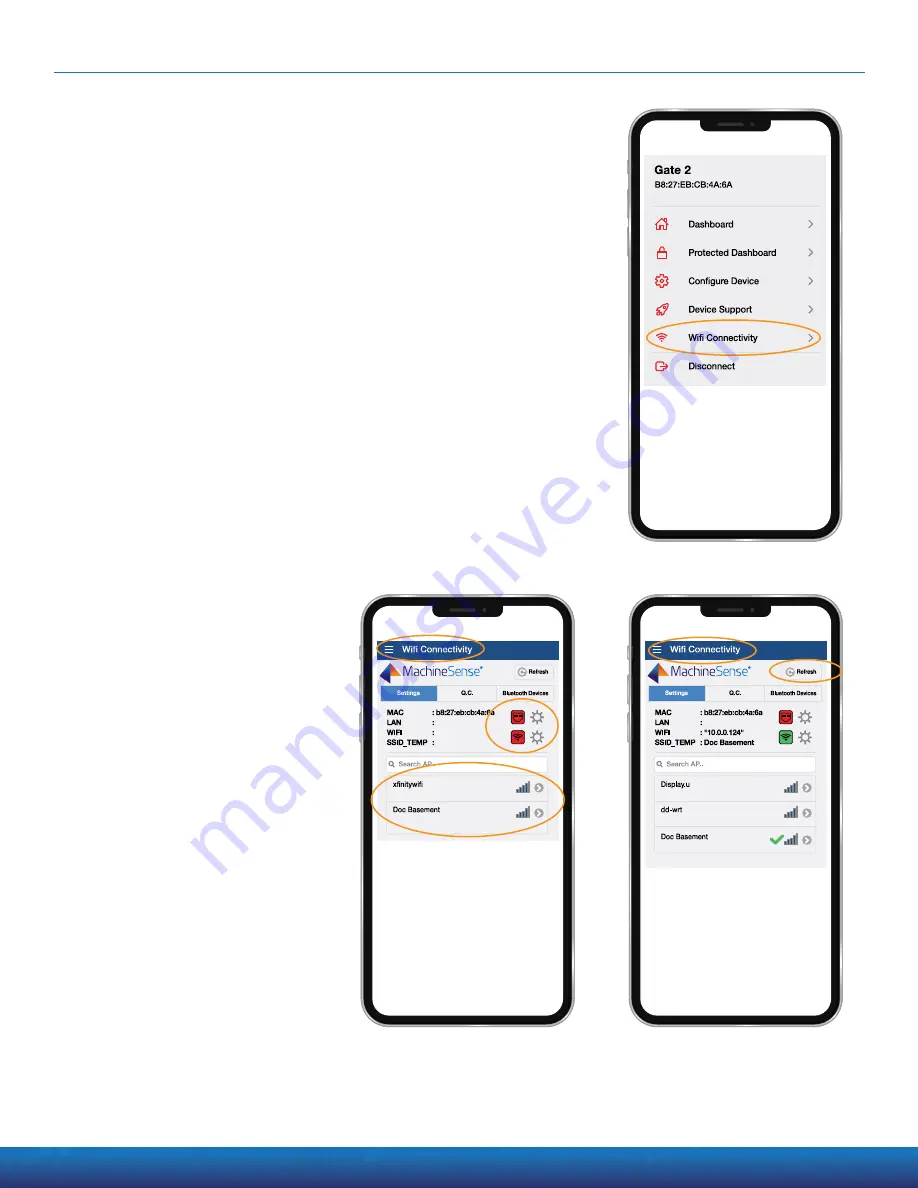
13. From the fly-out menu, click on
“WiFi Connectivity” (Figure 25).
14.
Figure 26 is the “WiFi Connectivity” page. The upper red square
tells
us that we are not connected to a network via “hard-wired”
Ethernet cable, which is the default setup. The red square below
also indicates that we are not connected via WiFi. Out of the box,
this is what you’ll see. In the lower section of the screen will
appear all WiFi networks available for you to connect to (they’ll
be different than those listed in
Figure 26). Look through the
networks shown on your screen and select the network you
want. The selected network should have good signal strength and
be able to access the internet. If you don’t know which one to
choose, ask your IT department for assistance.
15. After you have selected the WiFi network and entered the proper
password*, the app will connect to the network and the
MachineSense cloud. This process will take some time; please be
patient. If, after two minutes, the
screen has not changed to show
that you are now connected to the
chosen network, tap the “Refresh”
button in the upper right corner of
the screen. This should refresh the
app and you should see that you
are now connected to WiFi
(Figure 27).
Figure 25: This is a fly-out menu.
Click on “WiFi Connectivity.”
* The scanner can only connect to WiFi
networks that have WPA2 security. If your WiFi
is unprotected, you cannot connect to it. Either
enable WPA2 security or search for a secure
network.
16. That’s it! Should you need to
change the WiFi network that
you connected to, just navigate
to the
“Wifi Connectivity” screen
(Figure 27) and choose a new
network.
17. After completing any network
configuration, be sure to reboot
your scanner by unplugging
the power cable, waiting ten
seconds, and then plugging it
back in.
Figure 26: This is the WiFi
Connectivity page. In the lower
section of the screen, all WiFi
networks available appear.
Figure 27: This screen shows that you
are now connected to the chosen
network, tap the “Refresh” button in
the upper right corner of the screen to
refresh the app and see that you are
connected to WiFi.
MachineSense • Sales: +1-443-457-1165 • [email protected] • www.feverwarn.com


