background image

1   

HARDWARE INSTALLATION AND CONNECTION

  Note: All the installation and operations here should conform to your local electric safety 

rules.

1.1  

CHECK UNPACKED DVR

  When  you  receive  the  DVR,  please  check  whether  there  is  any  visible  damage.  The 

protective  materials  used  for  the  package  of  the  DVR  can  protect  from  most  accidental 

impacts during transportation. After checking, open the box to check for the accessories.  

  Please check the items in accordance with the list on the warranty card (Remote control is 

optional). Finally, remove the protective film from the DVR. 

  Note: Remote control is not a standard accessory and it is not included in the accessory bag.

1.2  

ABOUT FRONT PANEL AND REAL PANEL 

  For detail information of the function keys in the front panel and the ports in the rear panel, 

please refer to the User’s Manual included in the resource CD.

  The model in the front panel is important; please check according to your purchase order.
  The label in the rear panel is very important. Mace will need you to provide the serial number 

for the DVR should we provide any service after sales. 
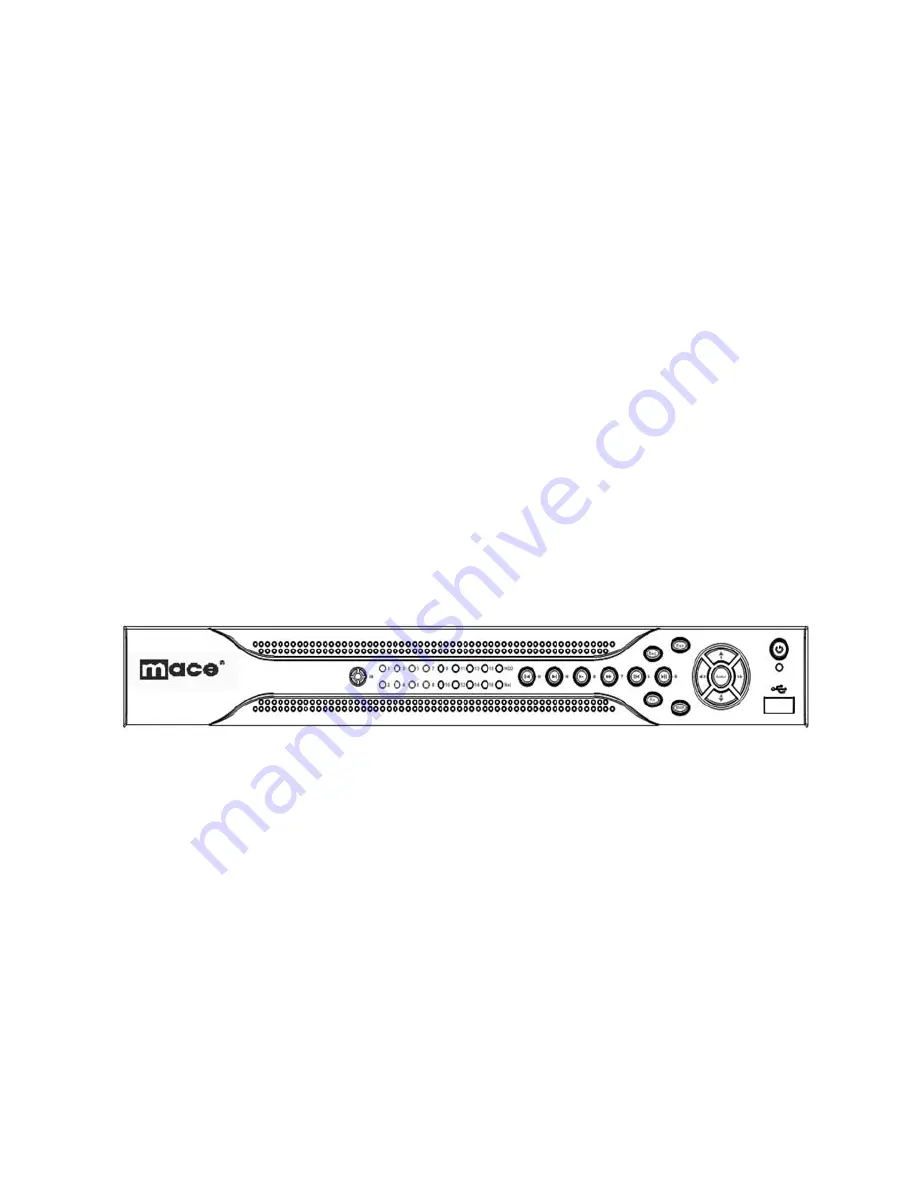
1.3   

FRONT PANEL

 The front panel is shown as in Figure 1-1 (SQ80 shown).

Figure 1-1

Figure 2-16

In Figure 2-16, please click the direction arrows (See Figure 2-17) to adjust PTZ position. 

There are a total of 8 directional arrows. Please note if you use a remote control, you can 

use only four directions (Up/down/left/right). The speed value ranges from 1 to 8.


Figure 2-17

2.8.3  3D INTELLIGENT POSITIONING KEY

In the middle of the eight directional arrows, there is a 3D intelligent positioning key. See 

Figure 2-18. Please note, this function needs protocol supported and can only be operated 

by mouse.
Click this key and the system goes back to the single screen mode. Drag the mouse on the 

screen to adjust section size. It canpan/tilt/ and zoom PTZ automatically to the desired object 

or location..

Figure 2-18

You can click set button in Figure 2-16 (or click REC button in the front panel) to set preset, 

tour, and pattern.

You can click page switch button in Figure 2-16 (or click “Fn” button in the front panel) to call 

main function.

Name

Function

Shortcut Key

Function

Shortcut key

Function

Shortcut Key

Zoom

Near

Far

▶▶

Focus

Near

Far

Iris

Close


▎▎

 ◀

Open

▶ 

▎▎

3

24

Summary of Contents for MVR-SQ-40 Series

Page 1: ...Thank you for purchasing a MaceView SQ Series DVR Please read the instructions completely before installation Please consult a legal expert on the proper use of this equipment in accordance with the...

Page 2: ...ut Main Menu 12 2 1 1 Login 12 2 1 2 Main Menu 13 2 1 3 Logout 13 2 1 4 Auto Resume after Power Failure 14 2 2 Live Viewing 14 2 3 Record Setup Schedule 14 2 3 1 Schedule Menu 14 2 4 Manual Record 15...

Page 3: ...ION SECURITY Heavy stress loads violent vibration or water intrusion are not allowed during transportation storage and installation 3 INSTALLATION Keep right side up Handle with care Do not apply powe...

Page 4: ...d Remote control is optional Finally remove the protective film from the DVR Note Remote control is not a standard accessory and it is not included in the accessory bag 1 2 ABOUT FRONT PANEL AND REAL...

Page 5: ...l Assistant function such as PTZ menu In text mode input number 1 4 English character G H I Left 2 Right 3 Shift current activated control When playback click these buttons to control playback bar In...

Page 6: ...on to reverse playback In reverse playback click this button to pause playback In text mode input number 6 English character M N O Play Next 9 In playback mode playback the next video In menu setup go...

Page 7: ...el is shown as below See Figure 1 2 Figure 1 2 1 Video input 2 Audio input 3 Video CVBS output 4 Audio output 5 Network port 6 USB port 7 HDMI port 8 RS232 port 9 Video VGA output 10 Alarm input alarm...

Page 8: ...Figure 1 3 Please refer to the following chart for detailed information 1 Video input 2 Audio input 3 Video CVBS output 4 Audio output 5 Network port 6 USB port 7 Video VGA output 8 RS232 port 9 Alar...

Page 9: ...1 5 CONNECTION SAMPLE 1 5 1 MVR SQ 80 Please refer to Figure 1 4 for MVR SQ 80 series product connection sample Figure 1 4 8...

Page 10: ...uct has three types of alarm ports Please refer to the following three figures for detailed information There are two alarm input types for you to select normal open NO and normal close NC Important P...

Page 11: ...the alarm port is shown as in Figure 1 7 Figure 1 7 AB Connection port Parameter Grounding Alarm Ground line Alarm Input 1 2 8 It becomes valid in low voltage 1 NO C 2 NO C 3 NO C Three NO activation...

Page 12: ...alarm input ALARM Use the same ground with that of DVR if you use external power to the alarm device Figure 1 9 Parameter Grounding Alarm Ground line Alarm Input 1 2 16 It becomes valid in low voltage...

Page 13: ...terface See Figure 2 1 System consists of four accounts Username admin Password admin administrator local and network Username 888888 Password 888888 administrator local only Username 666666 Passwords...

Page 14: ...you to log out The first one is from menu option In the main menu click shutdown button you can see an interface is shown as below See Figure 2 3 Figure 2 3 There are several options for you See Figu...

Page 15: ...number first You can select All if you want to set for all the channels Week day There are eight options they ranges from Saturday to Sunday and All Pre record System can pre record the video before...

Page 16: ...tra stream supports QCIF only Frame rate It ranges from 1f s to 25f s in NTSC mode and 1f s to 30f s in PAL mode Note For the 8 ch series DVR refer to the following information If the 1 channel resolu...

Page 17: ...SHOT In the Encode interface click snapshot button to input snapshot mode size quality and frequency In the General interface please input upload interval In the Schedule interface please enable snaps...

Page 18: ...pload interval In the Detect interface please enable the snapshot function for specified channels or in the Alarm interface enable the snapshot function for specified channels Please refer to the foll...

Page 19: ...n click save button See Figure 2 10 Please refer to the User s Manual included in the resource CD for detailed information Please boot up corresponding FTP server Please enable schedule snapshot or ac...

Page 20: ...Figure 2 11 Please refer to the following table for more information 1 2 3 4 5 6 3 3 91011 15 14 13 12 File List Playback Window File Information Playback Control Bar Select Playback Mode Here Set se...

Page 21: ...ame time 2 6 1 5 Digital zoom When the system is in full screen playback mode drag your mouse on the screen to select a section and then left click mouse to activate digital zoom You can right click m...

Page 22: ...ns Slow play button In playback mode click this button to switch between various slow play modes such as slow play 1 or slow play 2 Play Pause In slow playback mode click this button to switch between...

Page 23: ...alue is 80 Max connection system support maximal 10 users 0 means there is no connection limit Transfer mode Select the priority between fluency video qualities Network download System can process the...

Page 24: ...three choices none odd even Default value is none Figure 2 14 After completing all the setup click the save button the system goes back to the previous menu 2 8 2 PTZ OPERATION In one window display m...

Page 25: ...ase note this function needs protocol supported and can only be operated by mouse Click this key and the system goes back to the single screen mode Drag the mouse on the screen to adjust section size...

Page 26: ...sion can overwrite the previous one If you want to un install the web controls please run uninstall webrec 2 0 bat to auto delete the control or you can go to C Program Files webrec to delete Single f...

Page 27: ...he resources CD Figure 3 2 Note For detailed operation introduction please refer to the resource CD included in your package for the electronic version of the User s Manual This quick start guide is f...

Page 28: ...Mace Security Products Inc 5101 NW 21st Ave Suite 210 Fort Lauderdale FL 33309 877 585 6223...

Reviews: