background image

14


MM3

 User Manual

Charging

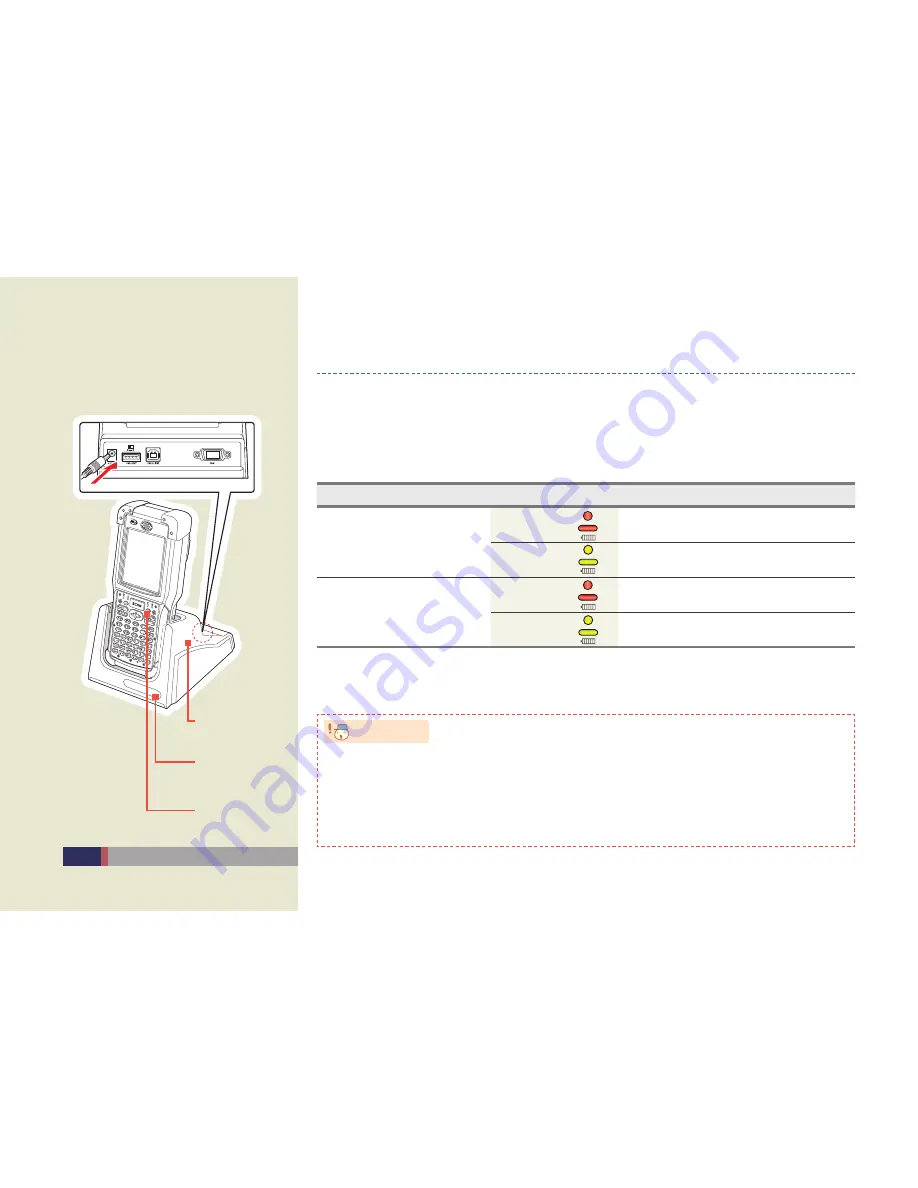
 Connect plug-in from charger to charge jack of main body, or charge jack of cradle, and 

• 

then place main body onto cradle.

Charging LED

Classification

LED Status

Description

Direct charging to main 

body

Red

Charging

Green

Charging completed

Cradle Charging LED

(Extra battery charging)

Red

Charging

Green

Charging completed

Main Unit Charging 
LED

Cradle Charging LED
(Aux. Battery 
Charging)

Aux. Battery Slot

8BSOJOH

 Do not use any other adapters except for the power supply device (5.2V/5A) that comes with 

• 

the product.

 Make sure to handle it gentle; damage with excessive force may cause no warranty.

• 

 Risk of explosion if battery is replaced by an incorrect type.  

• 

Dispose of used batteries according to the instructions.

 When attached battery is completely discharged, plug charger to main body, then reset the 

• 

device to check if screen is back on. To use, do at least 10 minute charging. 

 When charging, the status of the battery attached to main body can be confirmed 

• 

by the LED left of upper corner of main body. Also the status of Sub-battery can be 

confirmed by the LED right of low corner of Cradle.

Summary of Contents for MM3

Page 1: ...l information of user manual and programs in CD can be downloaded at www m3mobile net User Manual Please be sure to read the Warnings and Safety Precautions in order to use the product safely and corr...

Page 2: ...omissions M3 Mobile does not provide any guarantee including the implied guarantee on the product s characteristics in this user manual and suitability for special purposes and any other guarantees no...

Page 3: ...l product names and services used in the manual and product are company names service marks trademarks or registered trademarks of the corresponding right owners When separate application programs are...

Page 4: ...ontact the corresponding program manufacturers Do not use any battery adapter or accessories other than the designated ones provided with the product Free warranty service may not be allowed if failur...

Page 5: ...e product Do not try to modify the product by any means Modifications may cause fire injury electric shock or serious damage to the equipment and users The warranty service is not provided for trouble...

Page 6: ...Hz Quad Band RX GPS 850 900 1800 1900 MHz Band width 200 KHz GSM 5MHz 3G External appearance 88 x 215 x 61mm Width x length x height Weight 570g battery included Operating Temperature Main body 20 C 5...

Page 7: ...Part 11 Inserting and Removing the Battery 13 Charging 14 LED Information 15 Button Information 16 How to use Stylus Pen 18 How to connect to PC 19 Soft Reset Clean Boot 20 Basic Usage 21 Calibration...

Page 8: ...e Phone 49 Init Screen 50 Phone Control 51 Phonebook 53 SMS send and receive 54 Controls while on the phone 55 Phone setting 56 Usage of Device 57 To use the Camera 58 Bluetooth Communication 62 BTExp...

Page 9: ...uct Composition Name and Function of each part Inserting and Removing the Battery Charging LED Information Button Information How to use Stylus Pen How to connect to PC Soft Hard Reset MM3 Introductio...

Page 10: ...items are included when you open the box for the first time MM3 Main Unit One Standard Battery One High Capacity Battery Cradle USB Cable Portable Adapter Earphone Stylus pen Manual CD ActiveSync The...

Page 11: ...Name and Function of Each Part MM3 Main Unit LCD Touch Screen Scanner LED Reset Switch 55Keys 41Keys KeyPad HSDPA LED Charge LED Scanner Button Flash Pistol grip Battery Lock Battery IO Port Camera B...

Page 12: ...s that were not purchased cannot be used USB CLIENT Use for connecting Active SYNC PC with PDA Ethernet Enables use of Ethernet function for Main Unit When using Ethernet Cradle 5 2V DC Connect the ad...

Page 13: ...g the Battery Attaching Battery As picture shown put the battery pack to back of PDA and lock the battery pack with locking device Detaching Battery Press locking device to the right then using upper...

Page 14: ...adapters except for the power supply device 5 2V 5A that comes with the product Make sure to handle it gentle damage with excessive force may cause no warranty Risk of explosion if battery is replace...

Page 15: ...arging completed WWAN Status LED Blue Blinking WWAN Standby within range of phone internet Blue On WWAN in use phone SMS internet in use Blue OFF WWAN is off or out of range Scanner LED Green Scanner...

Page 16: ...nter the space as determined previously Bs Delete the text Enter Implement Command or move to the next line when entering the text Button Name Function Sp Keep a space when entering a text F1 F10 Impl...

Page 17: ...ever you should take your finger off after pressing the green button and then press the other key Button Name Function Enter Implement Command or move to the next line when entering the text Bs Delete...

Page 18: ...used when you select the text Please drag the desired part with stylus pen at tached on the screen Leave Stylus pen touching the screen for long and you can select the menu on the pop up screen You ca...

Page 19: ...ctor Connect charger to power source to wall Connect USB cable of USB cradle to USB port of desktop PC Place MM3 onto docking cradle then execute Synchronization with Desktop PC The location of USB po...

Page 20: ...y in some cases be lost Clean Boot Power off the device by pressing the power button more than 10 seconds Hold and press the Send button and End button together then press the power button briefly Cle...

Page 21: ...Calibration Main screen Input Screen Basic Usage 2...

Page 22: ...us If you don t need it click the Skip Press and hold the Stylus pen on the screen then select the Cut on the pop up menu Press and hold the Stylus pen like the arrow on screen Tap the Paste on the po...

Page 23: ...e standard time zone date and time To set up a password tap Next otherwise tap Skip Choose outlook e mail to set up an e mail account and then tap the Next POP3 IMAP Outlook E mail If you choose outlo...

Page 24: ...information Task info View the task information Today info View the Today s information Pocket MSN info View the Pocket MSN information Lock info View the screen Lock information Messages info View th...

Page 25: ...d Mobile To use the Keyboard Input Tap the arrow next to the keyboard icon and then select the keyboard on the menu screen as a picture above This is the Keyboard Input Screen You can input the letter...

Page 26: ...Recognizer on the menu screen as a picture above In the input screen of block rec ognizer you can input special letters and characters by tap ping the input box once It is the screen of block recog ni...

Page 27: ...cture above In the Letter Recognizer input screen you can input the capital letters in ABC the small letters in abc and numbers in 123 each in the input box seen on the screen Please choose Options on...

Page 28: ...arrow next to the key board icon and then select the Transcriber on the menu like the picture This is the Transcriber input screen If you input letters numbers and characters on the screen with the s...

Page 29: ...rs small letters numbers and characters using keypads For example in the case of inputting the M3 SKY Convert to a Keypad 6 convert to 1 Keypad 3 Convert to A Keypad 7 4 times Keypad 5 twice Keypad 9...

Page 30: ...30 MM3 User Manual MEMO...

Page 31: ...ActiveSync Introduction ActiveSync install Connect Synchronization of Data Troubleshooting ActiveSync ActiveSync 3...

Page 32: ...the data is synchronized at same time It follows the option settings of ActiveSync provided by Microsoft By linking MM3 and computer you can make data in both devices in the same status synchronizatio...

Page 33: ...ng PC with PDA in order to exchange the data each other Via this process the data on the PC and on the PDA can be synchronized The synchronization is available with Outlook 2003 or above version It is...

Page 34: ...hronization connect the device to the desktop computer ActiveSync will immediately start synchronization and synchronize according to the user s input of changes in a computer or the device Only upon...

Page 35: ...the ActiveSync Check the solutions below Ensure the correct USB cable is used in the cradle with USB port of the PC Ensure the power input cable of MM3 or LCD Please re try the Synchronization after S...

Page 36: ...36 MM3 User Manual MEMO...

Page 37: ...Via HSDPA Via Wireless WLAN Browsing the Web Site How to use Internet 4...

Page 38: ...l It is not available in the device which does not have WWAN module installed Tab Start Settings Connections Select Add a new modem con nection of My ISP in the Con nections Put the name you want into...

Page 39: ...he User name and password ac cording to the setting In some cases it is required to set IP ad dress at the advanced menu You can explore the Internet using WWAN connection Select the Manage existing c...

Page 40: ...ss LAN is optional You can only use WLAN when the WLAN module is built in to the device On the Today Main screen you select Wireless state bar or go to Start Settings Connections Wireless Manager When...

Page 41: ...s WLAN After configure Network authentifi cation tap the Finish You can see the wireless Networks available Configure the connect type then click the Next On the settings screen you select Wi Fi Icon...

Page 42: ...42 MM3 User Manual Configure DHCP Static IP Via Wireless WLAN 4 5 6 7 8...

Page 43: ...rams and files by accessing the Internet Browsing the Web Site Tap Start Internet Explorer This is the Internet Explorer process ing screen Input the address you want on the address window in upper of...

Page 44: ...how to use the Internet Explorer On the Menu Favorites you can see the list of sites that you have saved and browse to it directly The favorite page is like the picture above On the Menu History You c...

Page 45: ...ount Process the Start Messaging Select the Menu Tools New Account in the out look E mail box Set an E mail provider for other then tap Next When the Status is for com pleted tap the Next Input the E...

Page 46: ...n send and receive E mail using the e mail account Set an E mail provider for other then tap Next Select the Account Type and put the Name then tap Next Input the Incoming mail Outgo ing mail Domain t...

Page 47: ...To receive an e mail Select the Message on the Today Select the Send Receive in the Menu and check the received mail After process the Message program select the New You can send an e mail when you se...

Page 48: ...48 MM3 User Manual MEMO...

Page 49: ...Init Screen Phone Control Phone book SMS send and receive Phone functions Controls while on the phone Phone setting How to use the Phone 5...

Page 50: ...EDGE HSDPA connection GSM Operator It indicates the current Network Provider Call Status It shows Call Status Input Number It shows Inputted Numbers Key Pad It is used to dial the number and can be u...

Page 51: ...nd End Select the SEND and END button like the picture above to start and finish the Phone program Tap the Phone button on the left bottom of the Today Screen and then you can process the Phone progra...

Page 52: ...all by pressing the Talk button on the program or pressing SEND button on the device To hang up Press the END button on the pro gram or on the device Phone Receive When you get the Incoming Call you c...

Page 53: ...py or delete the Contact Options Set the Options for Contact View By See the Contact by Type Name Company Number Filter Filter the information you want Contacts Option Call W H M Call by the number on...

Page 54: ...You can also send SMS by selecting SMS send menu on Contacts or any other applica tions Change to the Text Messages on the Message Program like the picture above and tap the New on the bottom Input th...

Page 55: ...while talking on the phone Change to Mode available to input the Number on the screen Move to Contact End phone call Hold for a moment while on the phone Setting for receiver not to hear my voice whil...

Page 56: ...to set an information related to the Serv ice In the Network or SIM Name Description Call Barring Block the calling to the spe cific number Caller ID Turn on or off the Caller ID function If it is ena...

Page 57: ...To use the Camera Bluetooth Communication BTExplorer To use the GPS To use the Scanner Usage of Device 6...

Page 58: ...ightness Resolution QCIF QVGA CIF VGA SVGA SXGA UXGA QCIF QVGA Setting for size White Balance Automatic Sunny Cloudy Fluorescent Incandescent Setting for White balance Flash Flash ON Flash OFF Setting...

Page 59: ...con on the picture or video 8BSOJOH Tap the Menu Options Camera Tab and then you can set the route of the storage memory name and quality You can set the Video on the Video Tab Select the Start Progra...

Page 60: ...hanged to standby mode after certain amount of time In order to start Preview Mode again just tap the screen or press the camera button After taking a picture the captured image will be displayed on t...

Page 61: ...ils first to see the list of video files available When you select the video you want you can play the video re corded If you want to take a video select Menu Videos after executing the camera program...

Page 62: ...e transmission and reception of files between the serial connecting service and Windows Mobile device On the Today Main Screen select the Wireless State bar or Tap Start Settings Connections and selec...

Page 63: ...Mode connecting to BT device and COM settings You can set the Bluetooth mode and establish connection when you tap the Bluetooth icon on the Start Settings Connec tions In the COM Ports tab you can se...

Page 64: ...ble It shows the registered devices To add more device please tab Add new device Enter a Passcode to establish a secure connection The passcode can be fixed one or the one which is negotiated between...

Page 65: ...ct the file you want to transfer in the File Explorer Press the file name long and tab Beam File By tapping Beam File the list of available Bluetooth devices shown Please choose the device to transfer...

Page 66: ...mode Use the Services tab to add or delete Bluetooth services To add a service 1 Tap Add The Add Local Service window displays 2 In the list select a service to add 3 Tap OK The Edit Local Service wi...

Page 67: ...ces tab Use the Profile tab to load or remove Bluetooth services profiles If a profile is not used it can be removed to save memory Virtual COM Port defines which COM ports BTExplorer attempts to use...

Page 68: ...word and selecting the service Press BTExplorer in the Start Programs It displays the device list that you can connect Click the device you want and press the Next It displays the service list you can...

Page 69: ...b GPS and then you can set the information related to the GPS You don t have to set additional information when there is a single program which uses GPS data When there are more than one program which...

Page 70: ...arch ing the current location To Connect the GPS When there is a single GPS program please use the GPS hardware port COM2 When there are more than one GPS program please use the pre defined GPS progra...

Page 71: ...tion ScanEmul It is a program which can be used to output the scanned data on the application like MS Word Pad Internet Explorer or Business Application The ScanEmul program must be running if you wan...

Page 72: ...o times and compare the data whether it is same or not Time Out Scanner beam will be shoot for this time set Sound you can choose the sound which will ring when the data is scanned Output you can sele...

Page 73: ...e Scanner You can select the symbol Sym bology to activate You can create the prefix and suffix that will be used in the beginning and ending of the bar code data You can set the button that will be u...

Page 74: ...r How to use scanner 8BSOJOH Scanner is optional You can not use scan feature with no scanner enabled device 2D Barcode Scanner is optional Only with 2D Barcode scanner enabled device you can do 2D ba...

Page 75: ...MEMO 75 User Manual MM3...

Page 76: ......

Reviews: