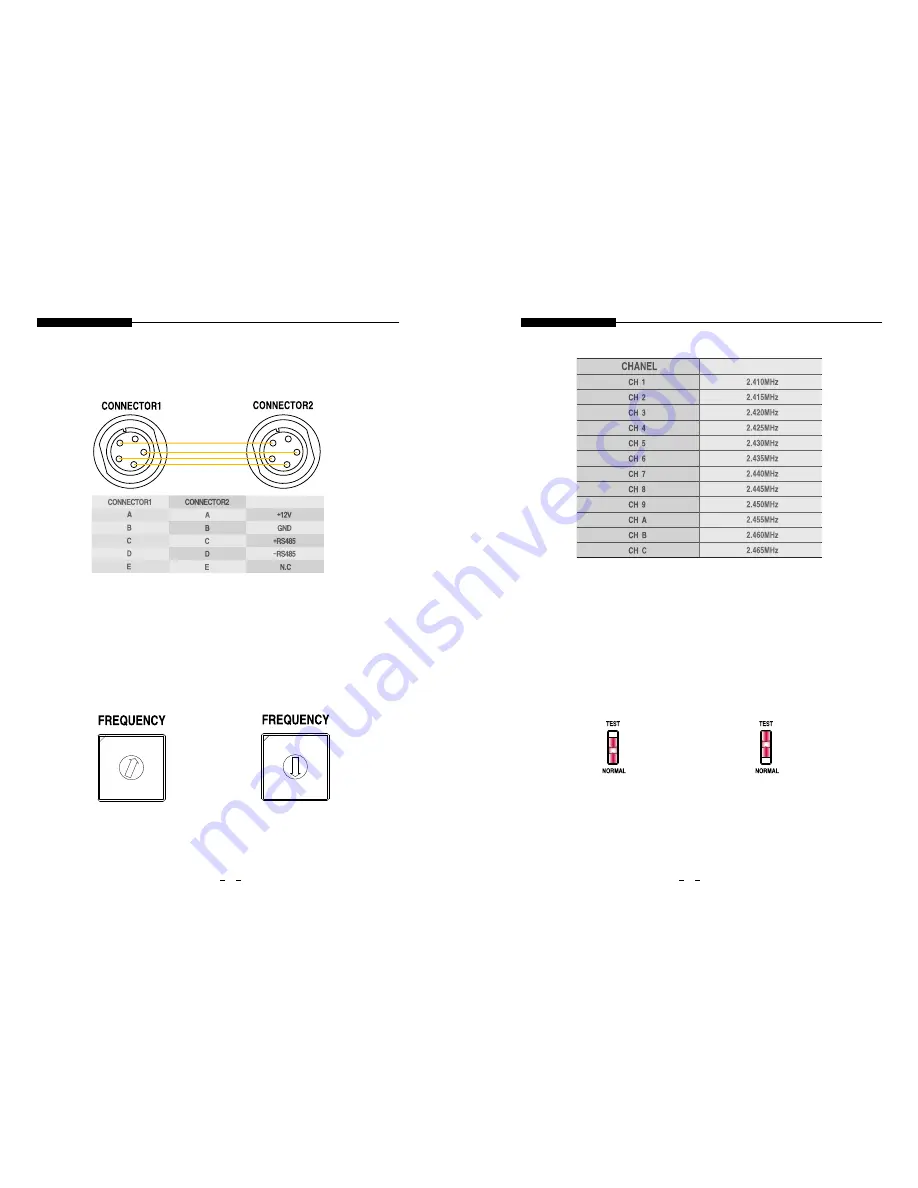
JOINING CONNECTORS
FREQUENCY SETTING
Connector1 and connector2 are connected inside in parallel. For that reason, either connector has
RS-485 signal are turned into receiving mode in RF transmission mode, transmission mode in RF receiving
the same function. Disassemble the provided connector, and solder the cable to the internal PIN as described
mode.
in the above table to avoid power shortage.
A
B
C D
E
A
B
C D
E
802.15.4
Frequency Table
TEST MODE
FREQUENCY CH1
FREQUENCY CH8
FREQUENCY
6
Wireless DATA Tranceiver Manual
7
●
●
●
●
Wireless DATA Tranceiver Manual
1 2
0
3
4
5
6
78
9A
B
C
D
E
F
1 2
0
3
4
5
6
78
9A
B
C
D
E
F
PURPOSE
1. Joining Connectors
2. RS-485 Signal
In case of frequency change, set the frequency by turning from 1 to C with a small flat-head
screw driver. The above picture demonstrates the case of the frequency channel 1 and 8.
1. Make sure that the power is off.
2. Lift the number 3 SET1 switch up to ON.
3. Set the preferred frequency using a small flat-tip screw driver by turning the rotary
switch according to the above frequency table(Number 0, D, E, and F, not present
in the table, is the same as CH1)
4. Turning the power on, RXD and TXD LED will flicker 8 times. At last, the frequency
has changed.
5. Lower number 3 SET1 switch to OFF to avoid repetition of the above process
whenever the power is on. In doing so, the frequency setting is skipped, and the
device will function normally.
Normal Mode
TEST Mode
In receiving mode, test data is transmitted as a RF signal.
In transmission mode, test data is transmitted as a RS-485 signal.
In test mode, even if the switch is set to NORMAL, data transmission will occur
for about 10 seconds before getting out of the test mode.
Test mode comes in handy in case of testing communication between a
transmitter and a receiver.


