R7M-DC16B
P. 3 / 7
EM-7803-H Rev.5
5-2-55, Minamitsumori, Nishinari-ku, Osaka 557-0063 JAPAN
Phone: +81(6)6659-8201 Fax:
+81(6)6659-8510 E-mail: [email protected]
MASTER CONNECTION
■
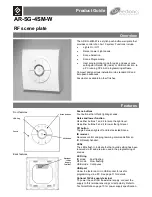
MASTER CONNECTION
Tx+/Rx+
Tx–/Rx–
SG
Rx+
Rx–
Host PC
DA
DB
DG
SLD
FG
Remote Unit
DA
DB
DG
SLD
FG
Remote Unit
TERMINATOR
TERMINATOR
Be sure to connect the terminating resistor included in the product package to the unit at both ends of transmission line.
The terminator must be connected across DA and DB.
The Host PC can be located other than at the extreme ends of transmission line.
CONNECTION DIAGRAM
Connect the unit as in the diagram below.
10
1
2
Y0
0 V
+24 V
–
+
18
YF
4
7
6
3
2
5
1
0 V
24 V DC
FG
SLD
DG
DB
DA
■
Output Connection Example
10
17
18
1
YD
16
YB
0 V
YF
15
Y9
14
Y7
13
Y5
12
Y3
11
Y1
9
YE
8
YC
7
YA
6
Y8
5
Y6
4
Y4
3
Y2
+24 V
Y0
2
EXTENSION CONNECTOR
In order to improve EMC performance, bond the FG
terminal to ground.
Caution: FG terminal is NOT a protective conductor terminal.
IRING INSTRUCTIONS
■
SCREW TERMINAL
Torque
: 0.5 N·m
■
SOLDERLESS TERMINAL mm (inch)
Refer to the drawing below for recommended ring tongue
terminal size. Spade tongue type is also applicable. Solder-
less terminals with insulation sleeve do not fit.
Communication cable: Applicable wire size 0.2 to 0.5 mm
2
(AWG26 - 22)
Recommended manufacturer: Japan Solderless Terminal
MFG.Co.Ltd
Others: 0.25 to 1.65 mm
2
(AWG 22 to 16)
Recommended manufacturer: Japan Solderless Terminal
MFG.Co.Ltd, Nichifu Co.,ltd
6 (.24) max
3.3 (.13) max
mm (inch)