11. The outer ring of the bearing is spherical and swivels in the housing to compensate for misalignment. Secure hold
down bolts, but
do not fully tighten
.
12. Align the setscrews on the bearings and tighten one setscrew on each bearing.
13. Rotate the shaft to allow the bearing outer rings to find their center of free movement.
14. Install the wheel on the shaft. Install the inlet cone in its original location. And adjust bearing position and inlet cone to
center the wheel in the inlet cone.
15. Tighten the hold-down bolts to the proper torque.
16. Turn the shaft by hand. Resistance should be the same as it was before the hold-down bolts were fully tightened.
17. Tighten the bearing setscrews. Refer to the Torque chart.
18. Re-install the pulley and adjust the belt tension.
19. Test run and retighten all setscrews and hold-down bolts; trim balance as necessary (.0785 in/sec max.)
After 24 hours of operation, retighten the setscrews to the appropriate torque. Make sure the socket key or driver is in good
condition with no rounded corners. The key should be fully engaged in the setscrew and held squarely to prevent rounding out of
the setscrew socket when applying maximum torque.
Flange Bearing Replacement
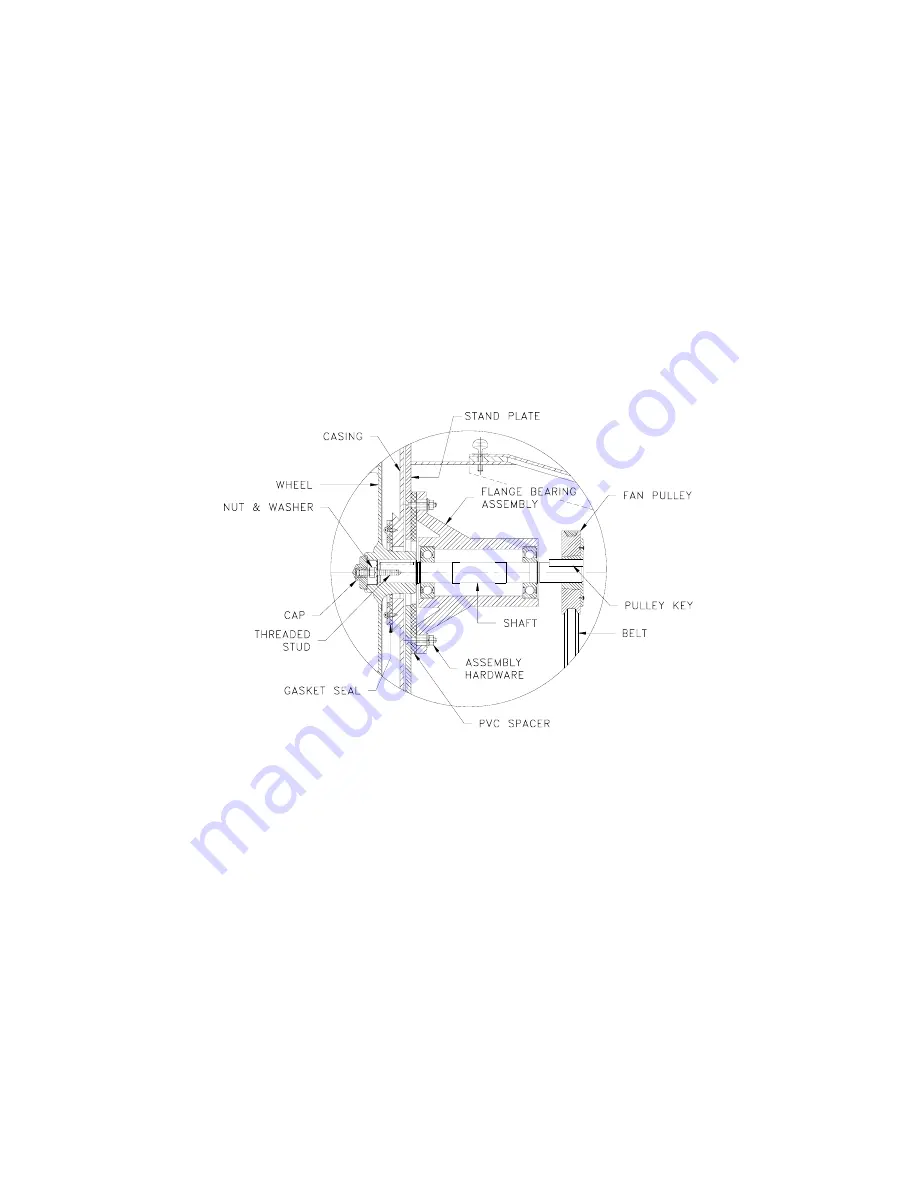
Please refer to Fig. 11 for the following procedures. The fan bearings are housed inside the flange bearing assembly, which
includes the shaft. It is easier and quicker to replace the entire assembly, rather than the bearings themselves.
Fig. 11 – Flange Bearing Assembly
1. Remove the fan drive belt and pulley.
2. Remove by unscrewing the front protective cap, and then the nut, washers and threaded stud. Removal of the inlet
collar on the front of the fan will give you better access.
3. Remove the wheel from the shaft – a 2-jaw puller may be needed.
4. Remove the assembly hardware that holds the entire assembly to the stand plate. The flange bearing assembly can
now be removed, complete with the shaft.
5. Before replacing the assembly, make sure the shaft and keys are clean and smooth.
6. Re-attach the flange bearing assembly to the stand plate, but make sure the PVC spacer is in good condition. Replace
if necessary.
7. Inspect and clean the bore of the wheel. Gently slide the wheel onto the shaft after inserting the key, and re-install the
threaded stud, nut and washers to the shaft, and tighten. Make sure the wheel hub is sitting well against the snap ring
on the shaft. Re-install the cap and tighten well.
8. Re-attach all the pulleys and adjust the belt tension.
9. Test run and retighten all screws and bolts if necessary.
10


