


Quattro Quick Start
It is recommended that you read this manual fully before installing and using
your USB Audio Quattro. This Quick Start guide may serve as an overview to
the steps ahead.
1. Plug the Quattro wall-wart into your wall receptacle and into the Quattro 9vAC power jack.
2. Connect the USB cable to your computer and the Quattro. Power up the computer with
the Quattro attached, and proceed with the driver installation.
3. With all audio levels turned down, connect your instruments to the Quattro audio
inputs, and connect the Quattro’s audio outputs to a mixer or monitoring system.
4. Configure your music software and start recording.
Theory of Operation
The USB port provides a high-speed connection to your computer. Devices can
be “hot-plugged” into the USB port with no need to power down the computer.
Additionally, there’s no need to open the computer, no tools are required, nor is
it necessary to configure the device other than plugging it in to the USB port and
installing the drivers.
The USB Audio Quattro utilizes the convenience of your computer’s USB port
to bring high quality, high resolution audio to your desktop or laptop computer.
The PC requires no IRQ other than the one that is already dedicated to the USB
controller when it is enabled.
In theory, multiple devices can be connected to the USB port (with the addition of
a USB hub). The USB Audio Quattro requires all of the bandwidth that is available
on the USB port, and therefore it is required that you plug the Quattro directly into
your computer’s USB port, and not into a USB hub with other USB devices. Of
course, if you are using a USB keyboard and mouse, you may have those plugged
into your computer’s other USB port (two are usually supplied on PC and Mac).
Your USB Audio Quattro USB Audio Interface is a 24-bit/96kHz capable device.
That means that you can record at any sampling rate that your recording software
will allow, up to 96kHz at a bit width of 24-bits, and at 16- or 24-bits with a
sampling rate of 48kHz or less. An ASIO control panel is included with your driver
software which allows you to set the Quattro to its different operating modes.
The Quattro has several operating modes, and when using the included ASIO
drivers, will function as a 4 input, 4 output audio device. On the PC, the ASIO
drivers as well as the Windows MME drivers will load automatically during the
driver installation procedure. Driver installation will also load a driver
configuration control panel that allows you to switch between the ASIO and
Windows MME drivers. When working with Windows MME (multimedia
extensions), the USB Audio Quattro functions as a 2 input, 2 output device only.
5
5.
3/4 “Output Level” switch: In the ‘out’ position, the Quattro Outputs 3 & 4 are set to
+4dBu line level operation. Pressing in and engaging this switch sets these outputs to
-10dBV line level.
6.
3/4 “Direct Monitor” switch: In the ‘out’ position, Quattro Outputs 1 & 2 are fed from
the computer for monitoring. Pressing in and engaging this switch connects Inputs 3/4
directly to the Quattro Outputs 3/4.
7.
“MIDI In” port: This MIDI jack provides MIDI input to your computer.
8.
“MIDI Out” port: This port provides MIDI Output from your computer.
9.
Power switch and LED: Pressing in and engaging this switch will power on the Quattro
and light the corresponding LED.
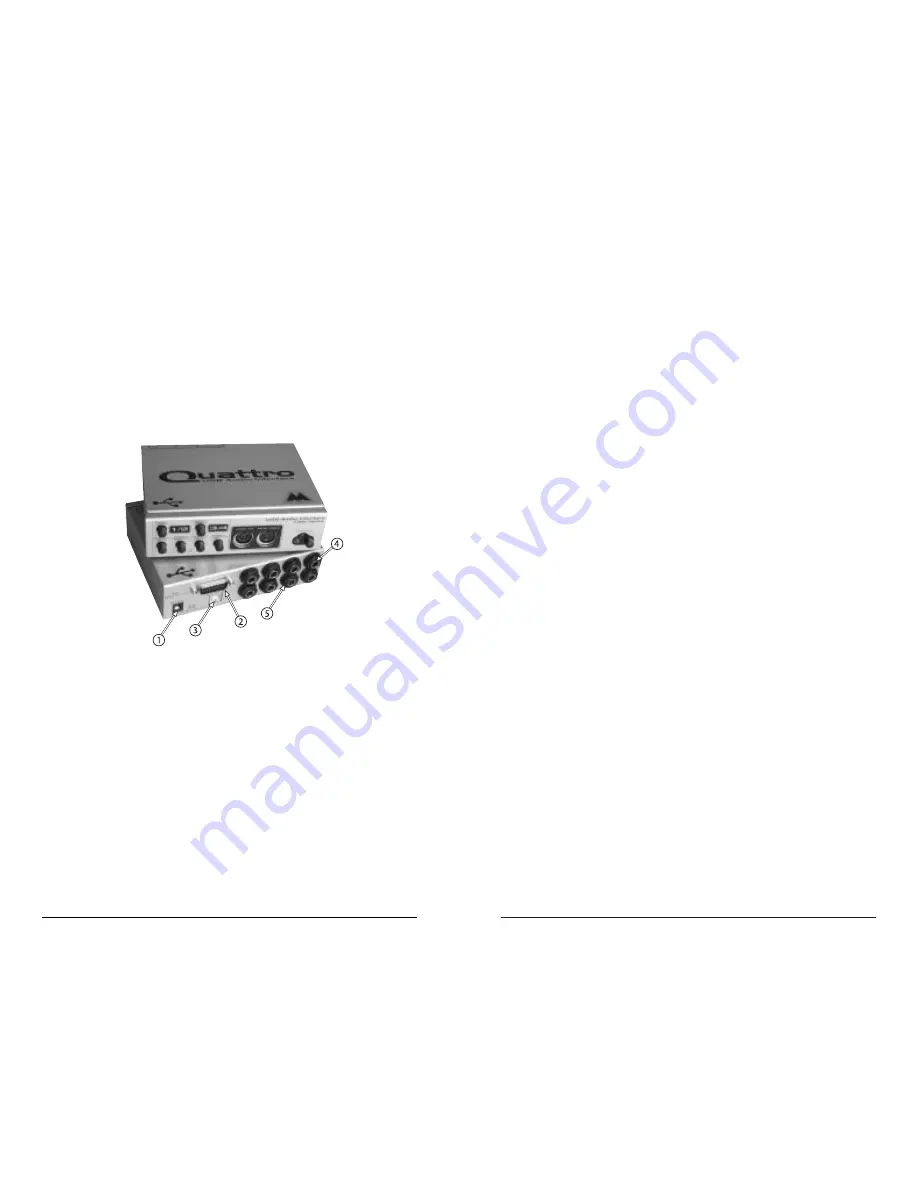
Quattro Rear Panel:
1. “9VAC” power jack: This jack accepts the wall-wart power supply that came with the
unit. Only the proper power-rated supply should be used.
2. “To Omni I/O” connector: This 15-pin DB connector accepts the female end of the Omni
I/O connection cable (available thru Midiman Inc.).
3. USB jack: This jack accepts the device-end of a standard USB cable.
4. Audio “In 4” through “In 1”: These 1/4” jacks accept either TRS or TS 1/4” plugs. These
are line level inputs, and generally will be connected to the outputs of a line level
instrument or preamp.
5.
Audio “Out 4” through “Out 1”: These 1/4” jacks accept either TRS or TS 1/4” plugs.
These are line level outputs, and generally will be connected to a mixer, power amp,
powered speakers, or a sound system.
4
Summary of Contents for Quattro USB
Page 1: ......


