background image

Introduction

Congratulations  on  purchasing  M-Audio’s  Ozonic—the  completely  integrated  audio/MIDI  production  and  performance  tool  designed  to 
streamline making music with your computer. Whether you’re an advanced user or are making music on the computer for the very first time, 
we strongly recommend that you read through this Users Guide to learn about proper installation, operation, and advanced functionality. 

What’s in the Box

Your Ozonic package contains the following:

<

  Ozonic audio/MIDI interface

<

  CD-ROM containing Driver Software and User Manual in PDF format 

<

  Printed QuickStart Guide

<

  CD-ROM containing Reason Adapted Express software

<

  1 meter 6-pin to 6-pin IEEE 1394 (FireWire) cable 

<

  12VDC 1000mA power supply

About the Ozonic 

A single IEEE 1394 cable connects the Ozonic to your computer’s FireWire port. If your PC is not equipped with a native FireWire port, you 
may purchase a FireWire PCI card at any computer electronics retailer. Check M-Audio’s Support Knowledge Base on the M-Audio website   
(http://www.m-audio.com) for information on compatible IEEE 1394/FireWire PCI adaptors.

IMPORTANT: 

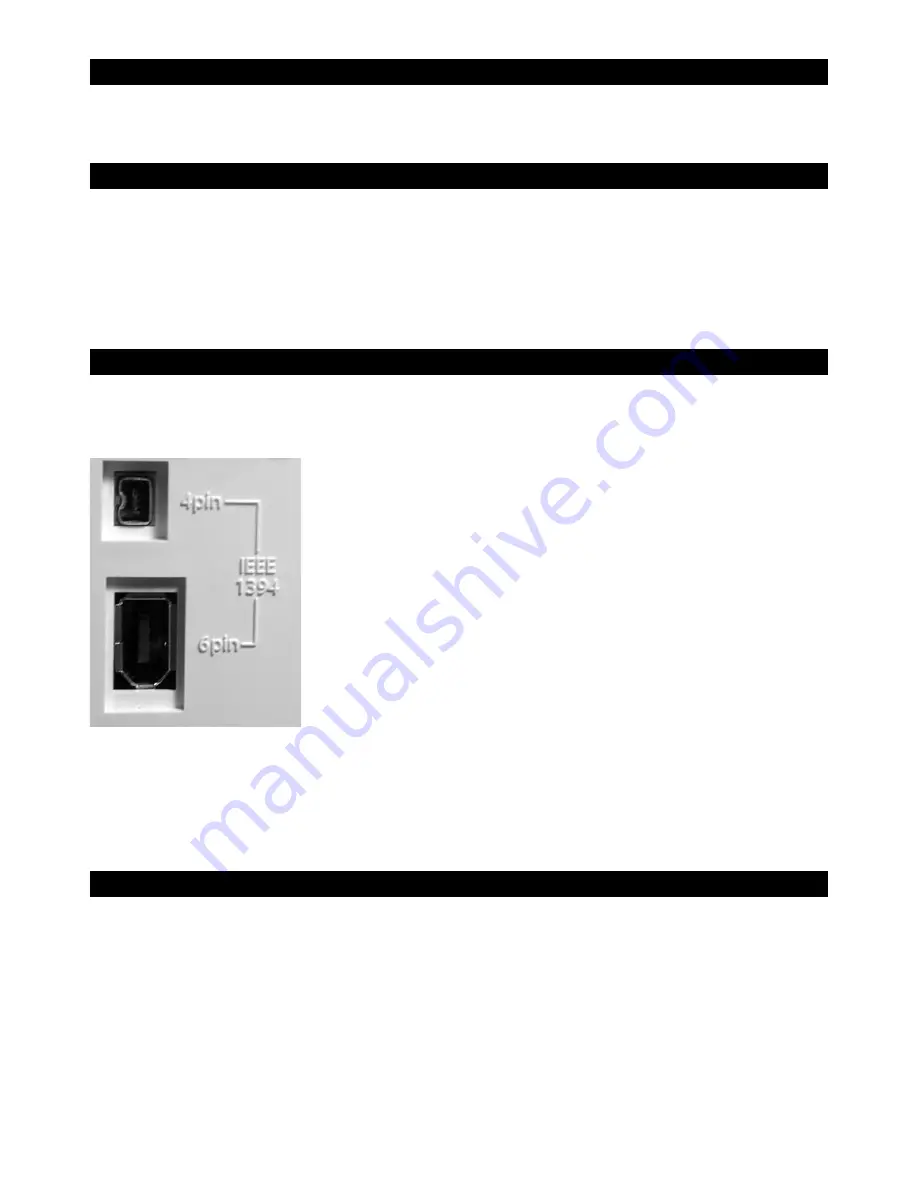
The Ozonic comes with a high quality six-pin to six-pin FireWire cable. We strongly suggest that you 
use this cable, or one of equal quality, for optimum audio performance. Your computer is equipped 
with either a six-pin or a four-pin interface, while the connector on the Ozonic is six-pin. The Ozonic 
requires a powered six-pin FireWire connection in order to receive bus power; if your computer has 
a four-pin connection or a 6-pin connection that does not provide power, you will need to use the 
supplied power adapter with an adapter cable.

(

Note:

 Some computer manufacturers may use a different nomenclature to refer to their FireWire 

connections, such as Sony’s “iLink,” or simply “1394” — when in doubt, consult the owner’s manual 
for your computer.) 

IMPORTANT: 

Reports  have  come  to  our  attention  of  isolated  problems  when  hot-plugging  IEEE  1394  (a.k.a. 
“FireWire”) devices. (Hot-plugging refers to making 1394/FireWire connections when one or more of 
the devices—including the computer—is on.) When hot-plugging, there are rare occurrences where 
either the FireWire peripheral or the FireWire port on the host computer is rendered permanently 
inoperable.  While  M-Audio  products  adhere  rigidly  to  the  FireWire  industry  standard  and  pass 
stringent internal testing, the possibility remains that hot-plugging your M-Audio FireWire interface 
with some computers may result in the type of problem described here.

We strongly encourage you to protect your equipment by refraining from hot-plugging  any bus-powered FireWire device, including the 
M-Audio Ozonic. Connect your FireWire device while both the computer and FireWire device are powered off. Power on the FireWire 
device, then turn the computer on last. 

If you are using bus power (systems with IEEE1394 6-pin connectors) make sure you make the cable 

connection first, then turn the FireWire device power switch on, and turn the computer system on last.

M-Audio is being proactive in investigating any issues that may adversely affect our customers. 

Please consult the Knowledge Base in the 

Support section at www.m-audio.com for updates on this important issue.

Ozonic Overview

The Ozonic is a 37-note MIDI keyboard and a 24-bit/96kHz audio interface equipped with four inputs: one XLR that fully supports phantom-
powered microphones, one unbalanced 1/4” instrument jack, and two unbalanced 1/4” TS jacks. There are four analog outputs, two on 1/4” 
TRS (balanced) and two on 1/4” TS (unbalanced) jacks. There is a stereo headphone output and MIDI in/out ports. All of these options make 
the Ozonic a perfect integrated choice for performance or studio environments in a computer music set up.

The Ozonic’s easy-to-use software Control Panel provides you with powerful routing and mixing control.


You can route any combination of 

input pairs to any of the analog output pairs.  This will give you complete control over the software returns from the computer host or the 
hardware direct monitoring streams.  You can take advantage of ultra-low latency software monitoring with built-in ASIO drivers, and near

-

zero latency hardware direct monitoring. 

With the Ozonic Headphone Stream Select function you can select which output pair you want to monitor, allowing you to pre-listen to an 
audio stream before it goes live.  The Ozonic also has hardware level controls for each output pair, allowing for real time mixing of the 
different audio streams, including Direct Monitoring.

English

3

Summary of Contents for Ozonic

Page 1: ...OZONIC 37 Key Audio MIDI Interface and Controller...

Page 2: ...peripheral or the FireWire port on the host computer is rendered permanently inoperable While M Audio products adhere rigidly to the FireWire industry standard and pass stringent internal testing the...

Page 3: ...utput Headphone Level knob Headphone Stream Select Merge knob Direct Monitor Level knob Phantom Power On Off switch for XLR input on rear of unit and activation LED for Input 1 on top panel Gain Contr...

Page 4: ...the headphones will monitor 4 Headphone Level Knob controls the headphone volume level 5 Direct Monitor Level Knob controls the amount of the input signal sent directly to the outputs 6 Input Gain Kn...

Page 5: ...vice from theft 12 Sustain Expression Pedals Driver Installation Windows XP NOTE Do NOT connect the Ozonic to your computer before you have run the installer application and shut down your computer If...

Page 6: ...s In most cases you should leave these in their default selected settings While Windows is most likely already con gured in this way these settings will ensure that you will be able to hear your DVD C...

Page 7: ...iver software has not passed Windows Logo testing Select Continue Anyway and proceed with the installation 12 The Found New Hardware Wizard will run a second time to install the Ozonic driver software...

Page 8: ...and open the Ozonic folder then open the folder for OS X 2 Double click the M Audio Ozonic Installer dmg le An icon labeled Ozonic will appear on your desktop 3 Double click on the Ozonic icon The le...

Page 9: ...detailing the remaining steps for the installation Read these steps then press OK 12 When the installation is complete click Close to complete the wizard 13 Once the installer is nished shut down you...

Page 10: ...nected to the Ozonic s MIDI output CONNECTION DIAGRAM The Software Control Panel Ozonic s driver software installation includes a Control Panel a simple yet powerful interface with your computer and D...

Page 11: ...Ozonic s analog inputs and software returns There are up to four virtual channels returning from your Digital Audio Workstation software Software Returns The mixer page provides up to four virtual au...

Page 12: ...possible so keep an eye on your output level meters when summing mixer channels Stereo Linking Both software return channels are controlled by software faders pairs can be linked for stereo operation...

Page 13: ...r WDM About Page This page contains information on your hardware and current driver software versions This information may be helpful if you ever have to update the driver software or need to call for...

Page 14: ...uced However since the audio is bypassing the software application you cannot add software effects or EQ plug ins to the signal being monitored ASIO direct monitoring when enabled will allow you to co...

Page 15: ...nformation Setting the Sample Rate In most cases you will want to set the sample rate from within your audio software This is covered in more detail in the Hardware Page section and in Setting Up Your...

Page 16: ...n shift up or down to give you access to 11 octaves 1 Press OCTAVE UP key for every octave you want to shift the keyboard up The LCD will display the current Octave setting and the OCT symbol 2 Press...

Page 17: ...later in this manual You can also program the assignable buttons to send out xed program messages to individual MIDI channels For further information regarding this method please see the Advanced Prog...

Page 18: ...llers press the function button labeled MUTE This feature allows you to alter the position of any controller without affecting the settings of your software Use this feature if you are switching betwe...

Page 19: ...uch 001 The strip generates modulation MIDI IN and OUT The MIDI In and MIDI Out ports have different uses depending on how you intend to connect and power Ozonic About the MIDI In Port An external MID...

Page 20: ...rm Note assigning the Zone to Channel 0 will set it to transmit on the Global Channel Zone Range The Zone Range de nes the upper and lower limits of the keys contained in a Zone To set the range of a...

Page 21: ...m the faders or rotary controllers The two charts show the transmit messages that can be programmed for each of the knobs faders and assignable buttons Please pay extra attention to the differences be...

Page 22: ...en press the Enter key Next press the Octave down button Assigning an Individual MIDI Channel 1 Select the controller you want to edit using one of the two methods described earlier 2 Press the EDIT b...

Page 23: ...ore only the faders to a preset 1 Press the ZONE GRP SELECT button and press the desired Group button this will de select all other groups that were enabled previously You should then see only Group C...

Page 24: ...ues required for these advanced messages press the EDIT button to begin Edit Mode After entering Edit Mode press the DATA 1 DATA 2 or DATA 3 button For more information please refer to Appendix B Assi...

Page 25: ...mory Ozonic uses non volatile memory allowing the memory to save after powering down and restarting The current controller and channel assignments are stored whether you have stored the setup to a mem...

Page 26: ...ist in Appendix E To transmit an NRPN RPN these two controller messages are sent along with their user speci ed values An additional controller message and value needs to be sent to specify the coarse...

Page 27: ...correctly Check to make sure the Power button is enabled If you are experiencing clicks and pops in your recordings Make sure your input levels are not too hot as this can cause distortion and clippin...

Page 28: ...info m audio com Tech Support 626 633 9055 Tech Support email techsupt m audio com Fax 626 633 9060 Internet Home Page http www m audio com M AUDIO Deutschland Germany Kuhallmand 34 D 74613 Ohringen...

Page 29: ...ber True Voice 0 127 X Velocity Note ON Note OFF 0 X X After Keys Touch Ch s X 0 X Pitch Bend 0 X Control 0 119 Change 0 X 120 127 0 X Program Change True Number 0 127 X System Exclusive GM GM2 MMC Me...

Page 30: ...NRPN MSB 135 NRPN Fine NRPN LSB NRPN MSB 136 Master Volume GM Volume LSB Volume MSB 137 Master Pan GM Pan LSB Pan MSB 138 Master Coarse Tune GM Tuning LSB Tuning MSB 139 Master Fine Tune GM Tuning LS...

Page 31: ...ing MSB 139 Master Fine Tune GM Tuning LSB Tuning MSB 140 Chorus Mod Rate GM2 Mod rate 141 Chorus Mod Depth GM2 Mod depth 142 Feedback GM2 Feedback level 143 Send to Reverb GM2 Reverb send level 144 P...

Page 32: ...12 37 55 62 98 0D 13 38 56 63 99 0E 14 39 57 64 100 0F 15 3A 58 65 101 10 16 3B 59 66 102 11 17 3C 60 67 103 12 18 3D 61 68 104 13 19 3E 62 69 105 14 20 3F 63 6A 106 15 21 40 64 6B 107 16 22 41 65 6C...

Page 33: ...Ensemble 1 49 String Ensemble 2 50 Syn Strings 1 51 Syn Strings 2 52 Choir Aahs 53 Voice Oohs 54 Syn Choir 55 Orchestral Hit 80 Syn Square Wave 81 Syn Sawtooth Wave 82 Syn Calliope 83 Syn Chiff 84 Sy...

Page 34: ...61 Controller 61 62 Controller 62 63 Controller 63 64 Sustain Pedal 65 Portamento 66 Sostenuto 67 Soft Pedal 68 Legato Pedal 69 Hold 2 70 Sound Variation 71 Resonance 72 Release Time 73 Attack Time 7...

Page 35: ...16 00 7F 00 7F n a 64 0 63 Drum EG Attack Rate relative change 17 00 7F 00 7F n a 64 0 63 Drum EG Decay Rate relative change 18 00 7F 00 7F n a 64 0 63 Drum Instrument Pitch Coarse relative change 19...

Page 36: ...weighted THD N 0 00319 Frequency Response 0 3 dB 20Hz to 40kHz 96 kHz Crosstalk 122 dB Impedance balanced 300 Ohms Headphone Outputs Max Output 2 1 dBV 0 784 Vrms into 32 ohms Signal to Noise Ratio 1...

Page 37: ...38...

Page 38: ...041025_OZONIC_UG_02...

Reviews: