background image

14


5  -  Using the MicroTrack 24/96 with a Computer

The MicroTrack 24/96 will interact with a computer for two purposes. First, the MicroTrack 24/96 will charge its battery with power it receives from 
the computer. Second, the contents of the MicroTrack 24/96’s CompactFlash card or Microdrive can be transferred to the computer. Additionally, 
files can be uploaded to the MicroTrack 24/96 for use later.

Charging the MicroTrack 24/96 from the Computer

To charge the battery of the MicroTrack 24/96 from your computer, connect the MicroTrack 24/96 to your computer using the supplied USB cable. 
Depending on the manufacturer of your computer, your computer may need to be powered on to provide power to the USB port. Other computers 
will supply power even if the main power is off. While charging, “Charging” or battery filling icon will be shown on the display. Once the battery is 
fully charged, “Charging Complete” or battery full icon will be displayed on screen.

Transferring Audio Files

Once you’ve made some recordings, you’ll want to transfer them to your computer so you can use them.

1.  Turn the MicroTrack 24/96 off.
2.   Connect the MicroTrack 24/96 to your computer using the supplied USB cable. The MicroTrack 24/96 will automatically turn on and will 

enter host mode.

3.   Once communication is established, a new hard drive will be present on your computer. Mac users will see this new hard drive as an icon 

on their desktop. PC user will find the new hard drive under “My Computer”.

To  transfer  files  from  the  MicroTrack  24/96,  simply  drag  them  from  the  MicroTrack  24/96  to  the  desired  destination  on  your  computer.  Your 
computer will then begin copying the files. To send files back to the MicroTrack 24/96, simply drag the files back into the MicroTrack 24/96 window. 
You can also create and delete file folders, rename files, and move them to new locations when connected to the computer. These features allow 
you to organize your collection of recordings with ease.

Portable Data Drive

While the MicroTrack 24/96 can only play and record WAV and MP3 files, you can store any file you wish on the MicroTrack 24/96’s CompactFlash 
card or Microdrive. This allows you to use the MicroTrack 24/96 as a portable memory card or hard drive. Any unsupported files in memory 
will be hidden from the Files menu when using the MicroTrack 24/96, but they will still be there when the MicroTrack 24/96 is reconnected to a 
computer.

Disconnecting the MicroTrack 24/96 from Your Computer

When you are finished transferring files to and from your computer, you will need to “unmount” the MicroTrack 24/96 from your computer before 
it can be released from host mode. The procedure for unmounting the MicroTrack 24/96 in each operating system is detailed below.

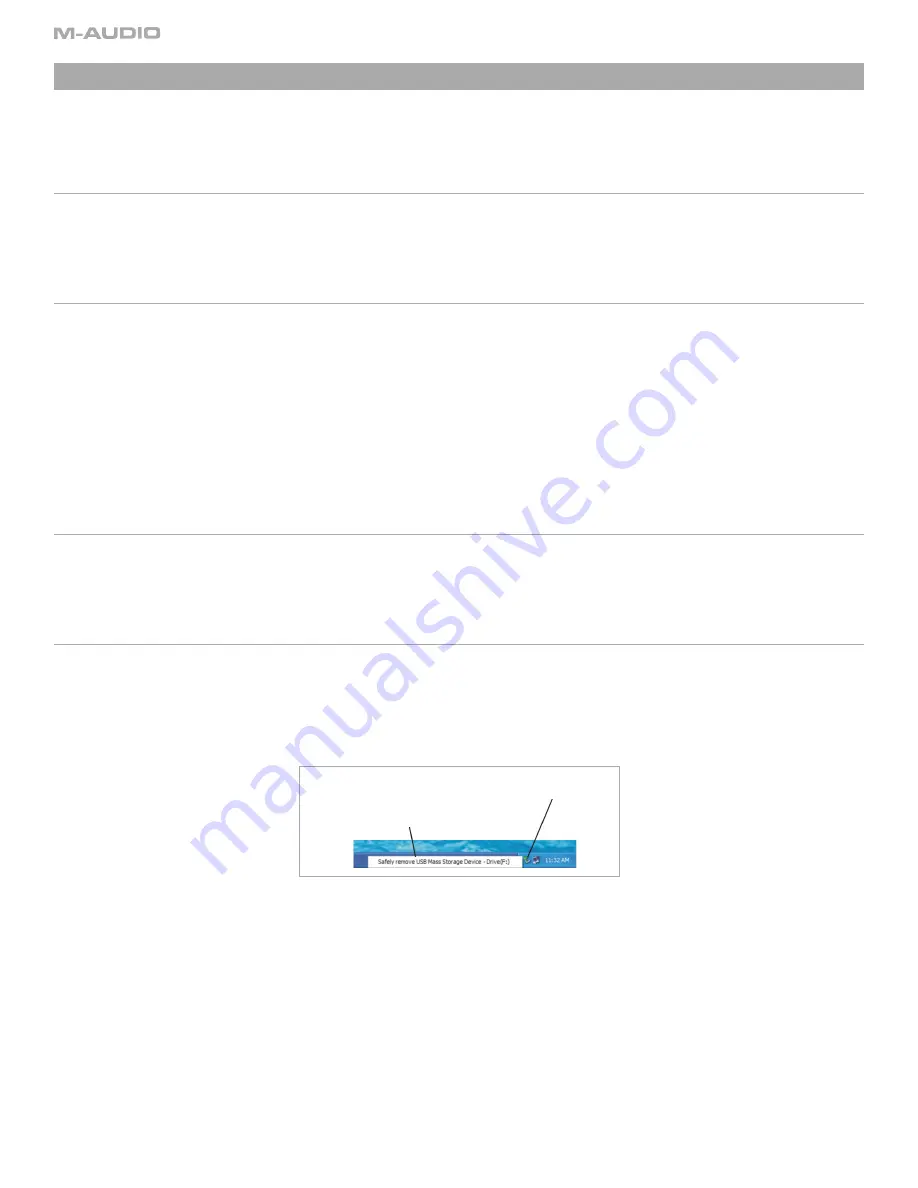
Disconnecting from Windows XP

To disconnect the MicroTrack 24/96 from Windows XP, click on the “Safely Remove Hardware” icon located in the System Tray.


A list of connected devices will be shown. The MicroTrack 24/96 will be listed as a “USB Mass Storage Device.” Click this device and Windows will 
attempt to unmount the MicroTrack 24/96. Windows will only be able to unmount the MicroTrack 24/96 if there are no programs trying to use 
files contained on the MicroTrack 24/96’s CompactFlash media. If Windows says that it cannot remove the MicroTrack 24/96, quit your running 
programs and try again.

Once the MicroTrack 24/96 has been unmounted, you can press its [DEL] key to exit host mode and return to normal operation.

5  -  Using the MicroTrack 24/96 with a Computer

1. Click here to show 

connected devices

2. Click here to remove 

the MicroTrack

Summary of Contents for MICROTRACK 24

Page 1: ...Professional 2 Channel Mobile Digital Recorder...

Page 2: ...s and Indicators 5 Front 5 Top 6 Bottom 6 Left 7 Right 8 Settings Menu 8 4 Operating Instructions 12 Recording 12 Playback 13 Loop Playback 13 5 Using the MicroTrack 24 96 with a Computer 14 Charging...

Page 3: ...r supply CompactFlash card Printed Quick Start Guide CD ROM containing this User Manual and Audacity editing software Product Features Records stereo WAV and MP3 les 16 or 24 bit recording and playbac...

Page 4: ...ery the unit will eventually turn off You will then have to recharge the battery before the MicroTrack 24 96 can be turned on again If you recharge the battery before the unit becomes inoperable the c...

Page 5: ...put signal exceeds the headroom of the MicroTrack 24 96 4 Input Levels Adjust These control the individual record levels of the MicroTrack 24 96 s left and right inputs 5 Signal Indicators Will light...

Page 6: ...k Connect a pair of headphones with an 1 8 plug for monitoring the MicroTrack 24 96 Bottom 12 RCA Outputs Line level outputs from the MicroTrack 24 96 13 S PDIF Input Allows a S PDIF format digital si...

Page 7: ...RS and 1 8 inputs Use the L position for line level devices The M position should be used when recording from microphones The H position uses a higher gain stage on the 1 4 TRS inputs which can help w...

Page 8: ...the current selection or enter a sub menu The MENU button is used to exit a sub menu When rst entering the Settings menu you will be presented with the following options each explained in detail in t...

Page 9: ...he highest quality recordings Be aware that the les created in this format can be quite large MP3 Selects MP3 as the recording format This format compresses the audio data to yield smaller le sizes Un...

Page 10: ...t the proper time and date on the device Connect to PC Menu This menu option is used to connect your MicroTrack 24 96 to your computer when the USB cable is already attached 1 Selecting this menu opti...

Page 11: ...ck 24 96 to turn off after the speci ed time of non use Please note The MicroTrack 24 96 will ignore this setting while in Record Paused Record or Playback modes to ensure that recording and playback...

Page 12: ...he Menu key and NAV wheel to select Settings Recording Sample Rate Select the appropriate sample rate and press the NAV wheel in again to make your selection 5 Select the BIT RATE of the MicroTrack 24...

Page 13: ...n the NAV wheel Press in again to resume playback play at half speed by pressing in and holding the NAV wheel for over two seconds Press in and hold the NAV wheel again to resume playback at original...

Page 14: ...icroTrack 24 96 simply drag the les back into the MicroTrack 24 96 window You can also create and delete le folders rename les and move them to new locations when connected to the computer These featu...

Page 15: ...press its DEL key to exit host mode and return to normal operation Swapping CompactFlash Media If you wish to change out the CompactFlash card or MicroDrive while the MicroTrack 24 96 is connected to...

Page 16: ...872 0444 Sales fax 514 396 7102 Internet Home Page http www m audio ca M AUDIO France Floor 6 Gresham House 53 Clarendon Road Watford WD17 1LA United Kingdom M AUDIO Japan 460 0002 2 18 10 Assistance...

Page 17: ...7 51 4 15 50 53 3 17 28 43 3 2 33 55 2 15 54 48 1 20 44 21 8192 8 6 50 28 6 5 7 51 4 23 18 17 4 3 25 14 3 13 13 3 2 11 39 8 Media WAV Recording Time in Seconds Capacity 16 16 16 16 24 24 24 24 MB 441...

Page 18: ...4 6144 6 5 7 51 4 15 50 53 3 17 28 43 3 2 33 55 2 15 54 48 1 20 44 21 8192 8 6 50 28 6 5 7 51 4 23 18 17 4 3 25 14 3 13 13 3 2 11 39 8 Media WAV Recording Time in Seconds Capacity 16 16 16 16 24 24 24...

Page 19: ...5 2 15 54 48 1 20 44 21 8192 8 6 50 28 6 5 7 51 4 23 18 17 4 3 25 14 3 13 13 3 2 11 39 8 Media WAV Recording Time in Seconds Capacity 16 16 16 16 24 24 24 24 bit width MB 44100 48000 88200 96000 44100...

Reviews: