7
Advanced Functions
In addition to setting an octave shift, the two octave “+” and “-” buttons discussed earlier in the manual under the section “Octave
Buttons” can also be used to control one of five MIDI functions.
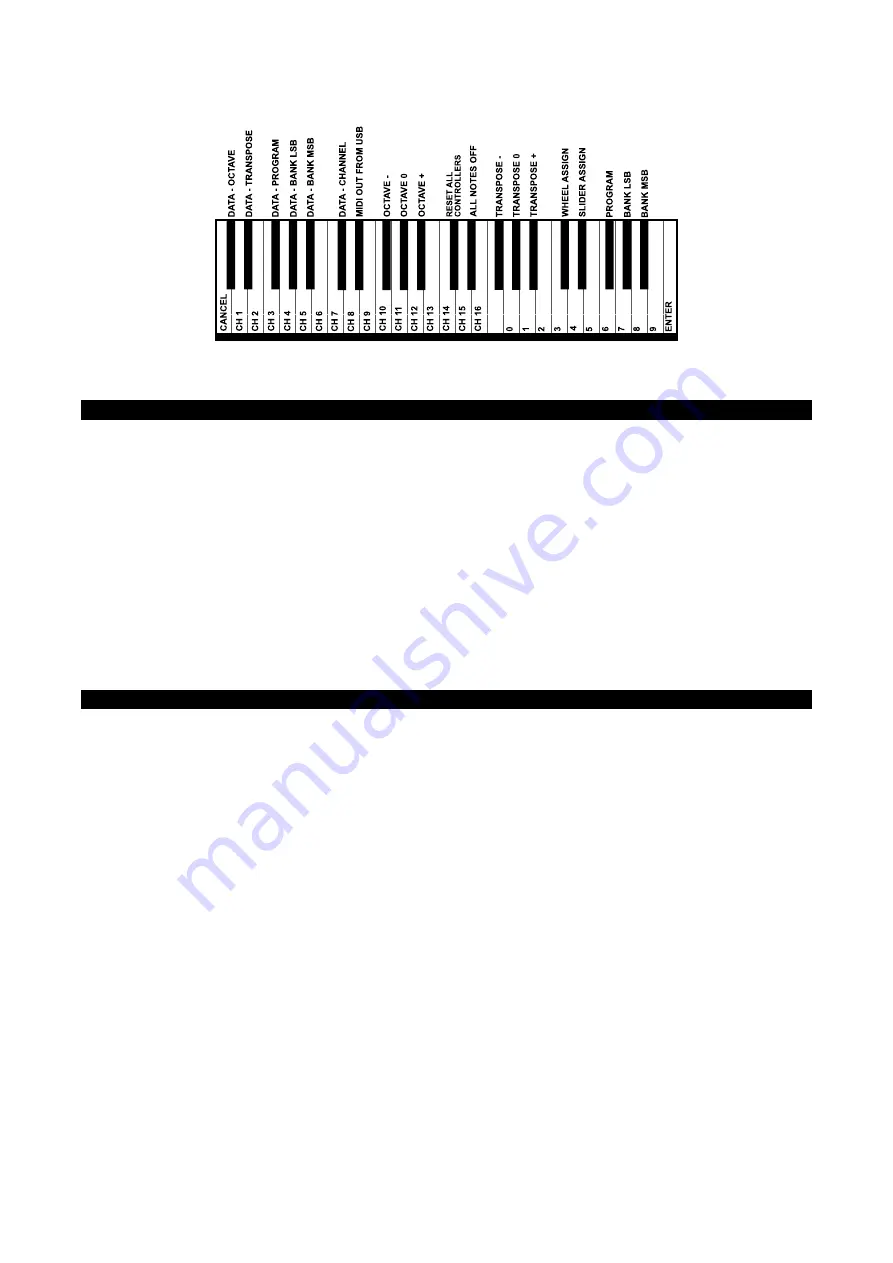
In the diagram above, you will see that the first 6 black keys are labeled “DATA = ________.” These keys are used to select the
function of the octave buttons. Some of the functions that these keys can be used for cannot send out a value less than 0. When
used to control these functions, both lights above the buttons will remain on, regardless of the current setting of that function.
To select an alternate function:
�
<
Press the Advanced Functions button, putting the keyboard into Edit Mode.
�
<
Press the black key that represents the function you want. Edit Mode will finish as soon as you have selected the function and
you will be able to play notes again.
The five available alternate functions of the octave buttons are described below:
Octave Shift
The Octave “+” And “-” Keys
Another method of shifting the Keystation octaves is with the use of the keys labeled octave “+” and “-.” After the Advanced
Function button has been pressed, placing the keyboard in Edit Mode, pressing these keys will shift the keyboard’s pitch up or
down one or more octaves (one for each time pressed). The default octave shift designation is “0” and will be the octave setting
each time you power up the keyboard. The lights above the octave buttons indicate that 0 octave shift is set when both are on.
To assign the “+” and “-” keys to control the octave:
<
Press the Advanced Functions button to get the keyboard into Edit Mode.
<
Press the black key above C1 (named C# 1), representing DATA = OCTAVE. Edit Mode will finish as soon as C# 1 has been
pressed.
There is also a method of performing a quick octave change, which can be useful when using the octave buttons to control
another MIDI function. This is accomplished as follows:
<
Press the Advanced Functions button to put the keyboard in Edit Mode.
<
Press the black key below B2 (Bb2)—in Edit Mode, this key functions as “”, increasing the octave by 1 (you may press
it again to increase the octave by 2, and so on).
<
Press the black key above F2 (F# 2)—in Edit Mode, this key functions as “OCTAVE -”, decreasing the octave by 1 (you may press
it again to decrease the octave by 2, and so on), OR, you can press the black key above G2 (named G# 2)—in Edit Mode, this
key functions as “OCTAVE 0” to reset the octave shift to 0.
<
When you have chosen your octave shift press C5, representing “ENTER,” to leave Edit Mode.
Summary of Contents for Keystation 88es
Page 1: ...KEYSTA TION 49 88 61 USB MIDI Controller...
Page 14: ...13 Appendices Useful MIDI Data Appendix A General MIDI Instruments...
Page 15: ...14 Appendix B Standard MIDI Controller Numbers MIDI CC s...
Page 16: ...15 040819_MAKSSeries_UG_01...
Page 17: ...16...
Page 18: ......


