background image


|

     6

KeyRIg 49 User Guide

Getting Started With Music Creation Software

7

If you are new to MIDI (Musical Instrument Digital Interface), you may find it challenging to understand why sounds have not simply 

been included in the keyboard  You will find that using a software-based sound source and recording system allows for access 

to an extremely large array of high quality sounds, a large graphic user interface, and freedom to work with many music creation 
applications. A basic understanding of MIDI will enable you to take advantage of its wealth of creative possibilities.

Pressing one of KeyRig’s keys causes the keyboard to send out MIDI (Musical Instrument Digital Interface) data. MIDI data just gives 

instructions on how a sound should play  These instructions dictate parameters such as what note to play, when to play it, how loud 
to play it, and which sound to use  
When using a virtual instrument within your recording software, data from the KeyRig 49 keyboard can be sent to the sequencer, 

routed to a virtual instrument, and sent to an audio output, turning MIDI data into audible sounds. For this, you must configure your 
music software to read MIDI data being sent from the KeyRig 49 and play the sound back accordingly. In many music applications, 
this entails going into the Options or Device Set-Up menu in your music software application and selecting the appropriate MIDI 
input device. KeyRig 49 should appear under the name “KeyRig 49 In” or “USB Audio Device” in the MIDI devices section of most 

Windows XP music software applications  

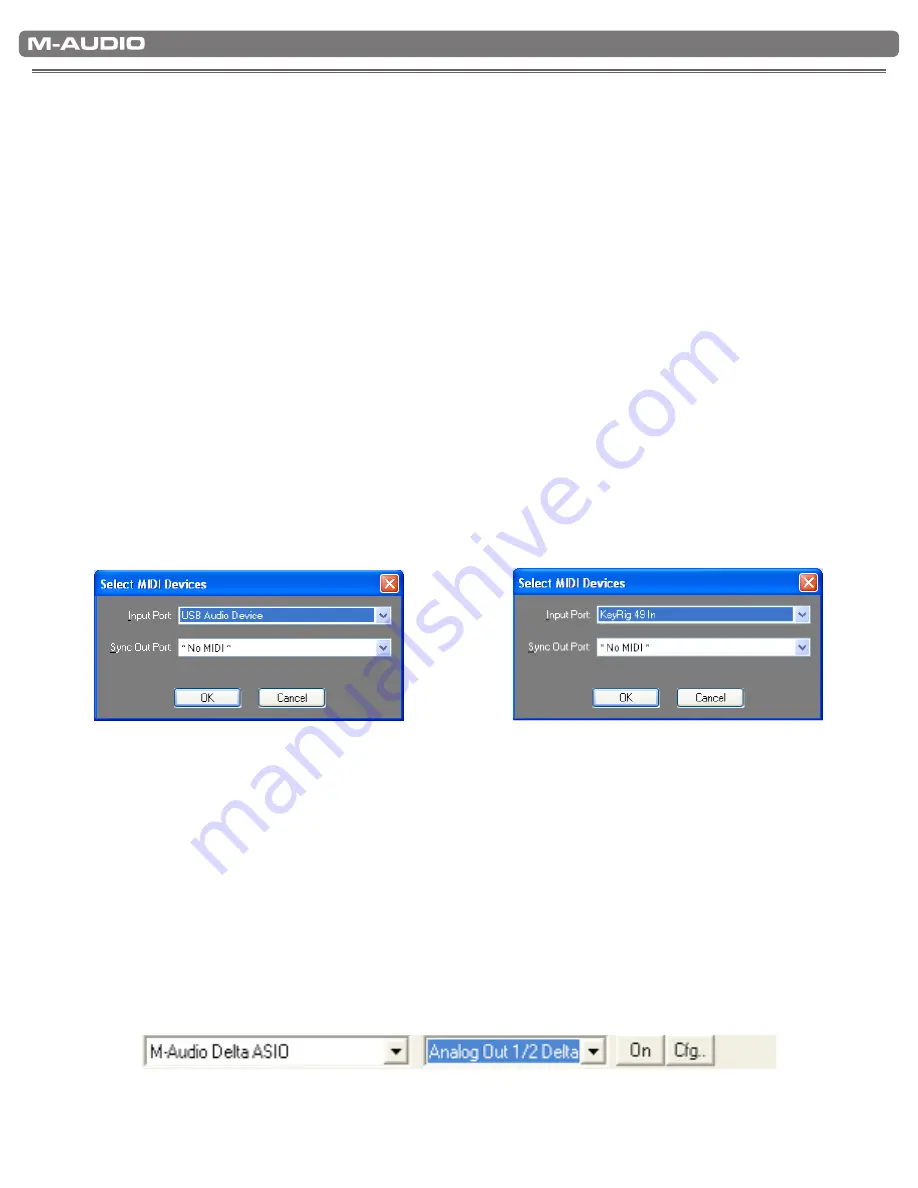
In Windows XP, KeyRig 49 will appear as “USB Audio Device” if the optional drivers have not been installed. After installing these 
drivers, KeyRig 49 will appear as “KeyRig 49 In.” Please consult your software’s documentation for instructions on how to configure 
the software for use with MIDI input devices. 

Figure A

: Sample MIDI device dialog window 

without optional KeyRig 49 drivers installed 

Figure B: 

Sample MIDI device dialog window 

with optional KeyRig 49 drivers installed 


NOTE:

 When running the Key Rig virtual instrument software in standalone mode, Key Rig automatically 
receives MIDI messages from your KeyRig 49 USB keyboard or from any other installed MIDI 
interface. No MIDI input configuration in necessary. 
 When running Key Rig as a plug-in, your host application’s MIDI input settings determine the 
MIDI information received by Key Rig. Please consult your host application’s documentation for 
more information on MIDI routing. 
 When using the Key Rig software in standalone mode, be sure to select your ASIO-compatible 
sound card and output channels from the pull down menu at the top of Key Rig’s screen as 
shown.


Summary of Contents for KEYRIG KeyRig 49

Page 1: ...User Guide Easy to Use 49 Note USB Keyboard...

Page 2: ...on and Setup 5 Getting Started With Music Creation Software 6 The KeyRig 49 Keyboard 7 Key Names 7 Octave Buttons 7 Pitch Bend Wheel 7 Modulation Wheel 8 Volume Slider 8 Sustain Pedal Jack 8 Advanced...

Page 3: ...leshooting Features 18 All Notes Off 18 Reset All Controllers 18 Warranty Terms and Registration 18 Warranty Terms 18 Warranty Registration 18 Technical Info 19 Appendices Useful MIDI Data 20 Appendix...

Page 4: ...49 Keyboard Features 2 Keyboard 49 key velocity sensitive keyboard Pitch Bend wheel Modulation wheel MIDI re assignable Volume slider MIDI re assignable Octave up down buttons MIDI re assignable Edit...

Page 5: ...ntium 3 800 MHz or higher CPU may be higher for laptops 256 MB RAM DirectX 9 0b or higher Windows XP SP2 or higher Windows 98 Me NT or 2000 not supported One native USB port Mac OS Macintosh G3 800 G4...

Page 6: ...al Windows XP drivers for KeyRig 49 1 Insert the KeyRig 49 CD ROM into your computer s CD ROM drive 2 The computer will automatically display the interactive install screen If your computer fails to l...

Page 7: ...music applications this entails going into the Options or Device Set Up menu in your music software application and selecting the appropriate MIDI input device KeyRig 49 should appear under the name...

Page 8: ...shift set to zero the lights above both the Octave and Octave buttons will be lit The default octave shift designation is zero and will be the octave setting each time you power up the keyboard If you...

Page 9: ...ent parameters such as pan balance attack reverb and chorus See chapter Advanced KeyRig 49 Features in Edit Mode for more information on this Some software applications respond to volume control MIDI...

Page 10: ...r ENTER key is pressed The light above the Edit Mode button will then turn off and the keyboard can then be used to play notes again Some functions do not require any additional data entry When these...

Page 11: ...s the black key above F2 F 2 In Edit mode this key functions as OCTAVE shifting the keyboard down one octave It is possible to shift the keyboard down a total of three octaves 4 Press the black key ab...

Page 12: ...KeyRig 49 keyboard to control MIDI sound modules or synthesizers Some music software applications support these messages however others do not Check your software s User Guide to find out if it can p...

Page 13: ...ed to change Bank LSB or Bank MSB 2 Using the Quick Select Method 1 Press the Edit Mode button 2 Press the black key above G4 G 4 or Bb4 A 4 representing Bank LSB or Bank MSB respectively 3 Press the...

Page 14: ...Some useful MIDI CC s are 01 Modulation 07 Volume 10 Pan balance 05 Portamento To assign a MIDI controller message to the Modulation wheel 1 Press the Edit Mode button 2 Press the black key above C4...

Page 15: ...er of the controller value you want to assign to the Volume slider 4 Press the ENTER key C5 If you make an error while entering the numerical data value you can press the CANCEL key C1 to exit Edit mo...

Page 16: ...r layer of banks was added The result is a system of 128 banks that can contain 128 sub banks in each of them which in turn can contain 128 sounds programs within them Bank change messages are useful...

Page 17: ...ules in Propellerhead Reason are non GM devices You can send program change bank LSB and bank MSB messages directly from the KeyRig keyboard Please consult the Advanced KeyRig 49 Features in Edit Mode...

Page 18: ...you want the sustain pedal to be off when it is not pressed make sure the pedal is not pressed when you power up Also check to see if there is a polarity switch on your foot pedal It is possible to u...

Page 19: ...oller to adjust to eliminate the effect you can send a Reset All Controllers MIDI message to set all controller values to their defaults To send a Reset All Controllers message 1 Press the Edit Mode b...

Page 20: ...es cause harmful interference to radio or television reception which can be determined by turning the equipment off and on the user is encouraged to try to correct the interference by one or more of t...

Page 21: ...llo 43 Contrabass 44 Tremolo Strings 45 Pizzicato Strings 46 Orchestral Harp 47 Timpani Ensemble 48 String Ensemble 1 49 String Ensemble 2 Slow 50 Syn Strings 1 51 Syn Strings 2 52 Choir Aahs 53 Voice...

Page 22: ...ntroller 60 61 Controller 61 62 Controller 62 63 Controller 63 64 Sustain Pedal 65 Portamento 66 Sostenuto 67 Soft Pedal 68 Legato Pedal 69 Hold 2 70 Sound Variation 71 Resonance 72 Release Time 73 At...

Page 23: ...nding a MIDI CC message You can assign these to the controls on your KeyRig 49 keyboard in exactly the same way as any other MIDI controller message The RPN messages control the following Controller N...

Page 24: ...C 0 820 391 191 Assistance Technique e mail support m audio fr mac m audio fr fax 33 0 1 72 72 90 52 Site Web www m audio fr M Audio Germany Kuhallmand 34 D 74613 Ohringen Germany Technical Support e...

Reviews: